| | planemechFJ's Build |  |
|
+11SingleTrack FiJiKrawl fjdarrell MadToy David B boaterspence NC FJ Driver bigdogdewey2 Speedrye FJ Derek planemechFJ 15 posters |
|
| Author | Message |
|---|
planemechFJ
SUPPORTING MEMBER


Posts : 112
Points : 4560
Join date : 2012-10-18
Location : Kernersville,NC
| Subject: Re: planemechFJ's Build  Thu Dec 13, 2012 1:37 am Thu Dec 13, 2012 1:37 am | |
| - bigdogdewey2 wrote:
- keep an eye on the for a week or two..that rubber seems to conform..so make sure you have it laying the way you want it to lay..not just clamped...
I take the axe and shovel off. I wont be running them all the time. But this is good info to keep in mind if decide to leave them up. | |
|
| | |
Speedrye
Trail Guide

Posts : 1050
Points : 6038
Join date : 2011-08-30
Location : Stokesdale, NC
| | Subject: Re: planemechFJ's Build Thu Dec 13, 2012 10:08 am | |
| I keep my shovel on mine all the time. I find that I need a shovel a lot for some reason when I'm away from home. I'm running a similar setup to you and my Quickfists haven't moved at all. I do keep my shovel on the inside mounts in case something ever goes wrong and it comes loose. The thought is that it will stay in the rack and not in someone's windshield.
If you've got enough wrap left, you should snake your shovel up! It would look awesome. | |
|
| | |
bigdogdewey2
ADMINISTRATOR

Posts : 3697
Points : 8682
Join date : 2011-08-30
Age : 56
Location : High Point, NC
| | Subject: Re: planemechFJ's Build Thu Dec 13, 2012 8:35 pm | |
| i leave both my ax and the shovel on the truck (to lazy to take it off)..and have no issues at all...love my quickfists! | |
|
| | |
FiJiKrawl
Trail Scout

Posts : 196
Points : 4767
Join date : 2012-06-14
Age : 41
Location : Charlotte, NC
| | Subject: Re: planemechFJ's Build Thu Dec 13, 2012 11:46 pm | |
| How big was the piece of vinyl you used on your roof? the largest I've found is 60"x72" | |
|
| | |
planemechFJ
SUPPORTING MEMBER
Posts : 112
Points : 4560
Join date : 2012-10-18
Location : Kernersville,NC
| | Subject: Re: planemechFJ's Build Fri Dec 14, 2012 2:54 am | |
| - Speedrye wrote:
- I keep my shovel on mine all the time. I find that I need a shovel a lot for some reason when I'm away from home. I'm running a similar setup to you and my Quickfists haven't moved at all. I do keep my shovel on the inside mounts in case something ever goes wrong and it comes loose. The thought is that it will stay in the rack and not in someone's windshield.
If you've got enough wrap left, you should snake your shovel up! It would look awesome. - bigdogdewey2 wrote:
- i leave both my ax and the shovel on the truck (to lazy to take it off)..and have no issues at all...love my quickfists!
Do you guys not have rust issues with the axes and shovels being exposed at all times? That is a interesting idea Speedrye. - FiJiKrawl wrote:
- How big was the piece of vinyl you used on your roof? the largest I've found is 60"x72"
The one I ordered was 56" x 240" not sure the dimensions but it was 5 pieces total. The roof, the front valance? of the roof, the rear door, and the right and left side. | |
|
| | |
Speedrye
Trail Guide
Posts : 1050
Points : 6038
Join date : 2011-08-30
Location : Stokesdale, NC
| | Subject: Re: planemechFJ's Build Fri Dec 14, 2012 8:00 am | |
| When I got my shovel, I painted the whole thing in the same satin black as my roof and other parts. No rust at all and it gets repainted as needed after usage. Color matched shovels are awesome! | |
|
| | |
bigdogdewey2
ADMINISTRATOR
Posts : 3697
Points : 8682
Join date : 2011-08-30
Age : 56
Location : High Point, NC
| | Subject: Re: planemechFJ's Build Fri Dec 14, 2012 7:40 pm | |
| i did the same thing...my ax handle was bright red...so i painted it black ...everything...shovel andle, head, ax, and handle...
| |
|
| | |
planemechFJ
SUPPORTING MEMBER
Posts : 112
Points : 4560
Join date : 2012-10-18
Location : Kernersville,NC
| | Subject: Re: planemechFJ's Build Sat Dec 15, 2012 2:20 am | |
| - Speedrye wrote:
- When I got my shovel, I painted the whole thing in the same satin black as my roof and other parts. No rust at all and it gets repainted as needed after usage. Color matched shovels are awesome!
- bigdogdewey2 wrote:
- i did the same thing...my ax handle was bright red...so i painted it black ...everything...shovel andle, head, ax, and handle...
I am definitely going to consider this. Maybe even use plasti dip as it was intended. lol. | |
|
| | |
Speedrye
Trail Guide
Posts : 1050
Points : 6038
Join date : 2011-08-30
Location : Stokesdale, NC
| | Subject: Re: planemechFJ's Build Sun Dec 16, 2012 7:46 pm | |
| Make sure you keep some spare vinyl for your top windshield strip. It'd suck to break your windshield and not be able to match the new trim piece to the rest of the roof. | |
|
| | |
planemechFJ
SUPPORTING MEMBER
Posts : 112
Points : 4560
Join date : 2012-10-18
Location : Kernersville,NC
| | Subject: Re: planemechFJ's Build Tue Dec 18, 2012 11:58 am | |
| - Speedrye wrote:
- Make sure you keep some spare vinyl for your top windshield strip. It'd suck to break your windshield and not be able to match the new trim piece to the rest of the roof.
Yes, I have a pretty good size spare piece left. also, Check out what Fed Ex woke me up with!!!   I checked into getting some 285's but I don't think that will pan out. I guess I will be buying wheels and then tires. I just cant decide if I want to run the lift with the 265's or wait until I get wheels and tires. | |
|
| | |
Speedrye
Trail Guide
Posts : 1050
Points : 6038
Join date : 2011-08-30
Location : Stokesdale, NC
| | Subject: Re: planemechFJ's Build Tue Dec 18, 2012 12:22 pm | |
| I ran my lift, body lift and wider wheels on 265's for awhile. It looked like a pregnant roller skate, but it was fine until I found a good deal on tires. Of course they were mud tires, so it at least looked a little more aggressive than stock tires... | |
|
| | |
FJ Derek
SUPPORTING MEMBER

Posts : 571
Points : 5132
Join date : 2012-07-12
Age : 39
Location : Greensboro
| | Subject: Re: planemechFJ's Build Tue Dec 18, 2012 12:34 pm | |
| What's your plans with the lift. Get 2.5 up front with the 5100's and 3 in the rear from the new spring? | |
|
| | |
planemechFJ
SUPPORTING MEMBER
Posts : 112
Points : 4560
Join date : 2012-10-18
Location : Kernersville,NC
| | Subject: Re: planemechFJ's Build Tue Dec 18, 2012 3:14 pm | |
| - Speedrye wrote:
- I ran my lift, body lift and wider wheels on 265's for awhile. It looked like a pregnant roller skate, but it was fine until I found a good deal on tires. Of course they were mud tires, so it at least looked a little more aggressive than stock tires...
Do you have a pic in that configuration? - FJ Derek wrote:
- What's your plans with the lift. Get 2.5 up front with the 5100's and 3 in the rear from the new spring?
It's setup to do 3" in the front and 2" in the rear. If I understand it correctly you can adjust the front but not the back. 3" being the max height. | |
|
| | |
FJ Derek
SUPPORTING MEMBER
Posts : 571
Points : 5132
Join date : 2012-07-12
Age : 39
Location : Greensboro
| | Subject: Re: planemechFJ's Build Tue Dec 18, 2012 3:18 pm | |
| Oh does the front shock have a spacer on it? | |
|
| | |
Speedrye
Trail Guide
Posts : 1050
Points : 6038
Join date : 2011-08-30
Location : Stokesdale, NC
| | Subject: Re: planemechFJ's Build Tue Dec 18, 2012 3:21 pm | |
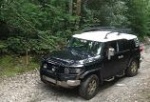
| Not the best pics, but it's all I've got here at work. The first is pre-body lift with pretty bald 265's. Approx 3"/2" lift. Both are showing my 17x9 wheels that stick out farther than stock (no spacers though). The second is with the body lift showing a 315 next to the 265. 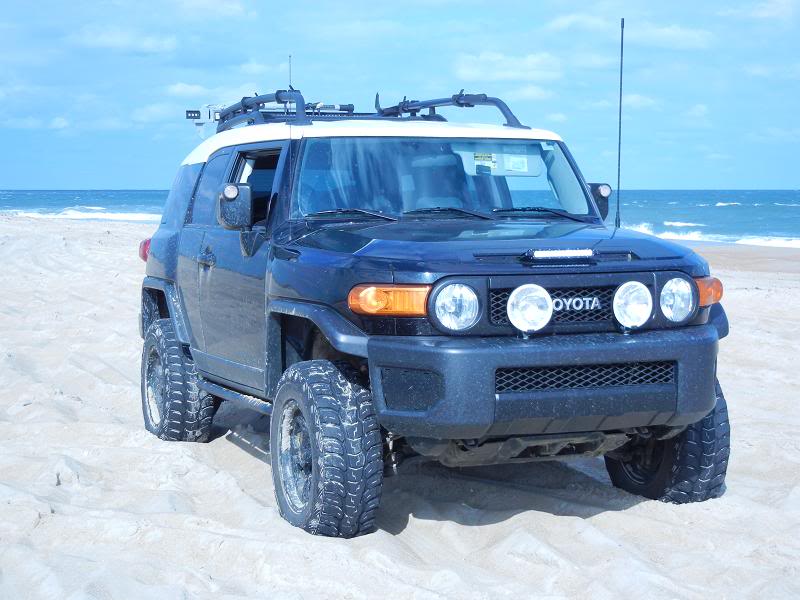 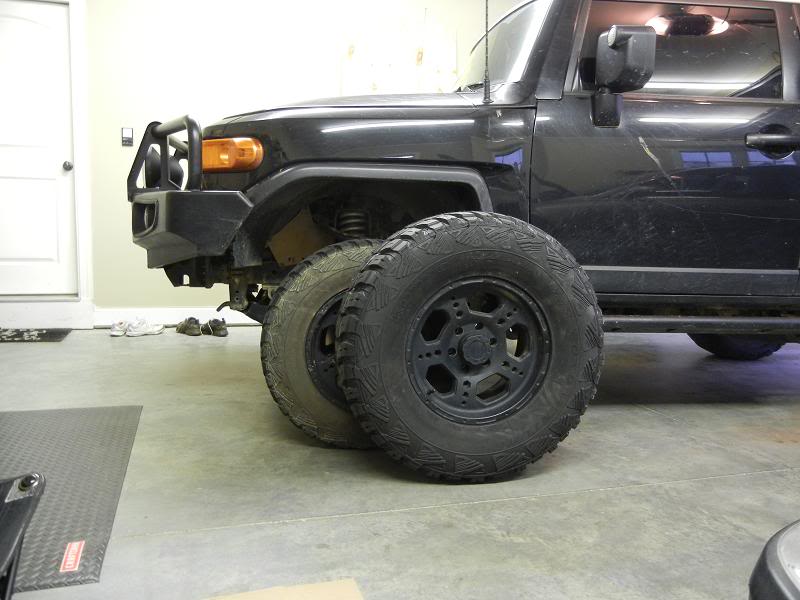 | |
|
| | |
bigdogdewey2
ADMINISTRATOR
Posts : 3697
Points : 8682
Join date : 2011-08-30
Age : 56
Location : High Point, NC
| | Subject: Re: planemechFJ's Build Tue Dec 18, 2012 10:52 pm | |
| see i dont think it looks that bad with the smaller tire...albeit mud tires...but still much smaller...
| |
|
| | |
planemechFJ
SUPPORTING MEMBER
Posts : 112
Points : 4560
Join date : 2012-10-18
Location : Kernersville,NC
| | Subject: Re: planemechFJ's Build Wed Dec 19, 2012 4:03 am | |
| - FJ Derek wrote:
- Oh does the front shock have a spacer on it?
I'm not sure if they are spacers or what but this is what the top of the front coils looks like.  - Speedrye wrote:
- Not the best pics, but it's all I've got here at work. The first is pre-body lift with pretty bald 265's. Approx 3"/2" lift. Both are showing my 17x9 wheels that stick out farther than stock (no spacers though).
The second is with the body lift showing a 315 next to the 265.
Thanks Speedrye that helps. Not that bad. - bigdogdewey2 wrote:
- see i dont think it looks that bad with the smaller tire...albeit mud tires...but still much smaller...
Yeah hopefully "street" tires would as good. Either way I've been thinking that maybe if I put the lift on and it's ugly, it will motivate me. lol | |
|
| | |
planemechFJ
SUPPORTING MEMBER
Posts : 112
Points : 4560
Join date : 2012-10-18
Location : Kernersville,NC
| | Subject: Re: planemechFJ's Build Thu Dec 27, 2012 3:01 pm | |
| Small planning update, I picked up these from"fjdarrell" Thanks again btw. 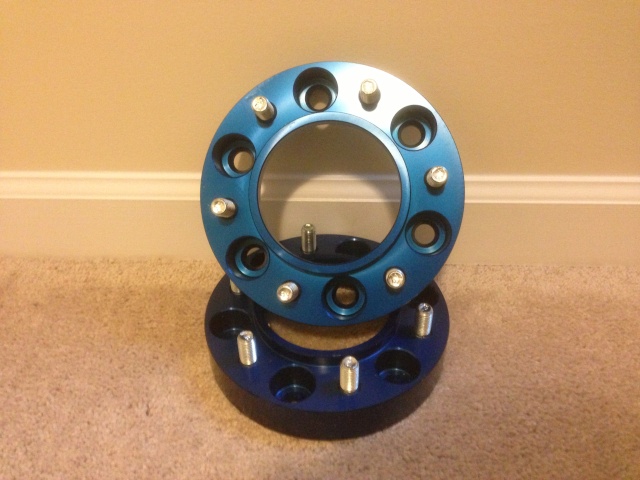 I just need to order another set and then I am going to install the lift. Just run the 265's with spacers until I can get the funds together for tires. Also got some recovery gear coming from "Southeast Overland". So I was able to add to the sticker collection.  Hopefully start installing these tonight when I get home from work. Hella Black Magic 1000's. They will be mounted on the front bumper in the same manner as the PIAA kit. 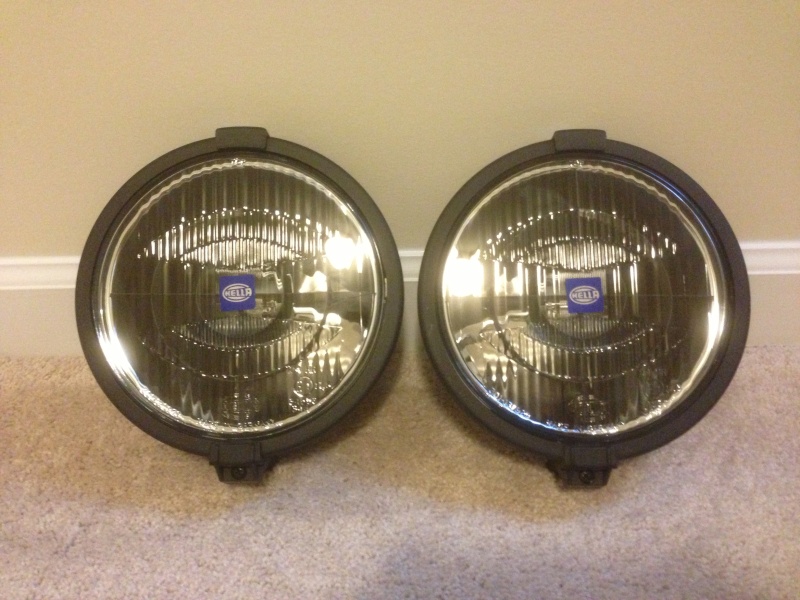 I have already wired the switch ( Offroad Lights ) 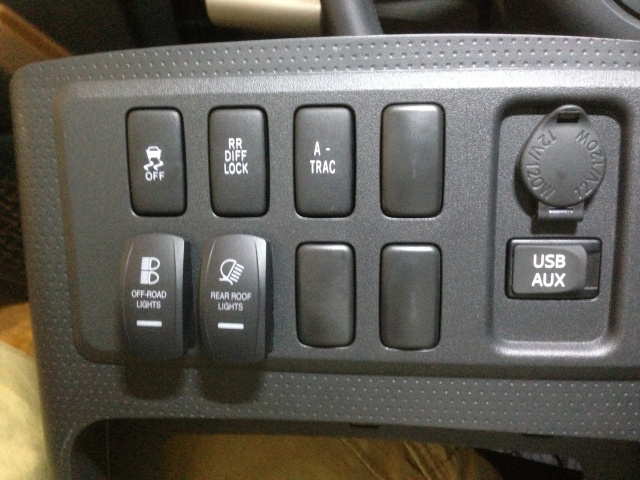 So Install should go pretty easy. | |
|
| | |
bigdogdewey2
ADMINISTRATOR
Posts : 3697
Points : 8682
Join date : 2011-08-30
Age : 56
Location : High Point, NC
| | Subject: Re: planemechFJ's Build Thu Dec 27, 2012 10:01 pm | |
| wow they look good...where did the spacers come from??they look like SPIDERTRAX ...and what is the size of them..i have an extra spacer i got from ALLPROOFFROAD....sell it for really cheap then all you need is one | |
|
| | |
planemechFJ
SUPPORTING MEMBER
Posts : 112
Points : 4560
Join date : 2012-10-18
Location : Kernersville,NC
| | Subject: Re: planemechFJ's Build Sat Dec 29, 2012 1:57 pm | |
| - bigdogdewey2 wrote:
- wow they look good...where did the spacers come from??they look like SPIDERTRAX ...and what is the size of them..i have an extra spacer i got from ALLPROOFFROAD....sell it for really cheap then all you need is one
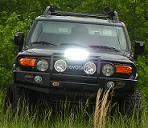
Yes, They are 1.25" Spidertrax. Thanks for the offer on the Allpro spacer but I have already ordered the other set of Spidertrax. Got My lights Installed and wired up. I real like the black housings Does anyone know of black headlights that are not film covers or have Halos. Close up. 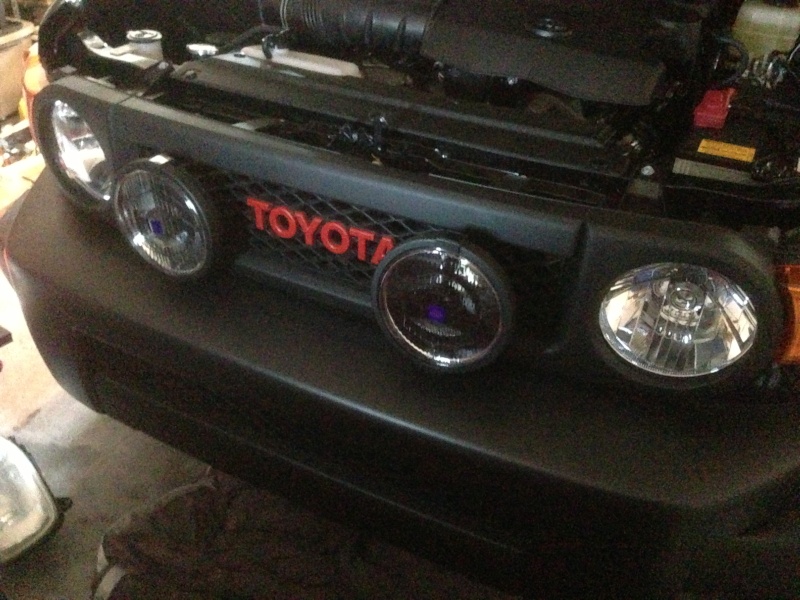 Other Views 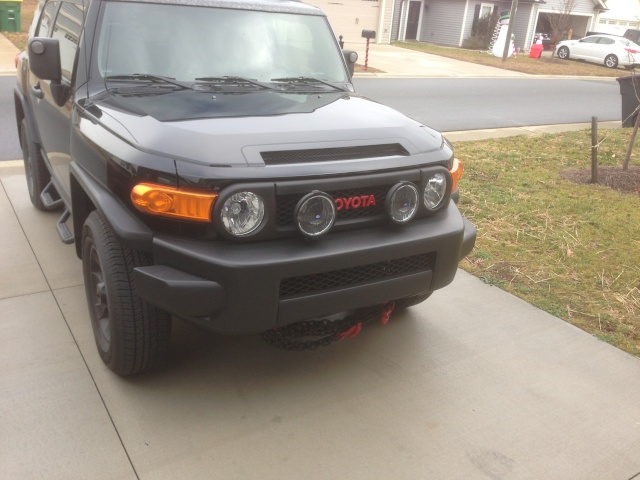 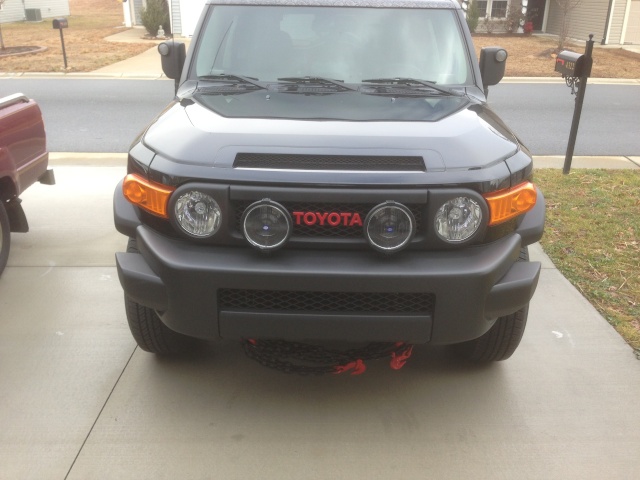 And one with the lights on. 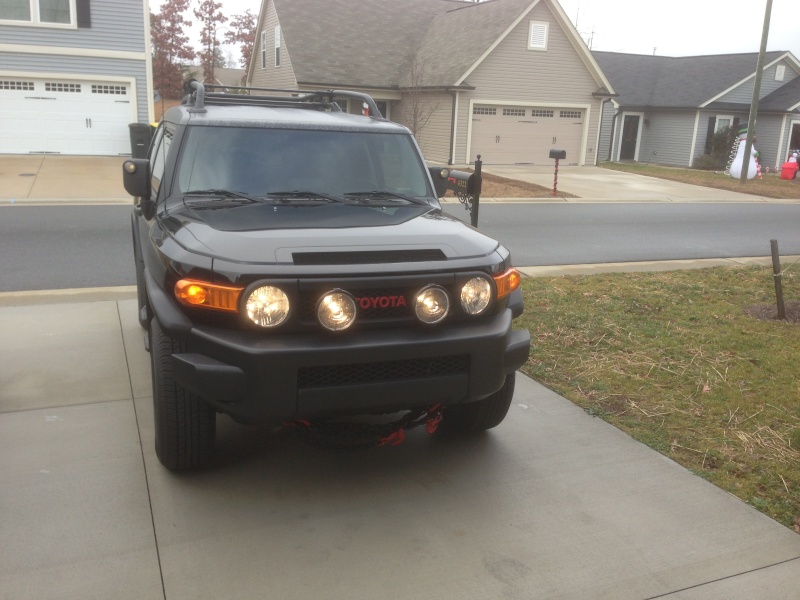 I will try and get some night shots up soon. | |
|
| | |
SingleTrack
Trail Scout
Posts : 267
Points : 4682
Join date : 2012-11-25
Age : 47
Location : Greensboro, NC
| | Subject: Re: planemechFJ's Build Sat Dec 29, 2012 5:31 pm | |
| Question for you guys: anyone know of a thread on here about removing the center dash switch plate thingy (the cluster of 6 or  to add more switches? If not, she'd some light on it for me? | |
|
| | |
planemechFJ
SUPPORTING MEMBER
Posts : 112
Points : 4560
Join date : 2012-10-18
Location : Kernersville,NC
| | Subject: Re: planemechFJ's Build Sat Dec 29, 2012 5:57 pm | |
| - SingleTrack wrote:
- Question for you guys: anyone know of a thread on here about removing the center dash switch plate thingy (the cluster of 6 or to add more switches? If not, she'd some light on it for me?
THIS PAGE Really helped me. | |
|
| | |
SingleTrack
Trail Scout
Posts : 267
Points : 4682
Join date : 2012-11-25
Age : 47
Location : Greensboro, NC
| | Subject: Re: planemechFJ's Build Sat Dec 29, 2012 6:25 pm | |
| | |
|
| | |
planemechFJ
SUPPORTING MEMBER
Posts : 112
Points : 4560
Join date : 2012-10-18
Location : Kernersville,NC
| | Subject: Re: planemechFJ's Build Fri Jan 11, 2013 1:24 pm | |
| Update: Much Thanks to Speedrye who gave his time, experience, tools, and garage in order to accomplish the install. Due to an unexpected day off work we were able to do some seriously impromptu wrenching. We got the lift, diff drop, and spacers installed. Before fender heights:     After fender heights:  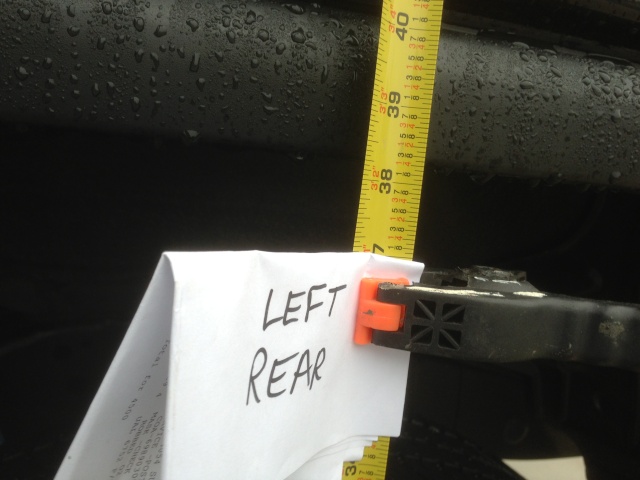   As you can see barring some minor variances the kit did good with the "leveling" it seems to leave the left hand lean that it had from the start. I understand this is common so I'm not that concerned. Some after shots:  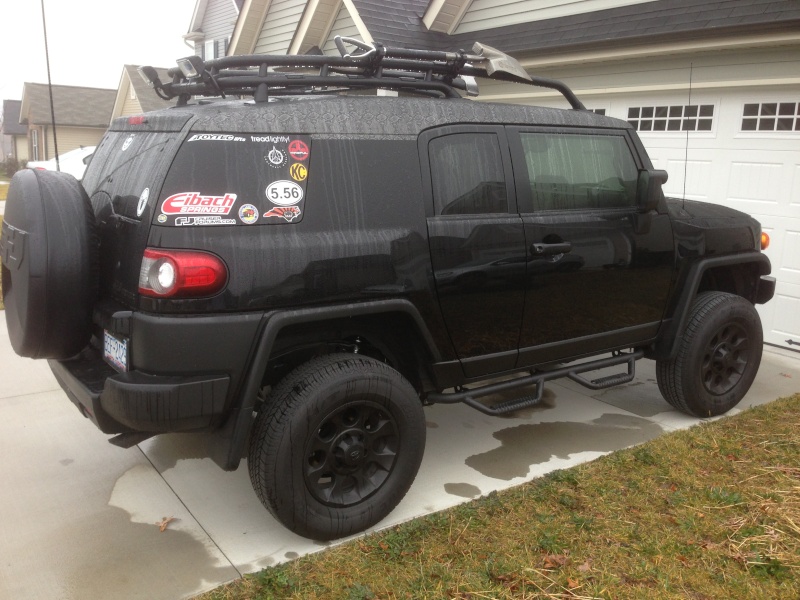  and a shot showing a better view of how the 265's look with 1.25" spidertrax installed.  Overall I'm pleased with lift it seems to ride and drive really nice. The 265's don't look great but they do look alot better than I thought they would. The Spidertrax really help in my opinion. Well now its time to save for wheels and tires. | |
|
| | |
FJ Derek
SUPPORTING MEMBER
Posts : 571
Points : 5132
Join date : 2012-07-12
Age : 39
Location : Greensboro
| | Subject: Re: planemechFJ's Build Fri Jan 11, 2013 1:30 pm | |
| Looks great man. The spacers definitely help out! | |
|
| | |
Sponsored content
| | Subject: Re: planemechFJ's Build | |
| |
|
| | |
| | planemechFJ's Build | |
|


