| | JP comes to life-A Truggy Build |  |
|
+92011TRDIceberg Speedrye Xx_Black-out Orange Boxx tbulluck totald bigdogdewey2 85runner NCFJ1 13 posters |
|
| Author | Message |
|---|
NCFJ1
VENDOR - HFS

Posts : 225
Points : 5035
Join date : 2011-10-30
Location : Chesnee, SC
 |  Subject: JP comes to life-A Truggy Build Subject: JP comes to life-A Truggy Build  Thu Dec 08, 2011 9:21 pm Thu Dec 08, 2011 9:21 pm | |
| I've been running this build thread on MUD and I thought that I would also run it over here. So I will get the thread up to speed over here as well and continue it as I go. I name my vehicles, this one is named after my buddy JP..... Now that I am in the new shop it was time to go and pick up my 83 PU that my buddy James was keeping at his house for me. We think this cab will work for us. I like the fenders and the grill. Between this truck and the 89 Donor I have, I have the drive train I need. Up side is that between the utility bed, cab and bed from the 89 and other parts it will cover what I have in both trucks and buy me some other parts as well. 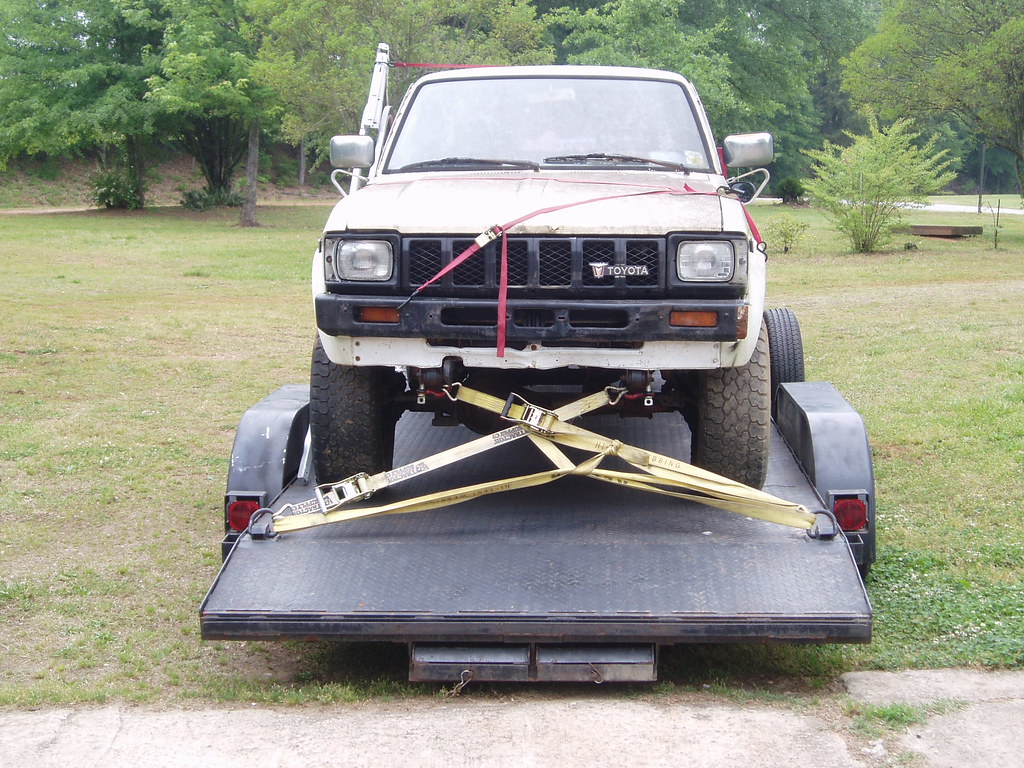  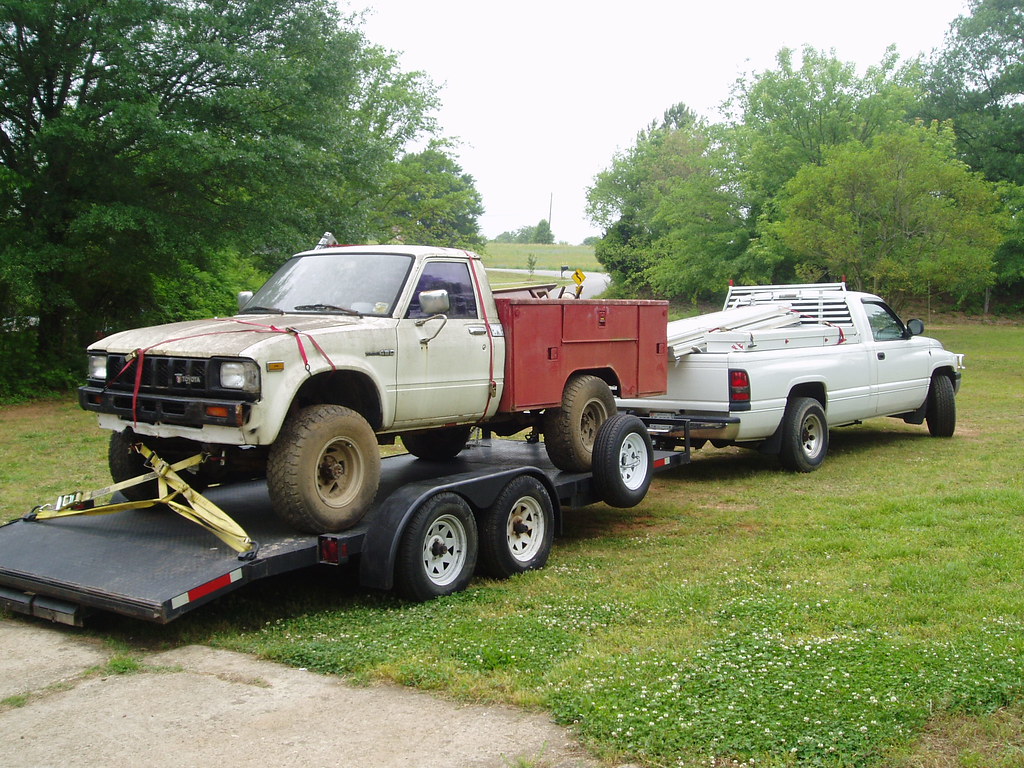 I did a bit of surgery Mon night. 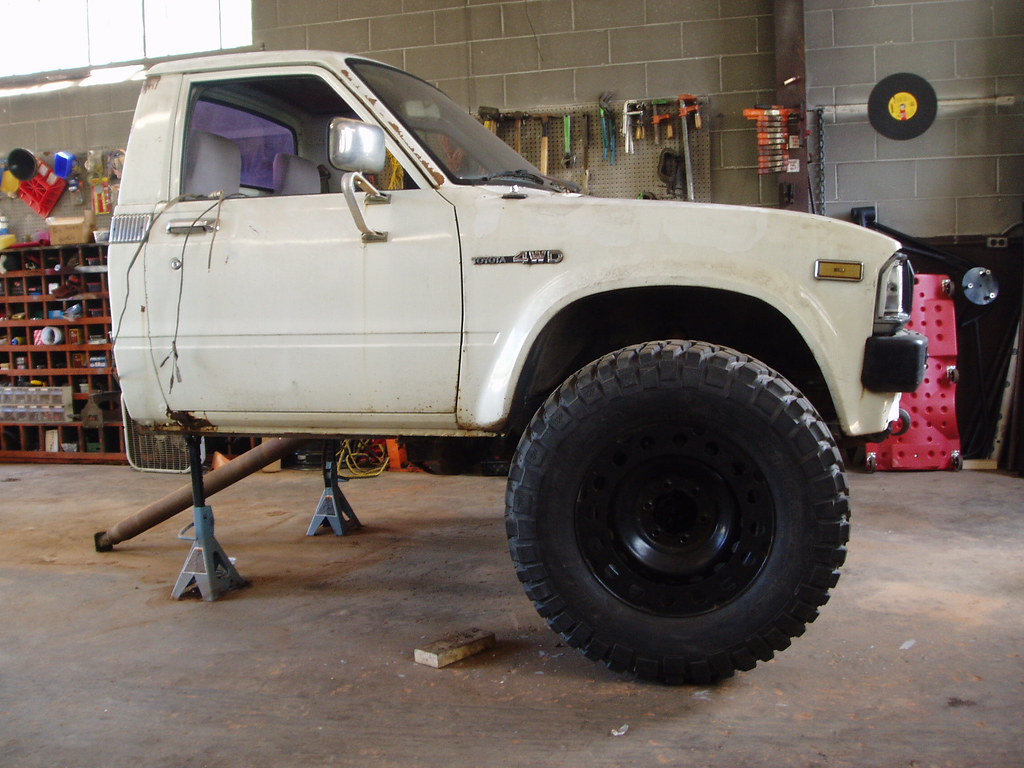 | |
|
  | |
NCFJ1
VENDOR - HFS

Posts : 225
Points : 5035
Join date : 2011-10-30
Location : Chesnee, SC
 |  Subject: Re: JP comes to life-A Truggy Build Subject: Re: JP comes to life-A Truggy Build  Thu Dec 08, 2011 9:23 pm Thu Dec 08, 2011 9:23 pm | |
| She is almost naked. None of the original frame will be used. Only the cab, fenders, hood and parts of the drive train are being kept. The entire wiring harness has been removed as well. 28 years of additions, repairs, and the wires themselves getting brittle are simply not worth playing with. A complete wiring harness from Painless will be used instead.  Very little of the interior will be reused either. A new dash will be used and the firewall and floor will also be rebuilt to accomodate the drive train being moved back and also a doubler box added to the existing drive train. 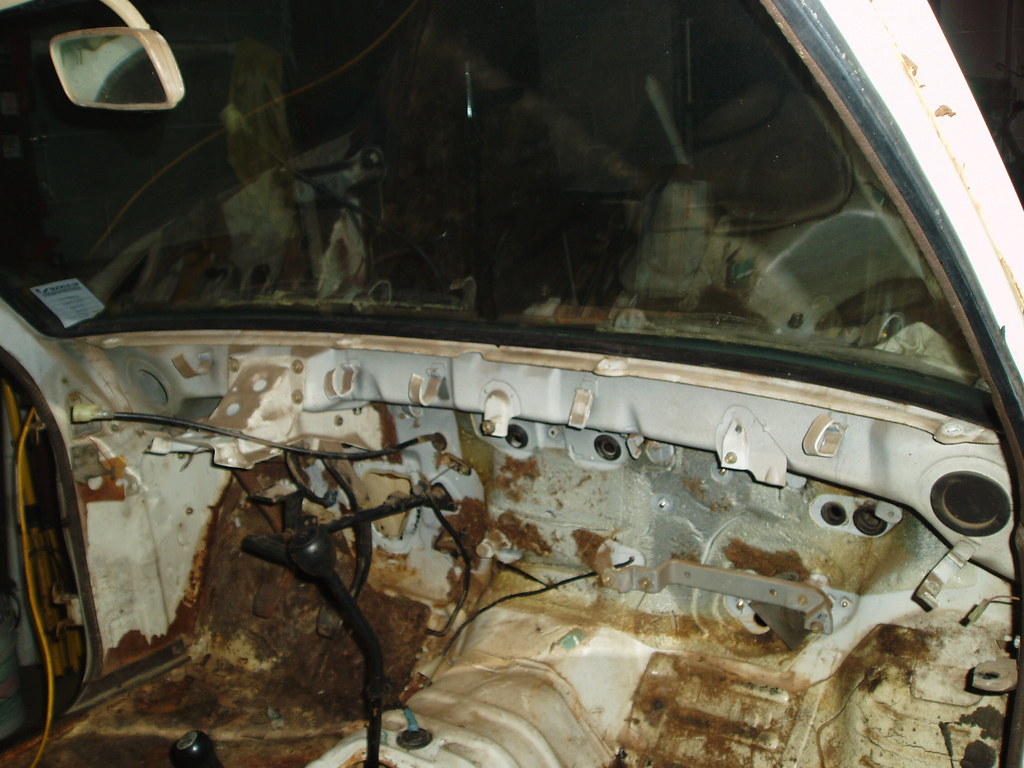 THe original grill will be used, I just like the look of it, as will the front fenders for the same reason. The motor is almost ready to come out. 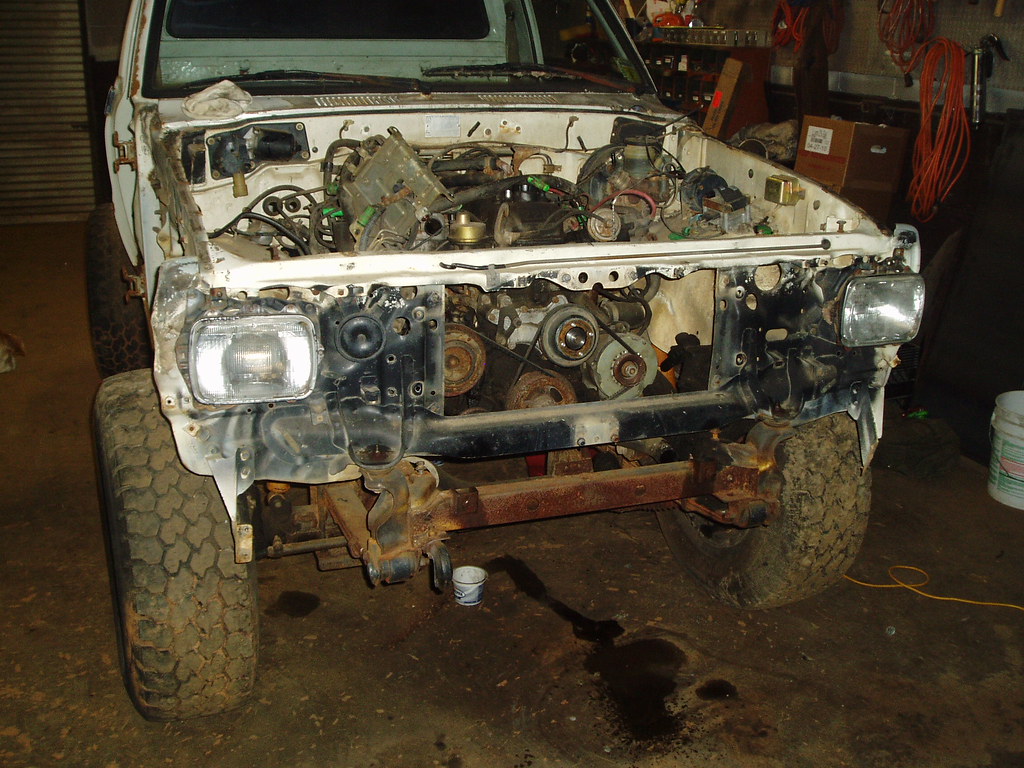 This motor, a 22R will not be used in this project and will be sold. A 22RE which is fuel injected will be used in it's place.  I't all apart now! Lots of scrap metal to be hauled off to the scrap yard. The cab is now hanging on the trolly and out of the way. I'll be happy when I build a shed and clear the rest of the yard equiptment out of the shop. Saved: Complete cab both axles steering box trans T-case heater and related controls body to frame mounts (may reuse rather than fab new ones) radiator master cylinders for brakes and clutch Selling: Utility bed R22 motor scrap steel stock seat steering column misc under hood components Truck #2 is now in the shop and will also be stripped to the frame 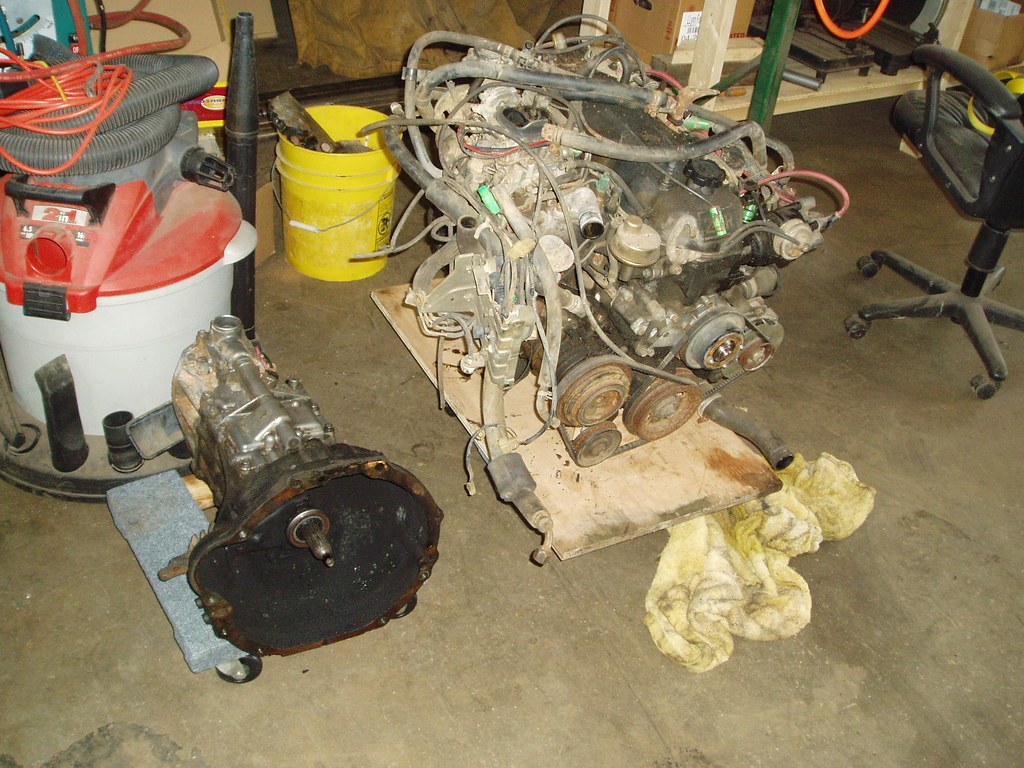 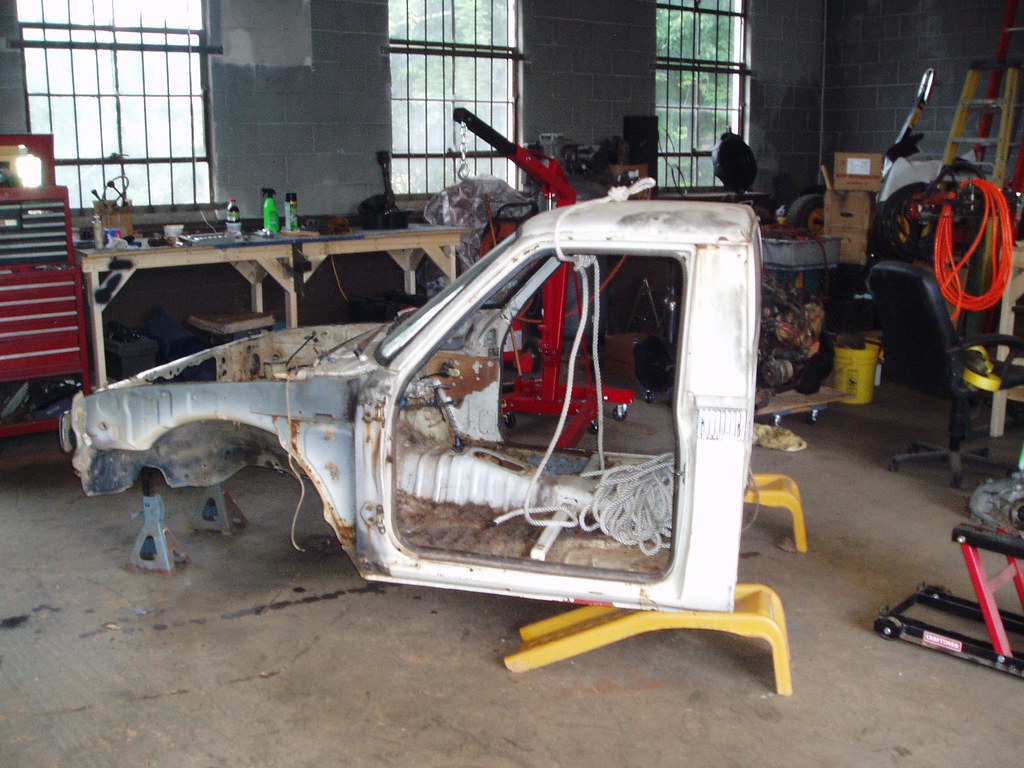 | |
|
  | |
NCFJ1
VENDOR - HFS

Posts : 225
Points : 5035
Join date : 2011-10-30
Location : Chesnee, SC
 |  Subject: Re: JP comes to life-A Truggy Build Subject: Re: JP comes to life-A Truggy Build  Thu Dec 08, 2011 9:24 pm Thu Dec 08, 2011 9:24 pm | |
| Vertical storage for the moment ;D  Truck number two, let the tear down begin 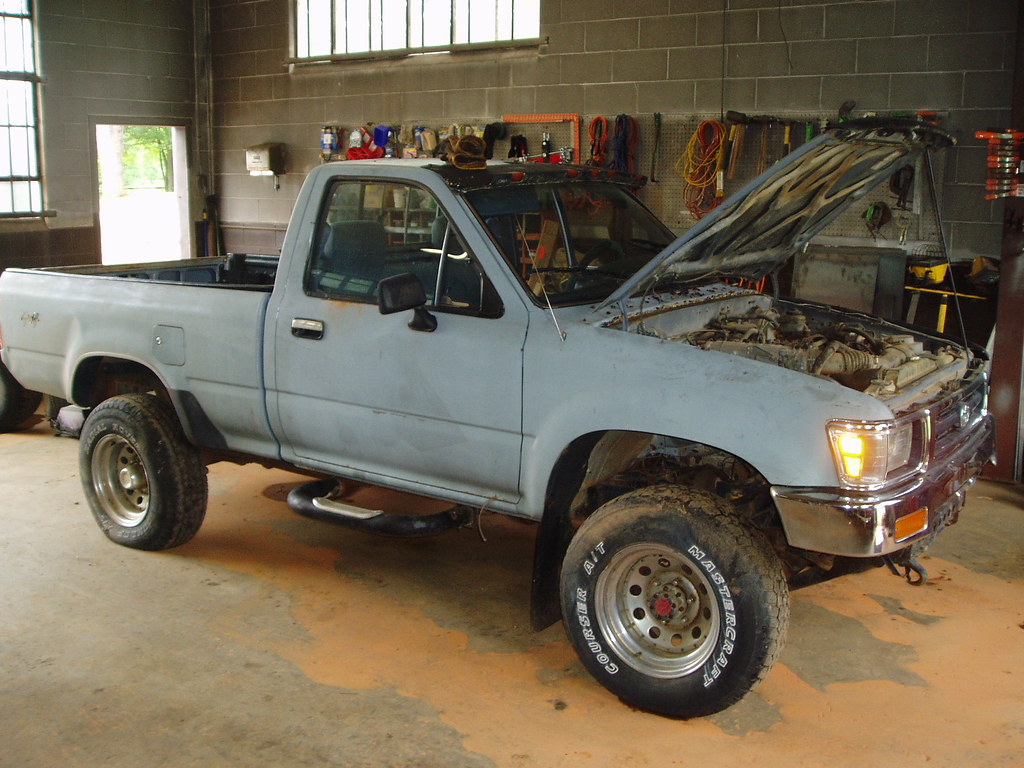 I know, I've been slacking off. Truck #2 stripped and out of here. Everything being used is in the shop, the rest is in the scap metal pile. 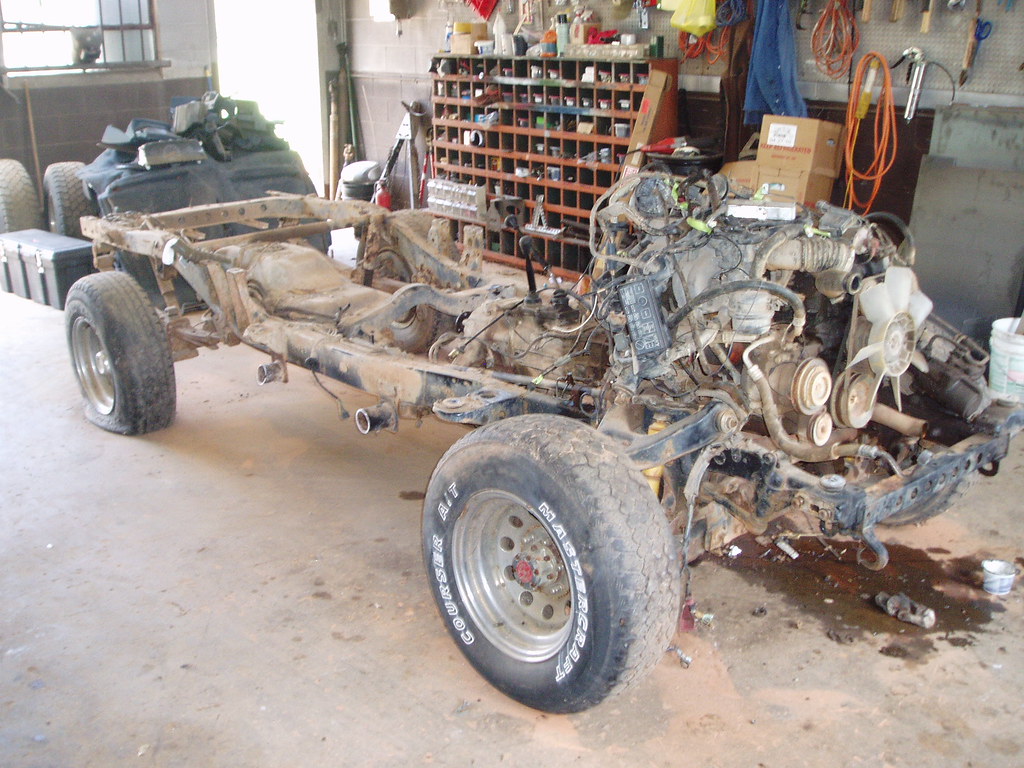 That's Max the shop dog. He came with the house, sorta. Old owner's brother lives next door and Max got left behind with him, only Max seems to prefer it over here. We'll probably end up with him, he makes 4 dogs.  Been making a bit of progress, there are a lot of projects going on in the shop and of course my own truggy comes last on the list. Both trucks are completely stripped All the scrap metal from the tear downs have been taken to the scrap metal man motors and gear cases are seperated the 89 rear axle that I am using in the truggy has the axles pulled and the spring perches and all tabes have been cut off and ground smooth (that particular job is all kinds of fun) started on preliminary drawings of frame layout, cross members and motor and T-case mounts. Gods willing and the creek don't rise, I should have the main frame steel and some of the tubing in the shop by end of next week!!! Can't wait SOmeone on another forum aksed about a general run down.......... I am good on engine parts at the moment. Currently have two 22R and one 22RE I do appriciate the offer though. Overall game plan.............nah I dont want to publish that, I'd have to live up to it. I am just in tear down and clean up of the parts I plan to reuse. But for now I want to use the fuel injection so it is either the RE or a conversion for the R. The up side is that the conversion includes all new under hood wiring and computer. So I can run the fuel injection as a pure stand alone with no BS of taking apart the stock wiring harness and then trying to eliminate as many sensors as I can . The conversion is easier and less hassle down the road. In either case the motor will be rebuilt top to bottom as will the trans,doubler and T-case. I really only want to do all this once putting in a tired old motor and questionable cases is just not worth the hassle. Drive line I am hoping to pull back about 8" in the frame, that is subject to change though. Ground up frame, partial exo cage around the cab, interior caging. Enough platform in the back for fuel cell, tool box, recovery gear, maybe battery, maybe radiator...maybe I am thinking 39s ,bigger brakes, hydro assist steering ( I am putting tags on it) 89 rear axle, 3" IFS hub swap to 82 front axle. Longfield axles in both, Lockers in both That is far as my brain will let me go at this point. I have a direction on suspension but not quite there yet. I have enough to think about for a while. Stan | |
|
  | |
NCFJ1
VENDOR - HFS

Posts : 225
Points : 5035
Join date : 2011-10-30
Location : Chesnee, SC
 |  Subject: Re: JP comes to life-A Truggy Build Subject: Re: JP comes to life-A Truggy Build  Thu Dec 08, 2011 9:26 pm Thu Dec 08, 2011 9:26 pm | |
| I got some work done on the Truggy today. I was able to get both of the main frame sections built. They are 2X3X 3/16"wall rectangular tubing. Hoping to tack in a couple cross members tomorow or Monday. 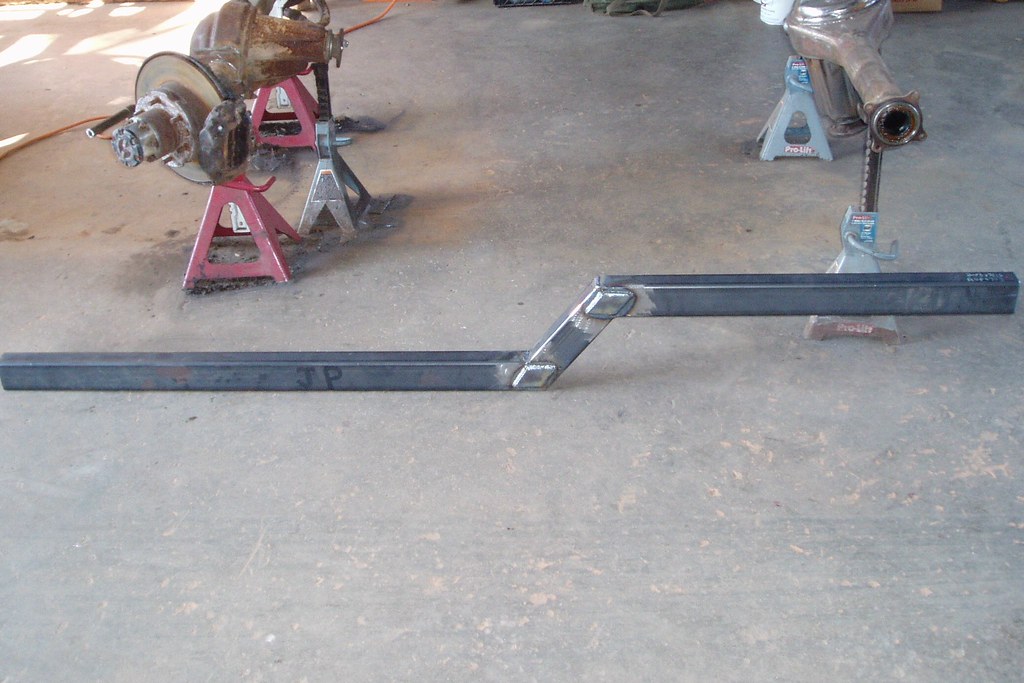 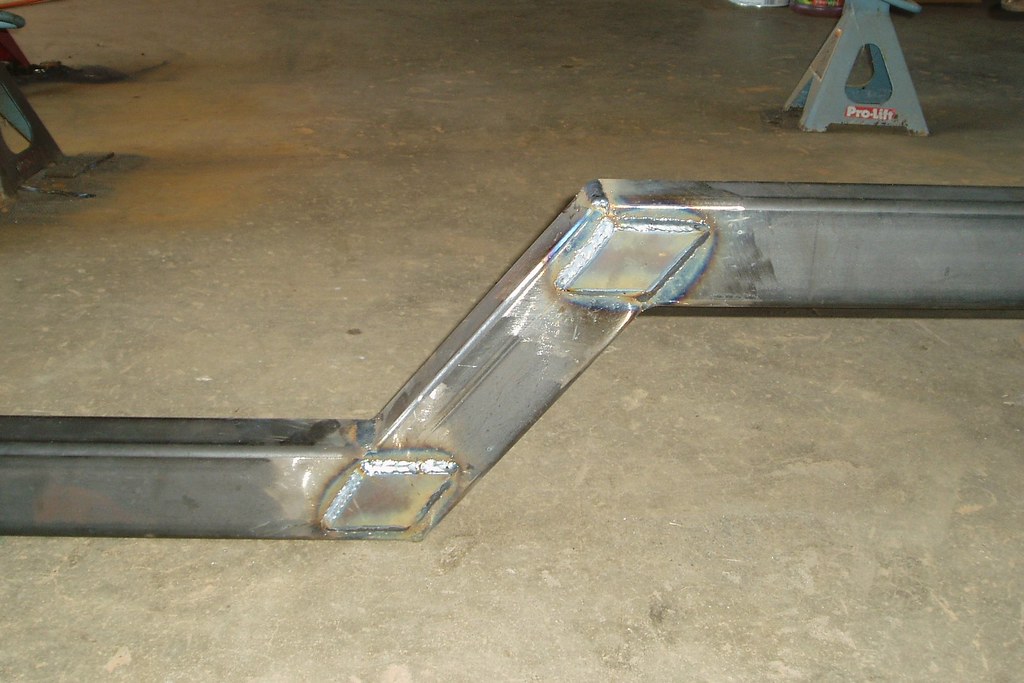 I have been able to put a little time toward the truggy build. The front frame section is up at ride height, the axles are located and the motor is hanging in it’s intended position. The floor of the shop is straight flat and level. I painted a white building box on the floor. Center both ways, inside of frame, and axles are marked on the floor. I use a plumb bob to set everything. I’ve been working on a 4 link calculator for the rear and 3 link for the front for a while now and getting the suspension design worked out. I’ll be stripping the motor this weekend and starting on a set of motor mounts. Some Specs……. Wheel base 114” Front axle moved forward 3” Moved motor back 11” Moved motor Down 2.5” Ground to bottom of frame 23” Tires 39” Front driveshaft aprox 42” Rear driveshaft aprox. 42” Target Travel up 4” down 10” 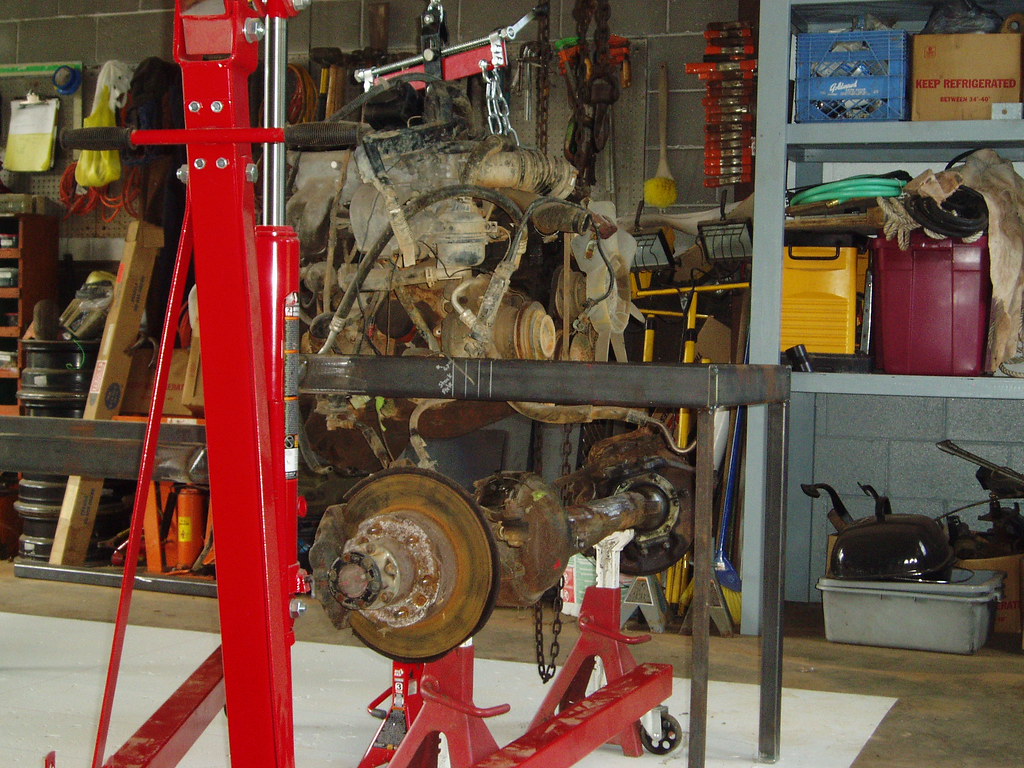 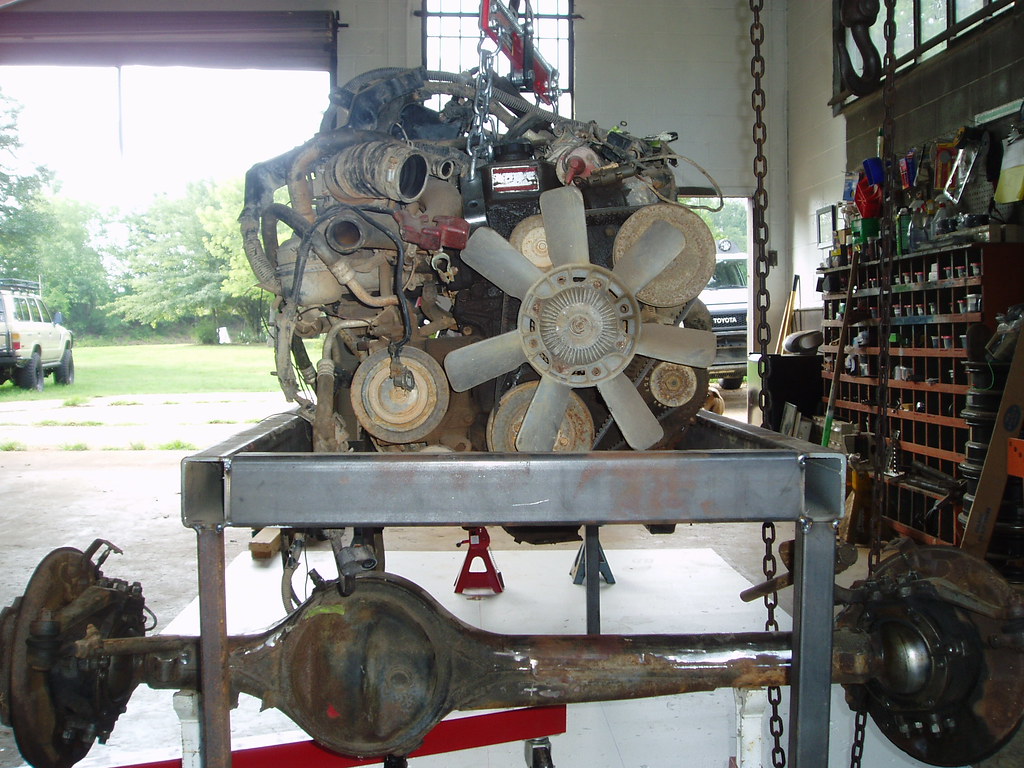 I finally found some time to work on my own project. I got both the motor sides of the motor mounts built. 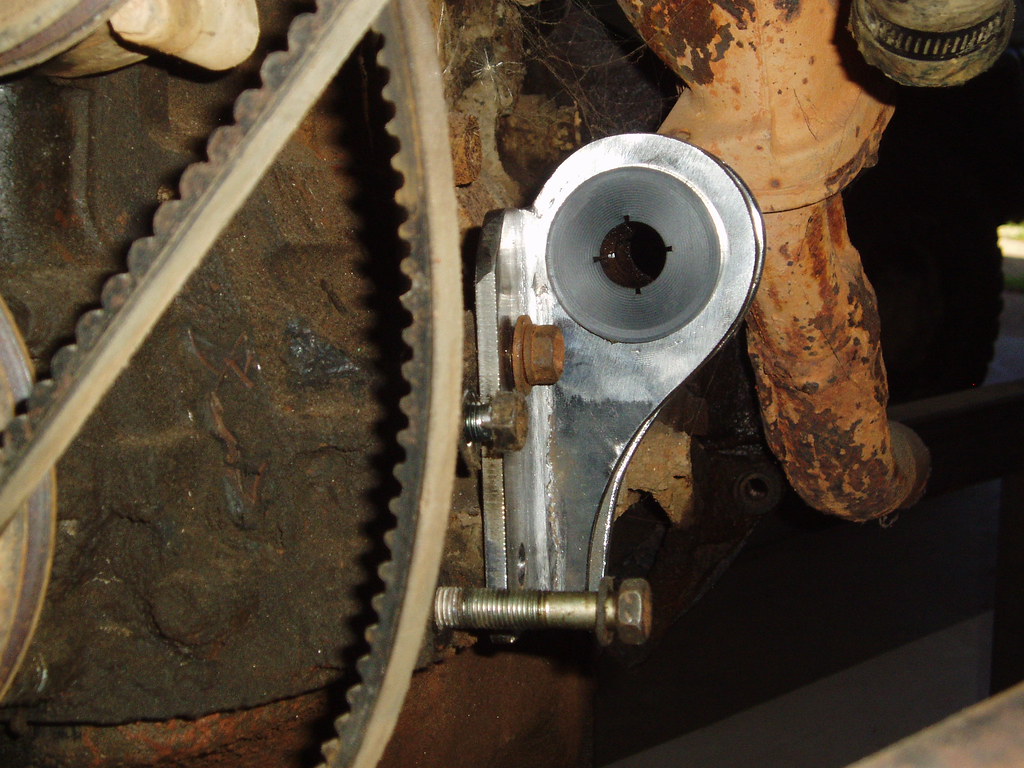  I got the main supports on the frame side cut today. They will be boxed on the top and have angle braces back down to the frame as well. 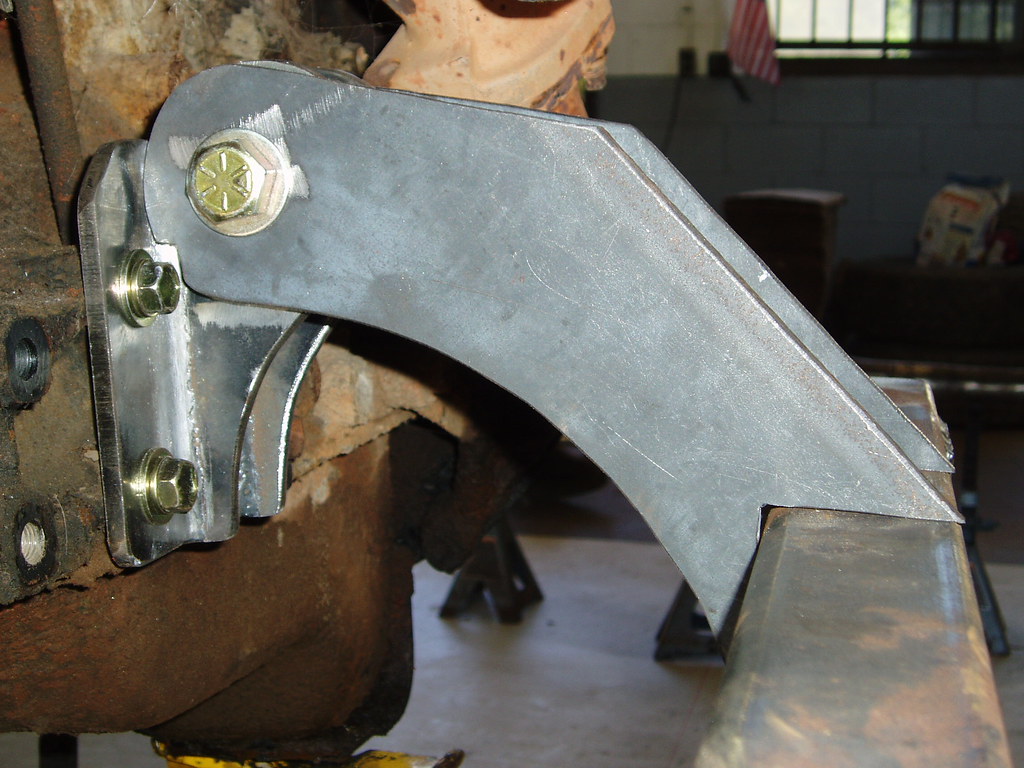 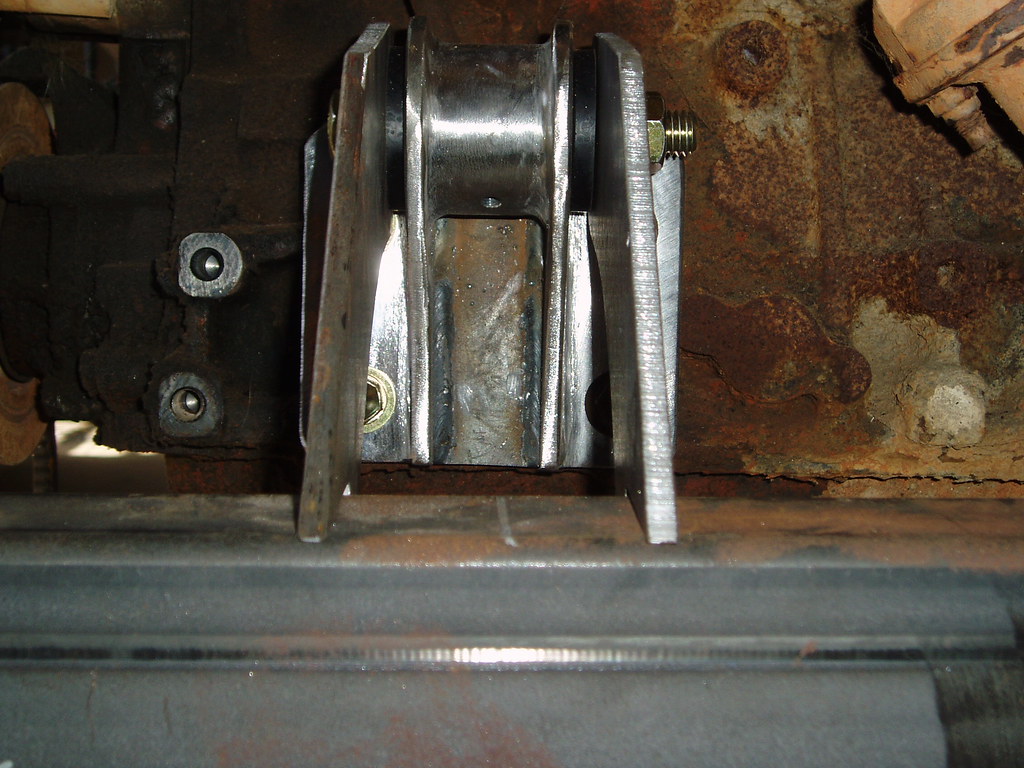 | |
|
  | |
NCFJ1
VENDOR - HFS

Posts : 225
Points : 5035
Join date : 2011-10-30
Location : Chesnee, SC
 |  Subject: Re: JP comes to life-A Truggy Build Subject: Re: JP comes to life-A Truggy Build  Thu Dec 08, 2011 9:28 pm Thu Dec 08, 2011 9:28 pm | |
| So many Toyotas, so little time:) 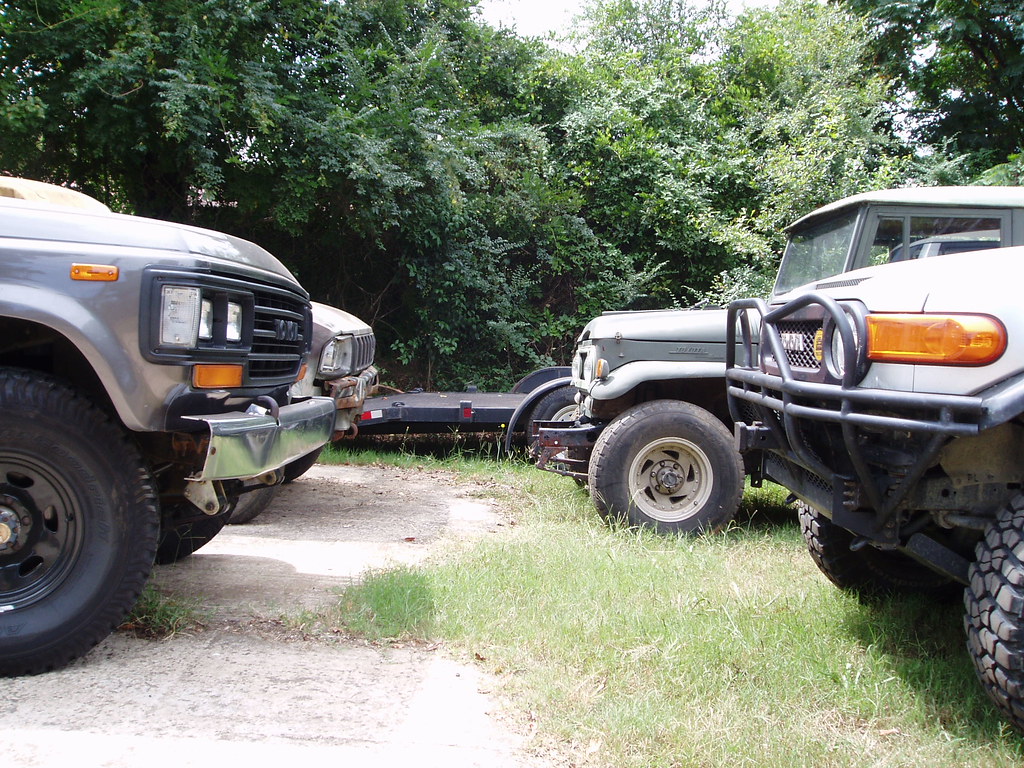 I got a lot of the T-case cross member done today. I am more interested in the frame mounted pieces over the cross member itself. It will rotate 180 degrees on the cross member to be installed, the T-case and trans will drop out from under the rig. There will be bracing between the 2X3 and the plate and a bolt top to bottom in shown hole. 11.5 " between the mounts, 24" between the frames. The side plates held up with the magnets weld to the frame for extra support. 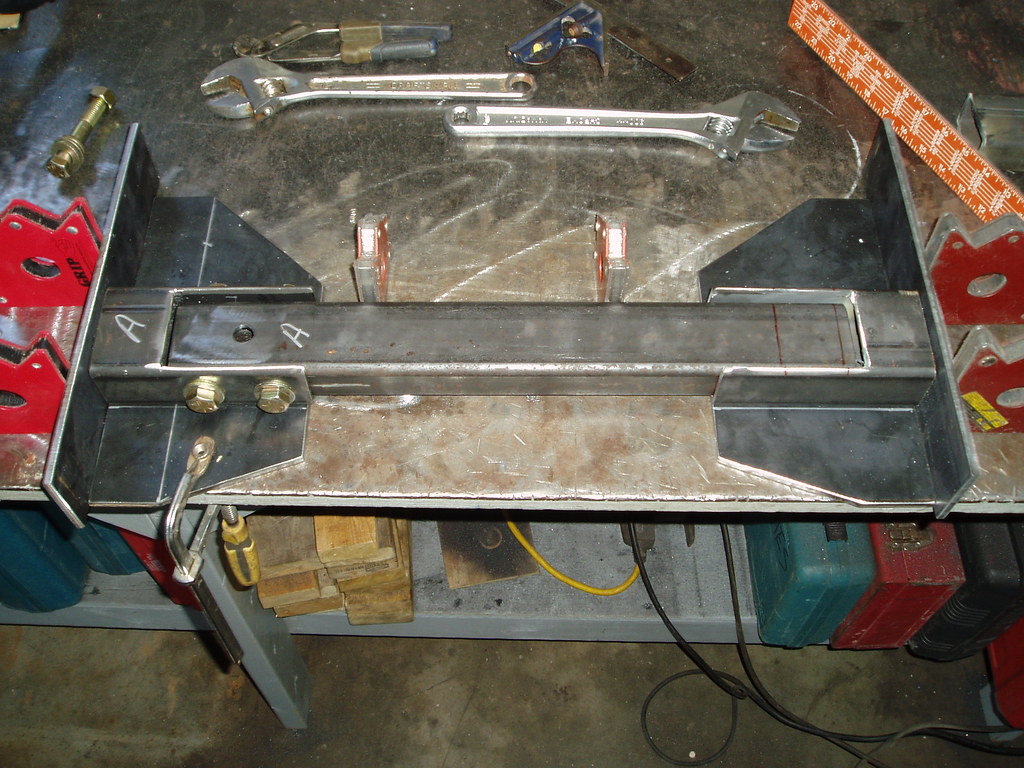 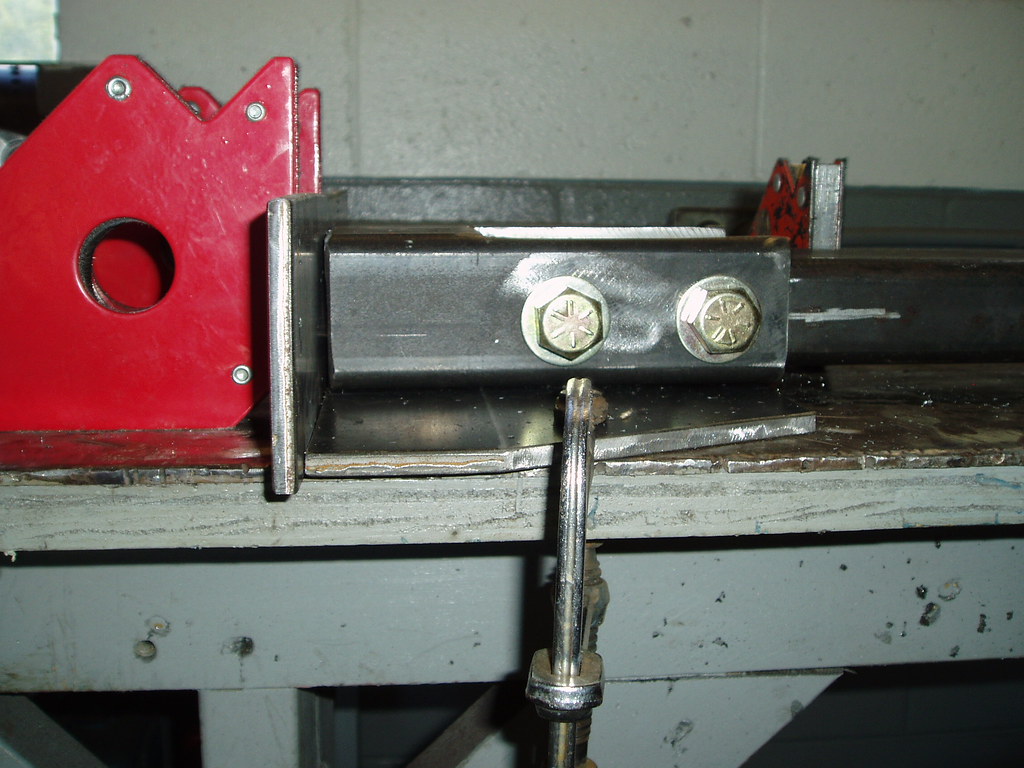 Started work on the rear axle. The rear of the axle is pretty thin and a skid plate is needed. The top of the skid plate will also help support the tower for the mounting points of the upper links. 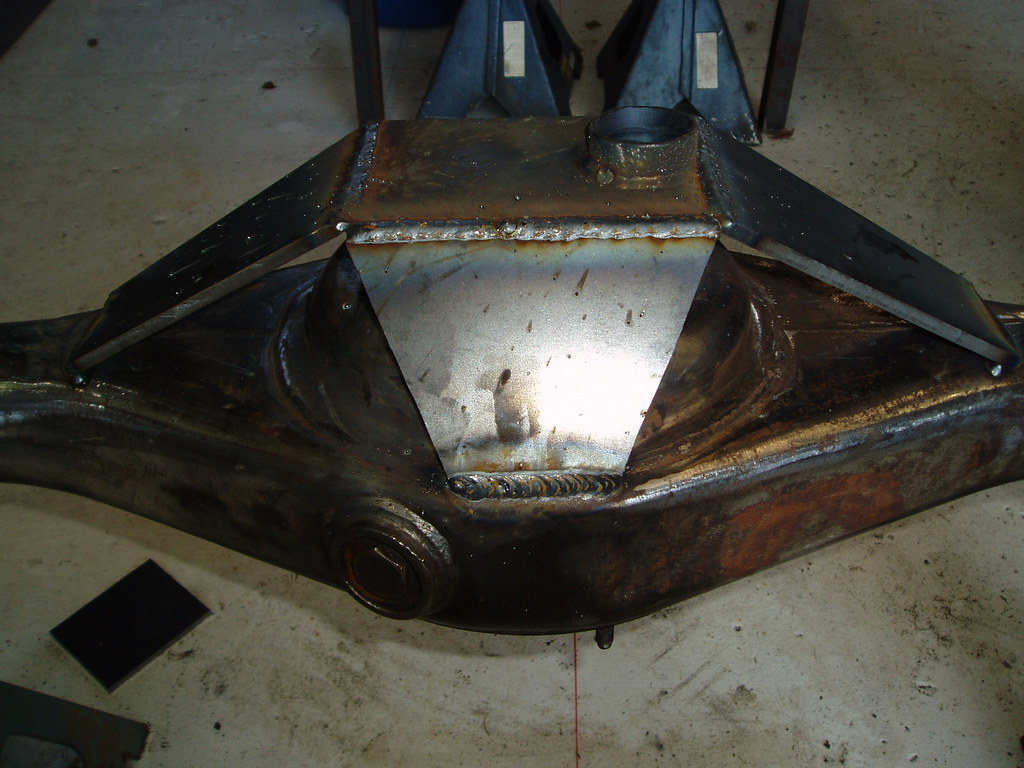 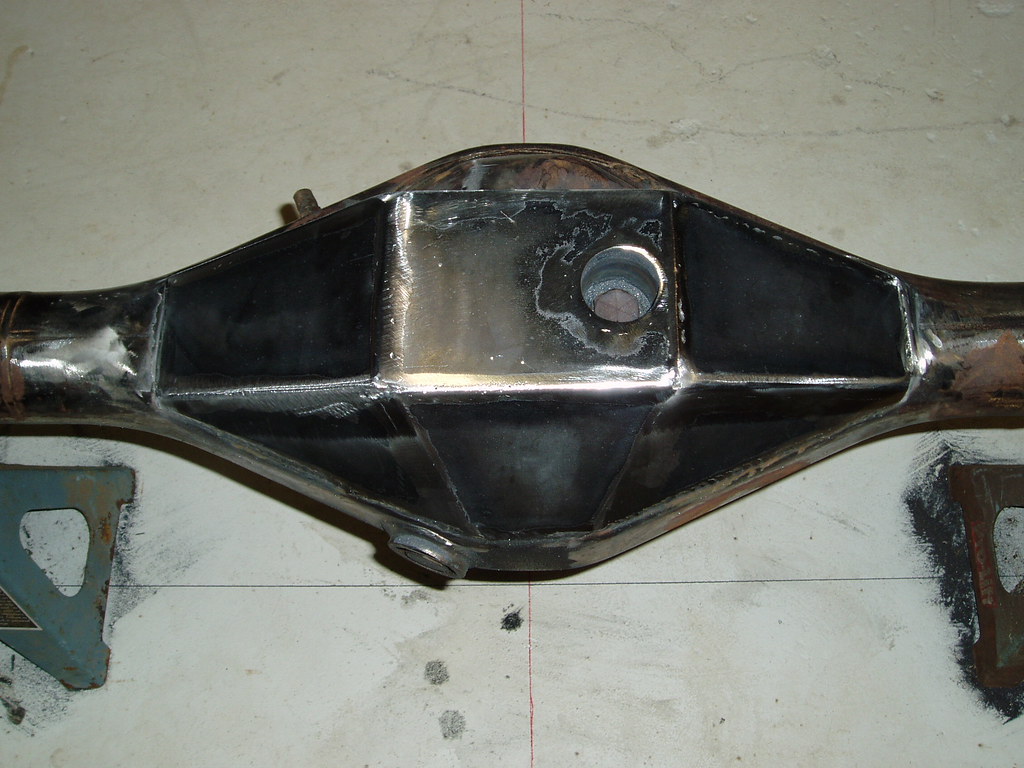  Yes Virginia, there is a Santa Claus!! And he delivers via Fed Ex. Received the Marlin Crawler Dual Case Kit today. Let the games begin  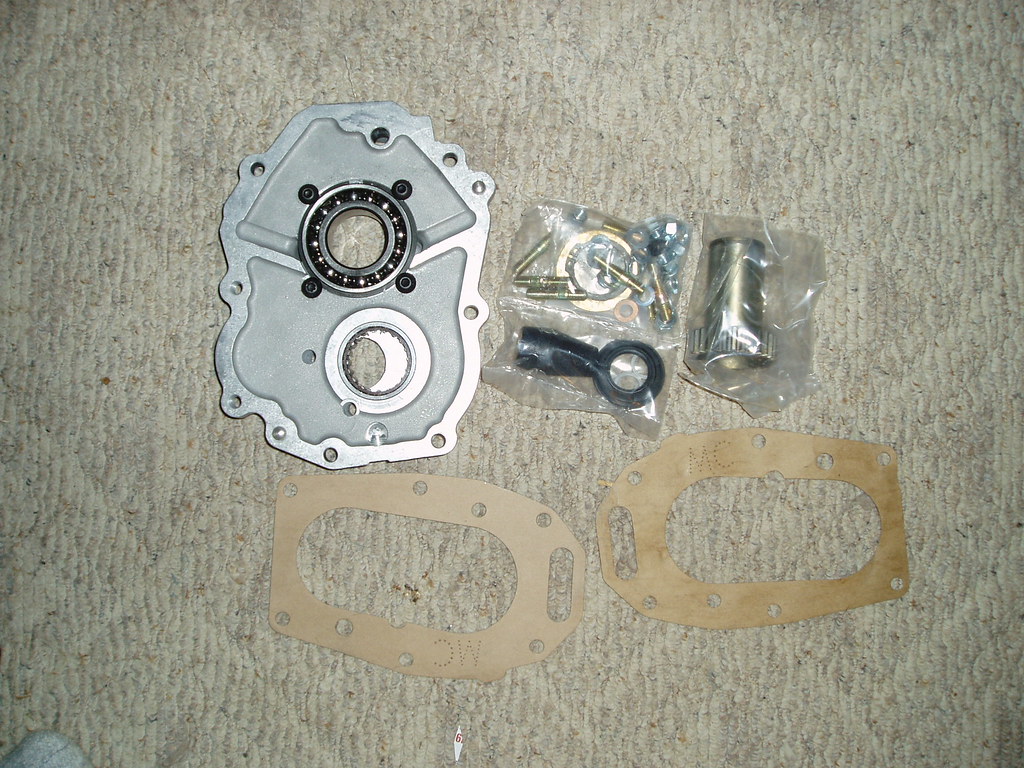 I was able to get the doubler together and bolt the T-case up to it today. Tearing down the donor case took a while because two of the bolts were seized into the case. Nothing some heat could not handle, just time consuming. The quality of Marlin Crawler equipment is well worth the money. I could have purchased a doubler from Trail Gear but I felt this is a true case of you get what you pay for and went with Marlin, no regrets at all on that front. Marlin invented it and has perfected it over the years including better bearing support and better oiling. I am hoping to find some time tomorrow or Tues to bolt up the trans and install it all on the back of the motor. 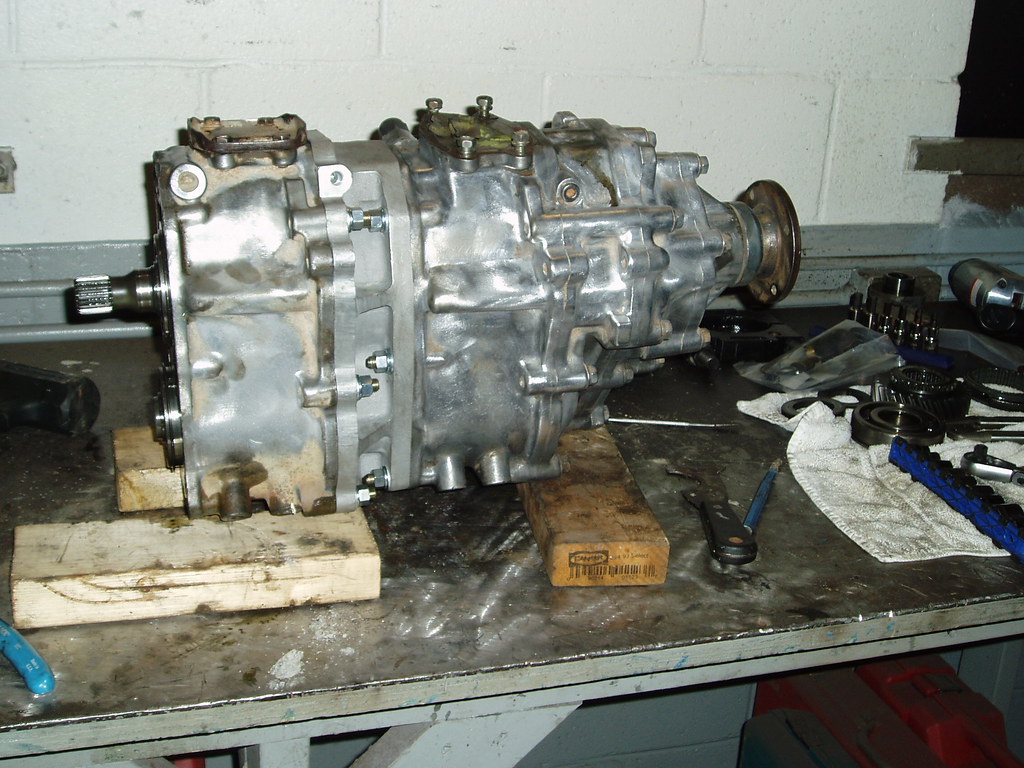 | |
|
  | |
NCFJ1
VENDOR - HFS

Posts : 225
Points : 5035
Join date : 2011-10-30
Location : Chesnee, SC
 |  Subject: Re: JP comes to life-A Truggy Build Subject: Re: JP comes to life-A Truggy Build  Thu Dec 08, 2011 9:29 pm Thu Dec 08, 2011 9:29 pm | |
| I had a pretty productive afternoon in the shop today. Got the trans and cases bolted up to the motor and supported and sat the cab on the frame rails to get a feel for how things will line up. I did some measuring and I think that I can lower the motor and drive train 2” in the frame rails and still have a flat belly pan and have enough to clear the upper link in the front end at full stuff. I went with the rotated case doubler to make sure that the front drive shaft would clear the cross member supporting the T-Case, turned out to be just enough and keep the cross member above the bottom of the frame rails. Even a blind squirrel finds a nut once in a while.  A little time with the sawzall and the cab floor and firewall were gone. I’ll be building all new to replace it once the final position of motor and drive train position is finalized. Cross members and seat frames will carry the new flooring and firewall. As the cab sits right now it is 6” from the bottom of the frame rails up to the bottom the of the seam on the rocker panels and 14” between the outside of the frame and the same seam. I plan to boat side this area. The cab still needs to move forward about 6” but the cowl is making contact with the top of the intake manifold. Once the motor is dropped in the frame this will no longer be an issue. 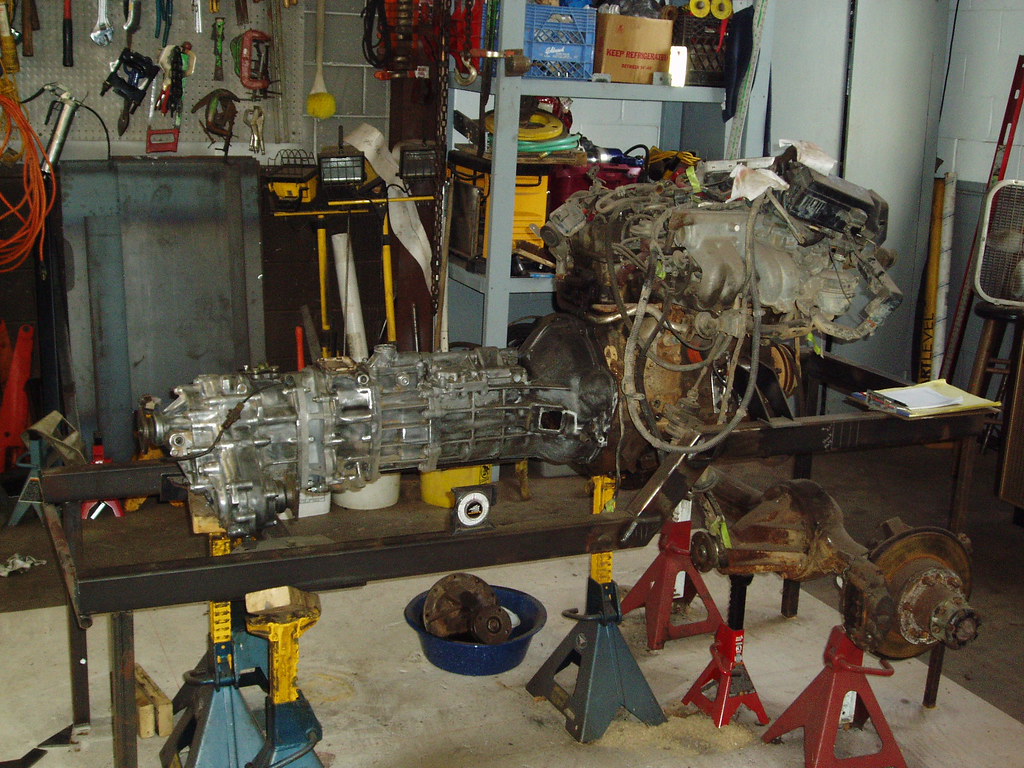 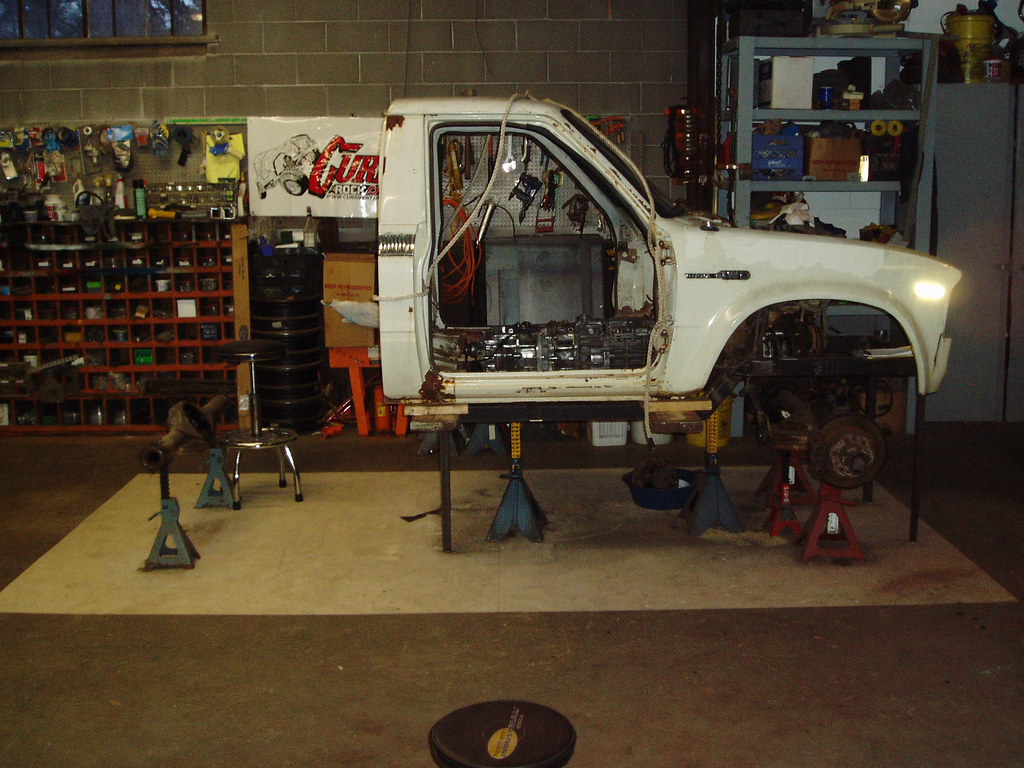 Dropped the cross member so the bottom is in the same plane as the bottom of the frame rails, It’ll hold two bolts for the belly pan. Urethane bushings and 9/16” bolts. 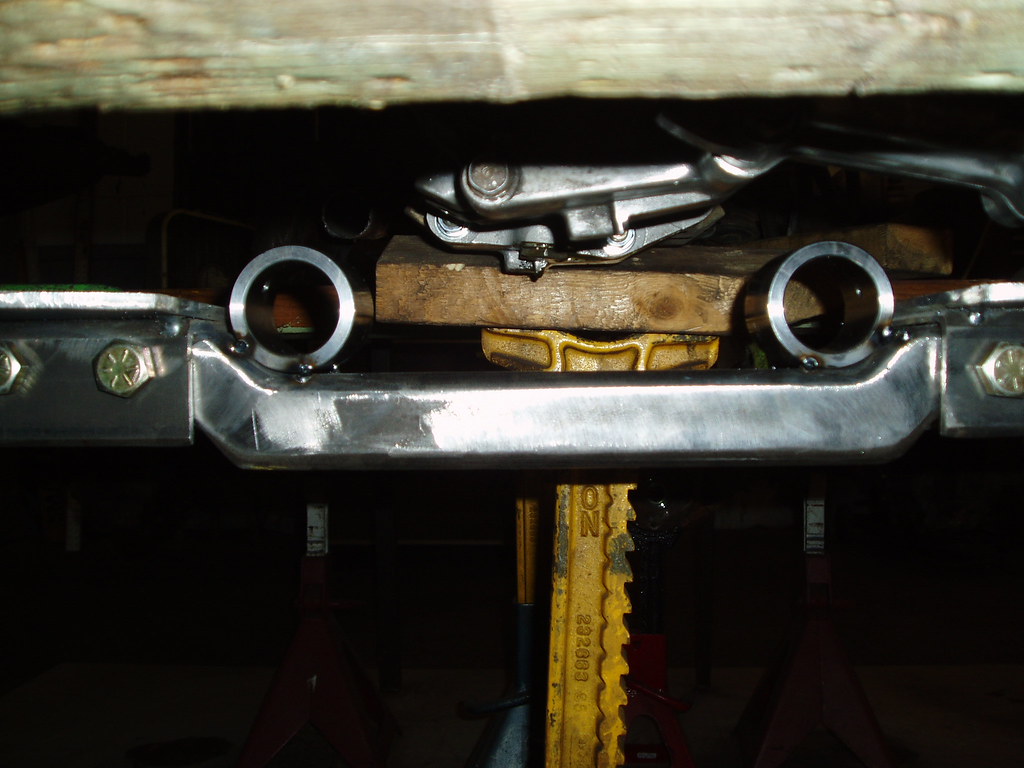 The driveshaft flange and U Joints are the determining factor here, on how much to remove from the plate and how close to the plate. 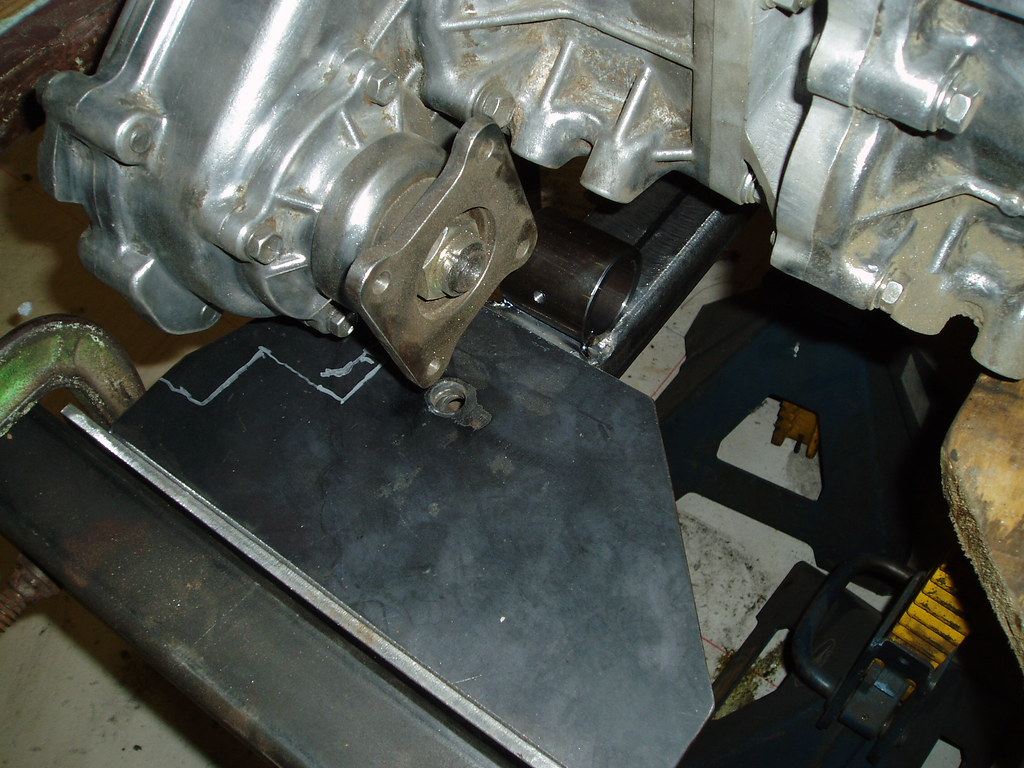 | |
|
  | |
NCFJ1
VENDOR - HFS

Posts : 225
Points : 5035
Join date : 2011-10-30
Location : Chesnee, SC
 |  Subject: Re: JP comes to life-A Truggy Build Subject: Re: JP comes to life-A Truggy Build  Thu Dec 08, 2011 9:30 pm Thu Dec 08, 2011 9:30 pm | |
| I was able to get all the cross member pieces fabbed up and welded today. 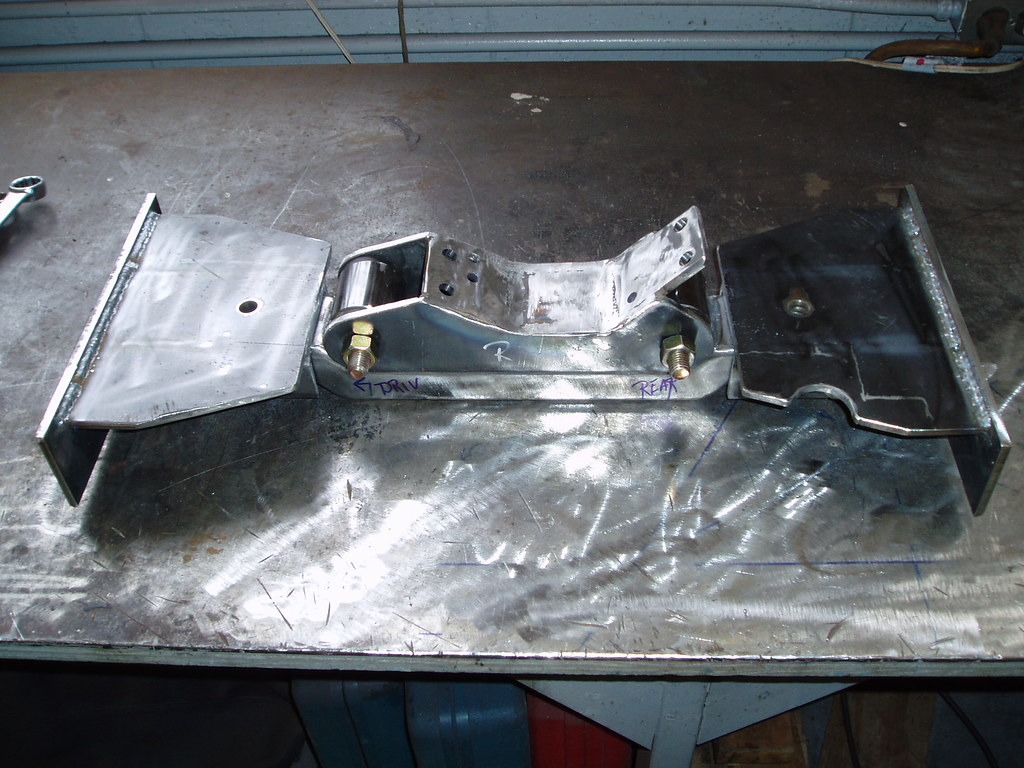 This section bolts to the transfer case, bolts through the urethane bushings to the cross member. 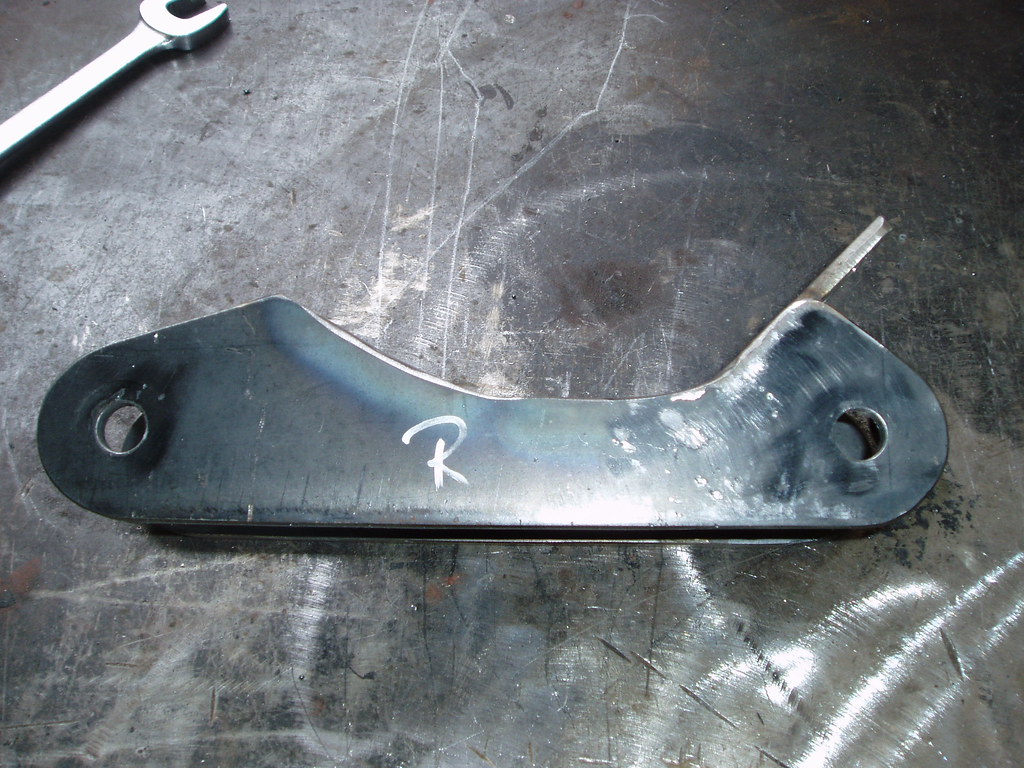 Installed and tacked into the frame rails 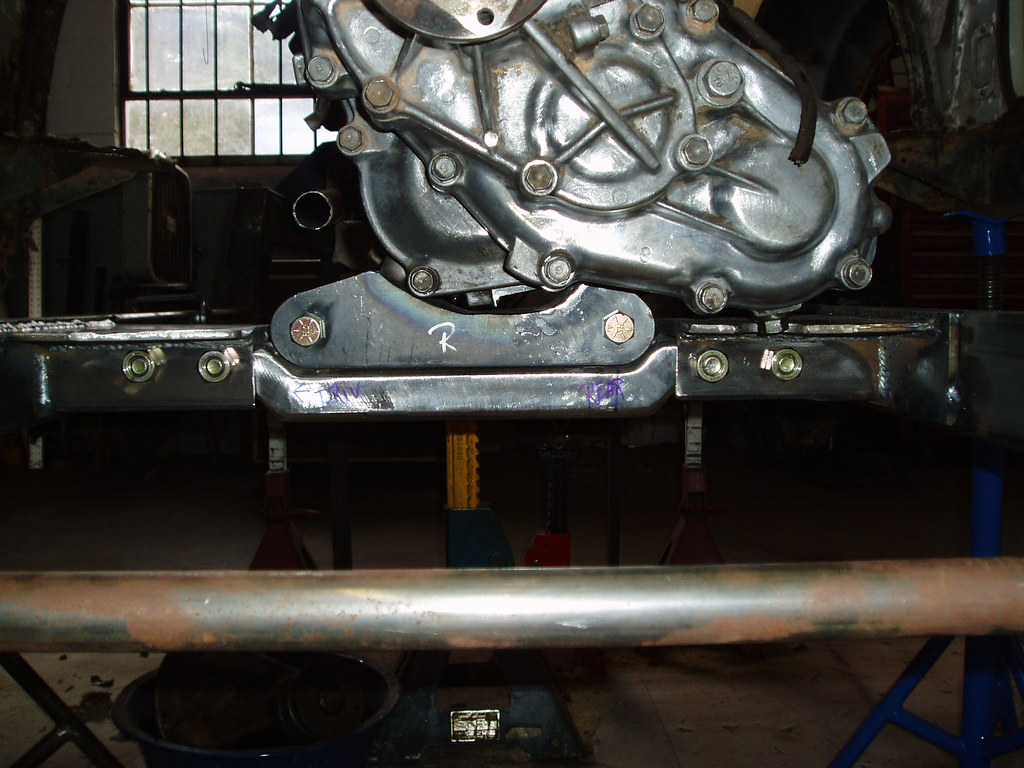 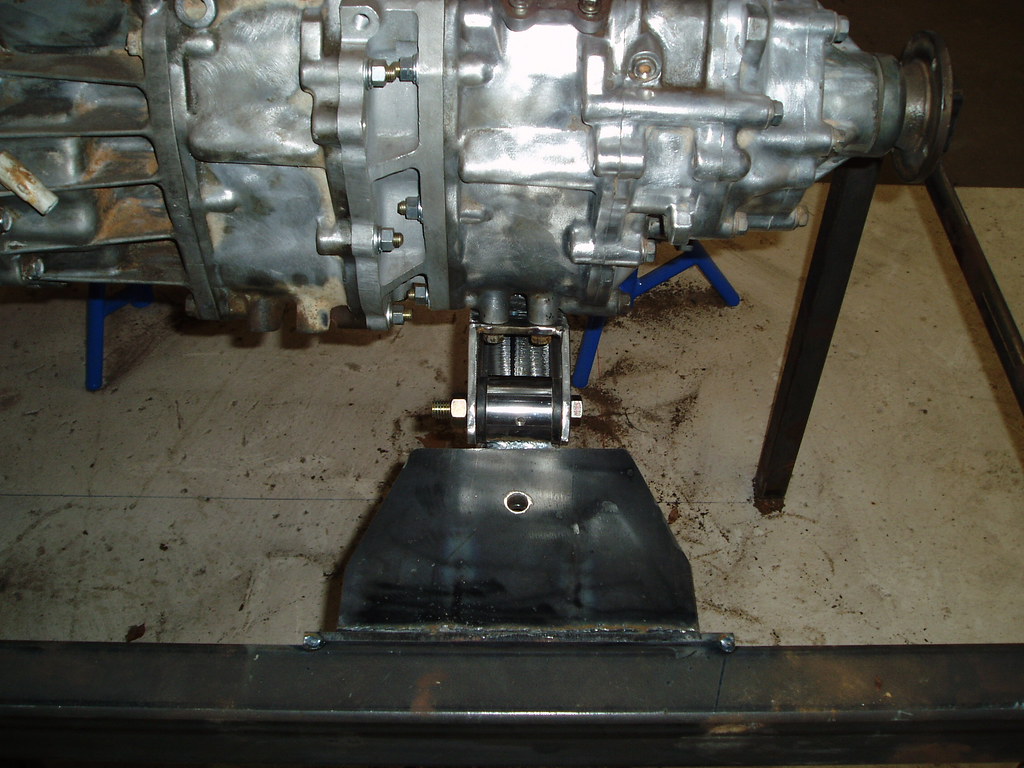 I spent a bit more time on the truggy today, working on the boat sides and the rear axle truss and upper link tower. This photo shows the basic setup, the blue tape representing the upper and lower links. The frame side of the upper links will be housed just to the inside of the outer bars for the boat sides, you can see the ends of the tubes just under the cab seams. The upper links will be adjustable in placement via mounts with 5 different mounting points spaced 5/8" vertically. 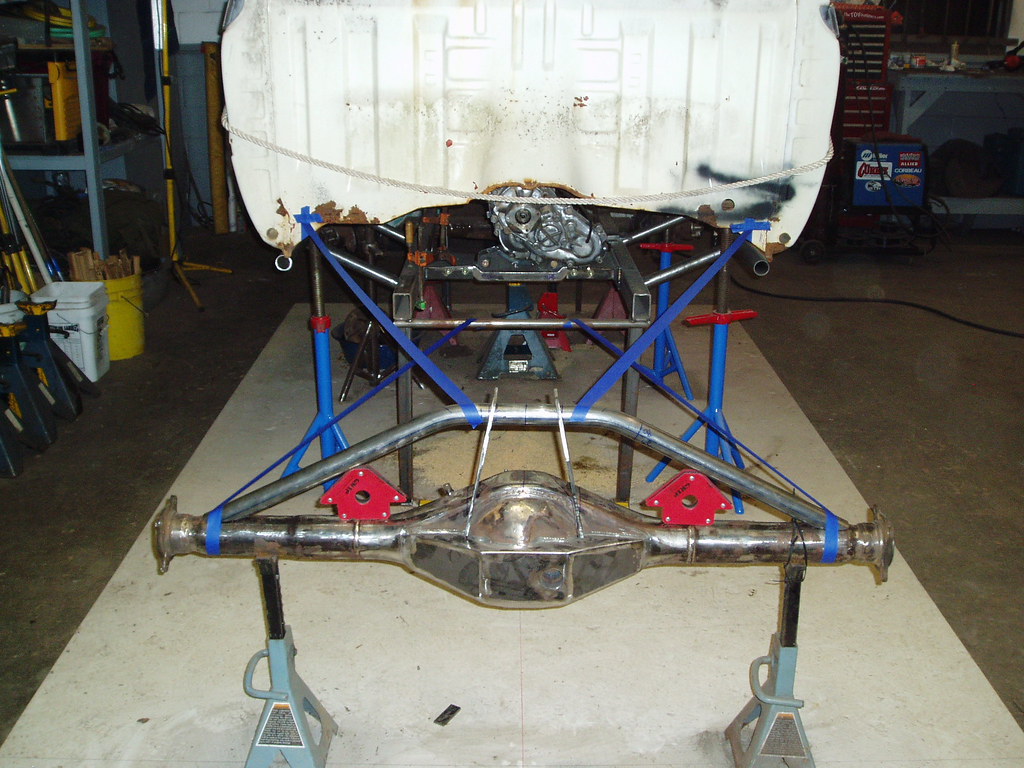 This photo shows the basic triangulation of the links. Brackets on top of the axle tower will hold the rear of the upper links. The towers will be gusseted for support. and strength. The tower also acts as a main support for the truss. 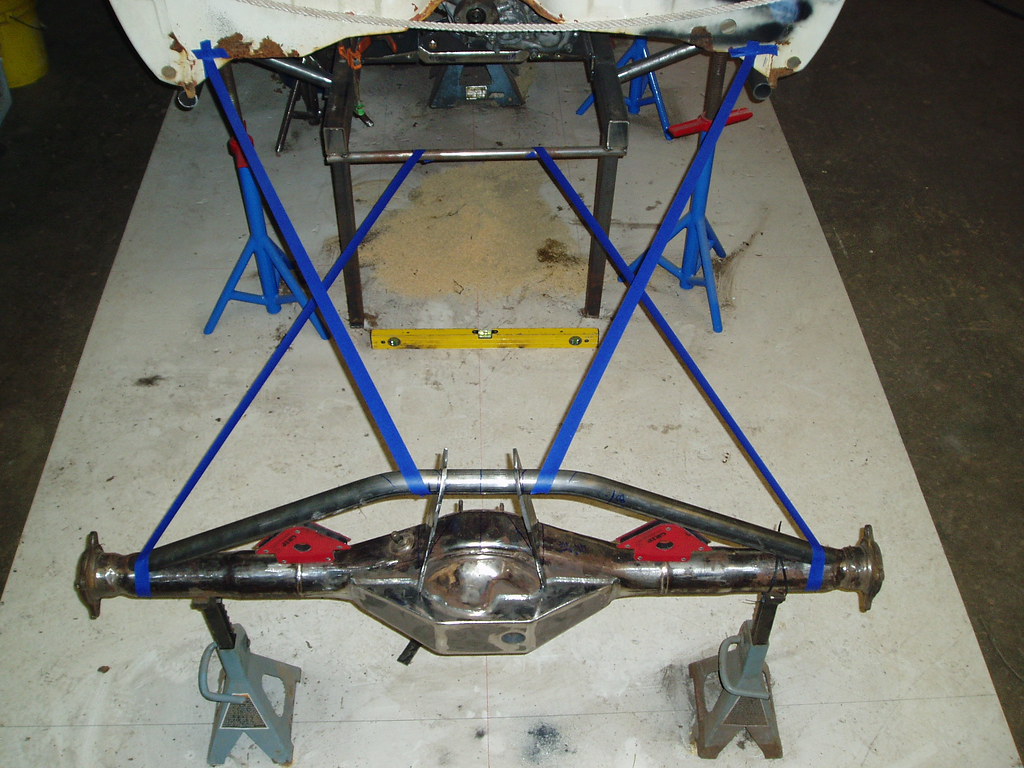 This photo shos the basic link placememt. The upper links are pretty close to actual vertical placement. The lower links will mount centered on the axle and centered vertically on the frame rails making the angle a bit higher than shown. 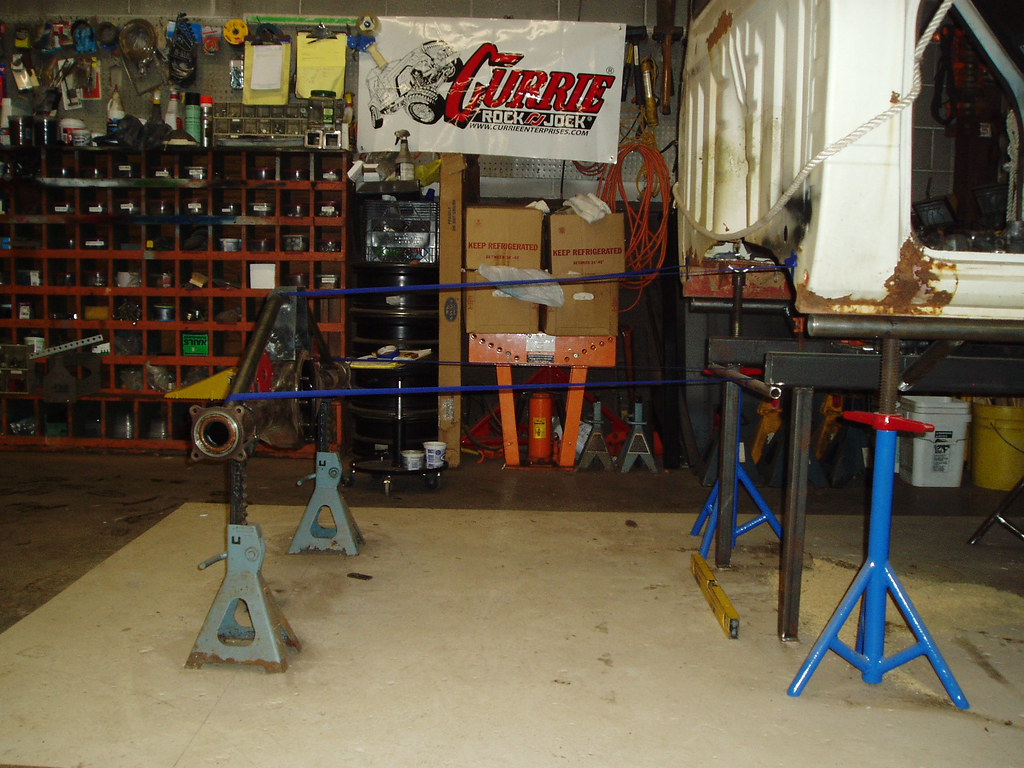 This photo gives you an idea of how the upper link tower also supports the axle truss. The area between the two 1/4" plates will be filled in with 1/8" plate acting as a gusset. The upper link tabs will be welded to the tower on the inner side and to the axle truss tube on the outside with a gusset between them. 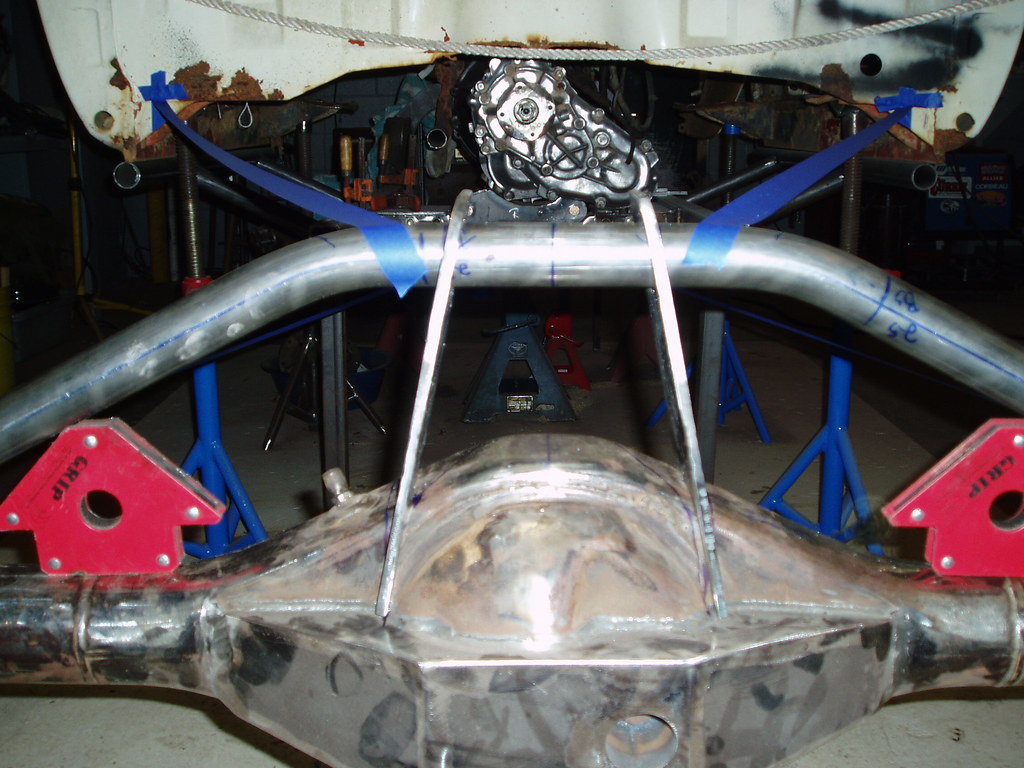 | |
|
  | |
NCFJ1
VENDOR - HFS

Posts : 225
Points : 5035
Join date : 2011-10-30
Location : Chesnee, SC
 |  Subject: Re: JP comes to life-A Truggy Build Subject: Re: JP comes to life-A Truggy Build  Thu Dec 08, 2011 9:31 pm Thu Dec 08, 2011 9:31 pm | |
| Another Sat in the shop. I was still waiting on Johnny joints so I figured I’d deal with one of the front body mounts, what’s left at least. Started with this  Kept and duplicated with 1/8” plate both sides, 1/8” plate top piece, 1/8”plate down the side and along top to tie back to stronger material. The A Post on the roll cage will have a ¼” plate on the base, it will bolt through the 1/8” plate body mount to a ¼” plate on the frame. 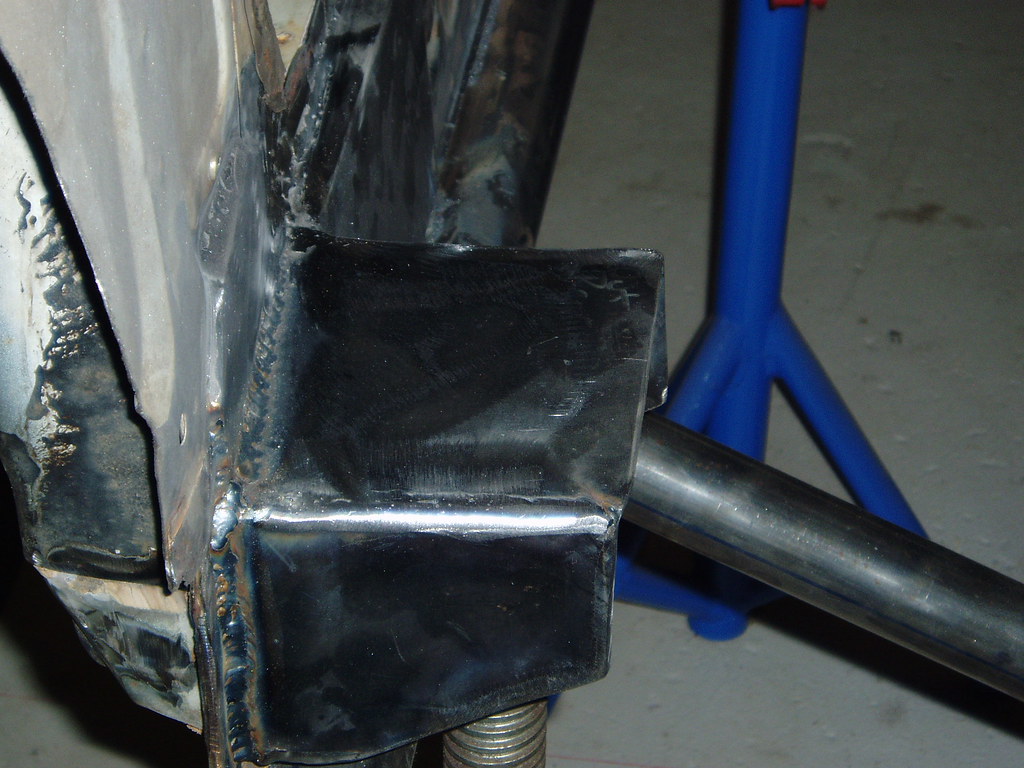  In the beginning you figure out the basics, wheelbase,tire size, target weight, CG Height. You take all your basic measurements from your rear axle center to where in space you plan to mount the links. Figure it all out on the 4 link calculator, changing dimensions in small increments to improve the numbers you are shooting for. You come to a set of numbers that work, at least on the computer. Then you start building it, I did the axle side first. I built the frame side upper link mounts, 5 way adjustable. I made up a pair of links, attached one end to the axle side, the other to the frame side link and used that to position the frame side link. A little masaging of the numbers and they were tacked in where they are going to live. Plugged the new numbers into the calculator , a little massage on the lower link numbers and I will be good. Now to support the upper link mounts  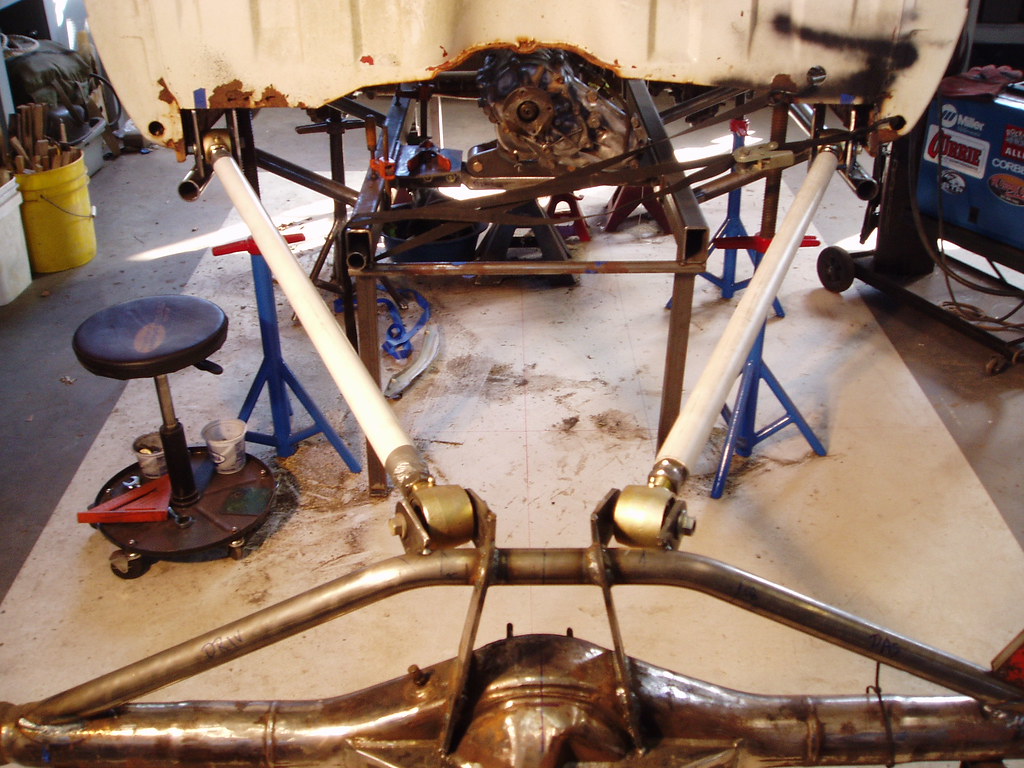  | |
|
  | |
NCFJ1
VENDOR - HFS

Posts : 225
Points : 5035
Join date : 2011-10-30
Location : Chesnee, SC
 |  Subject: Re: JP comes to life-A Truggy Build Subject: Re: JP comes to life-A Truggy Build  Thu Dec 08, 2011 9:33 pm Thu Dec 08, 2011 9:33 pm | |
| All four links in place. Cross member and cage in the upper link frame mounts is next.  Worked on the cross member for the frame side of the lower links today. Test fit went well, just needs to be welded up and have a few gussets added. Note the bolts toward the outside, the center section is removable to ease removal of the transfer case and trans. 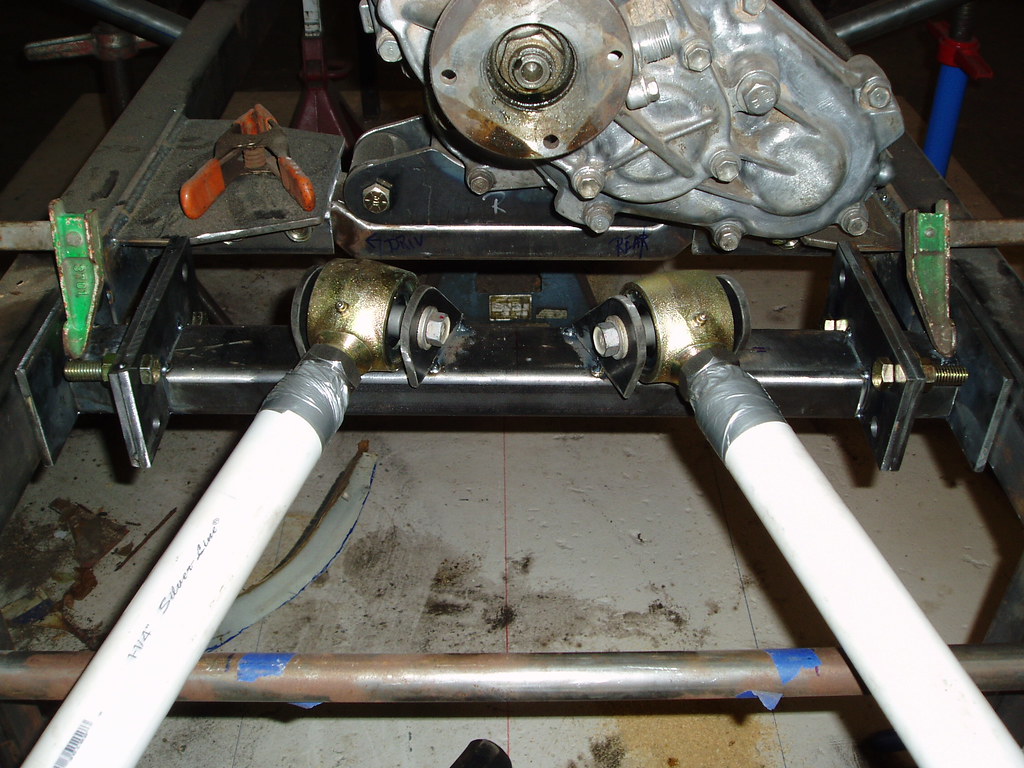 Working nights on the Truggy is paying off. Got the T-case and lower link cross members welded in and the boat sides are coming along as well. The Upper Link frame side mounts are also coming along. I need to put the cab back on the frame so I can get a cross member fabbed up between the two mounts and triangulated back down to the main frame. It looks a lot fatter than it really is, only 4'5" outside to outside of the boat sides. 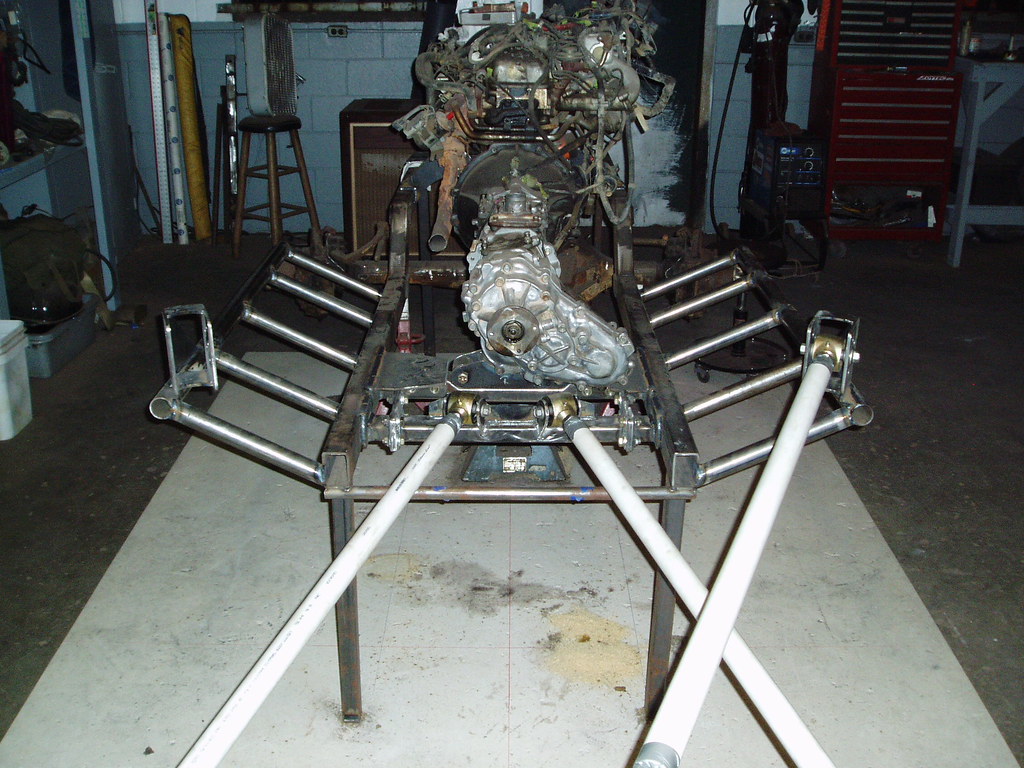   | |
|
  | |
NCFJ1
VENDOR - HFS

Posts : 225
Points : 5035
Join date : 2011-10-30
Location : Chesnee, SC
 |  Subject: Re: JP comes to life-A Truggy Build Subject: Re: JP comes to life-A Truggy Build  Thu Dec 08, 2011 9:34 pm Thu Dec 08, 2011 9:34 pm | |
| The boat sides and upper frame/floor support is starting to come together. The front body mount and then the front of the roll cage will tie into the small boxes toward the front of the boat sides. More triangulation will tie those and the rear cage mounts that will sit on top of the frame side mounts for the rear upper links. 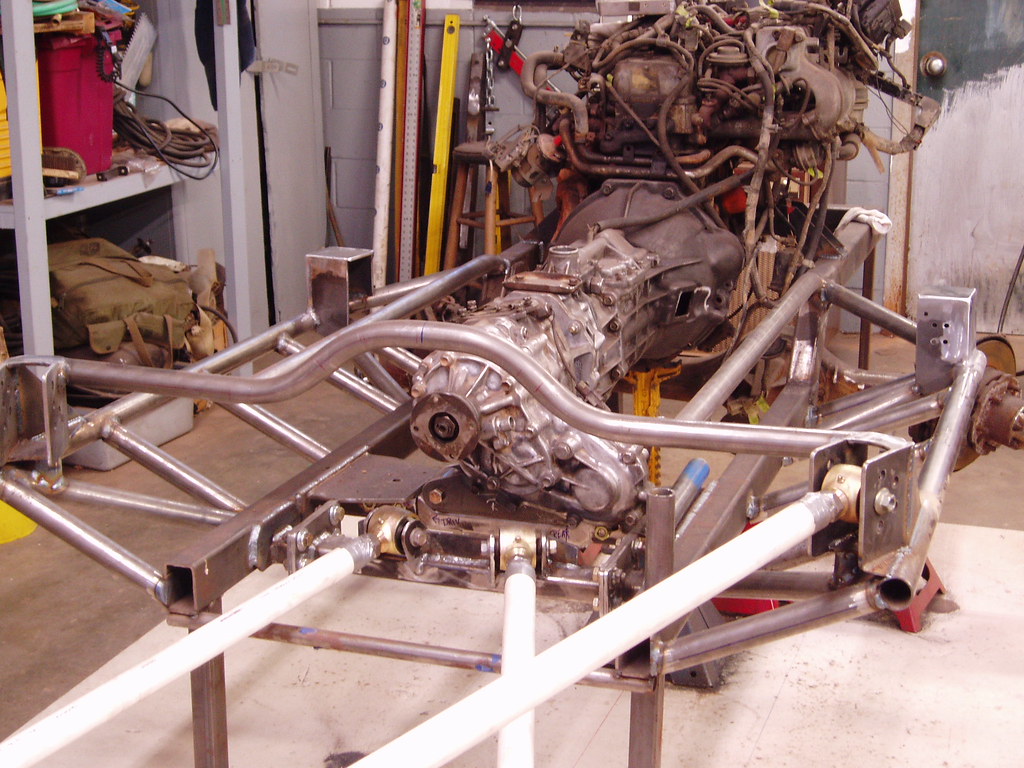 My trailer got a workout again today. 82FJ 60 82 mini truck cab-4 fenders,hood with TITLE  transfer case 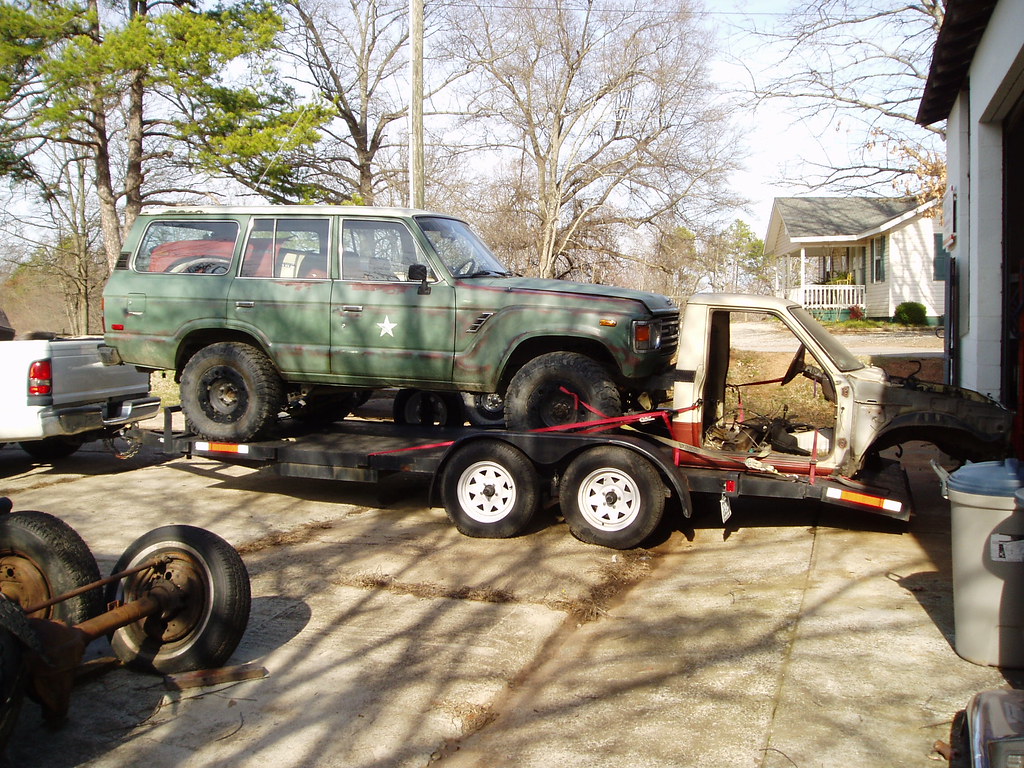 | |
|
  | |
NCFJ1
VENDOR - HFS

Posts : 225
Points : 5035
Join date : 2011-10-30
Location : Chesnee, SC
 |  Subject: Re: JP comes to life-A Truggy Build Subject: Re: JP comes to life-A Truggy Build  Thu Dec 08, 2011 9:36 pm Thu Dec 08, 2011 9:36 pm | |
| I actually got some work done on the truggy this week, amazing. I got the rest of the truss work done on both sides of the frame. This will both strengthen the boat sides as well as creat a truss on both sides of the frame. THe humidity was over 90% for two days straight, thus the forming surface rust. I'll be cleaning that up this week and either caoting with WD40 or a light coat of paint to prevent future rust while in the ohhhhhhh so long build process. 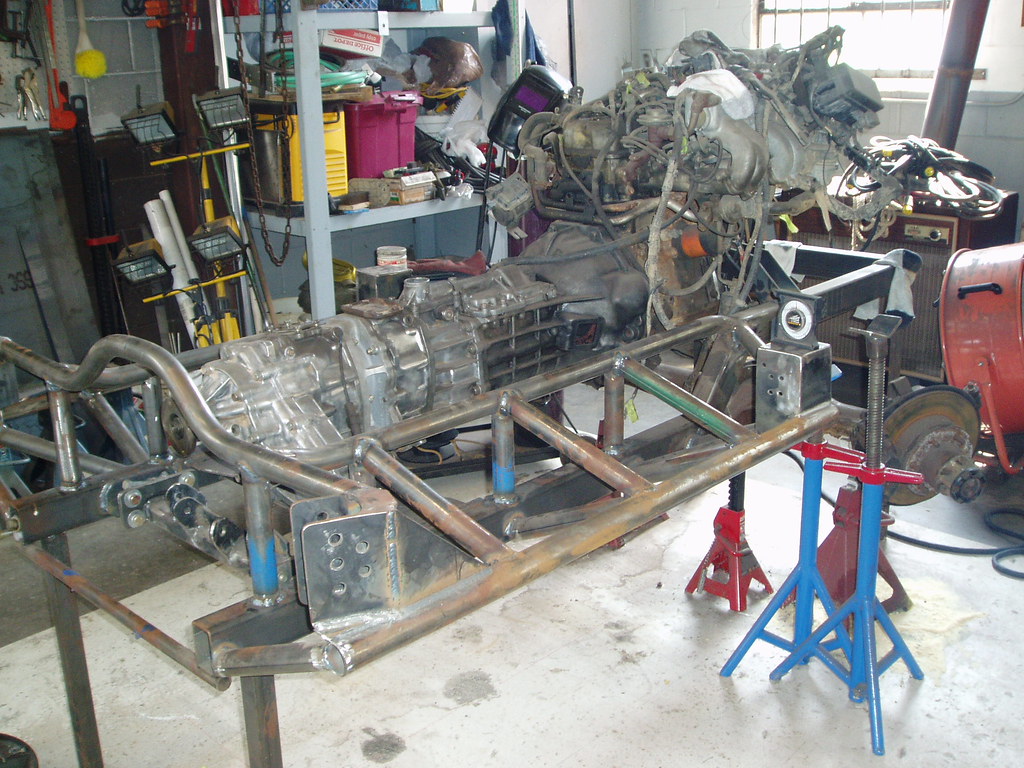 Got the cab back on the frame and the fenders and hood mocked up to start narrowing the front end. I am taking 12" total out of the width of the front end. 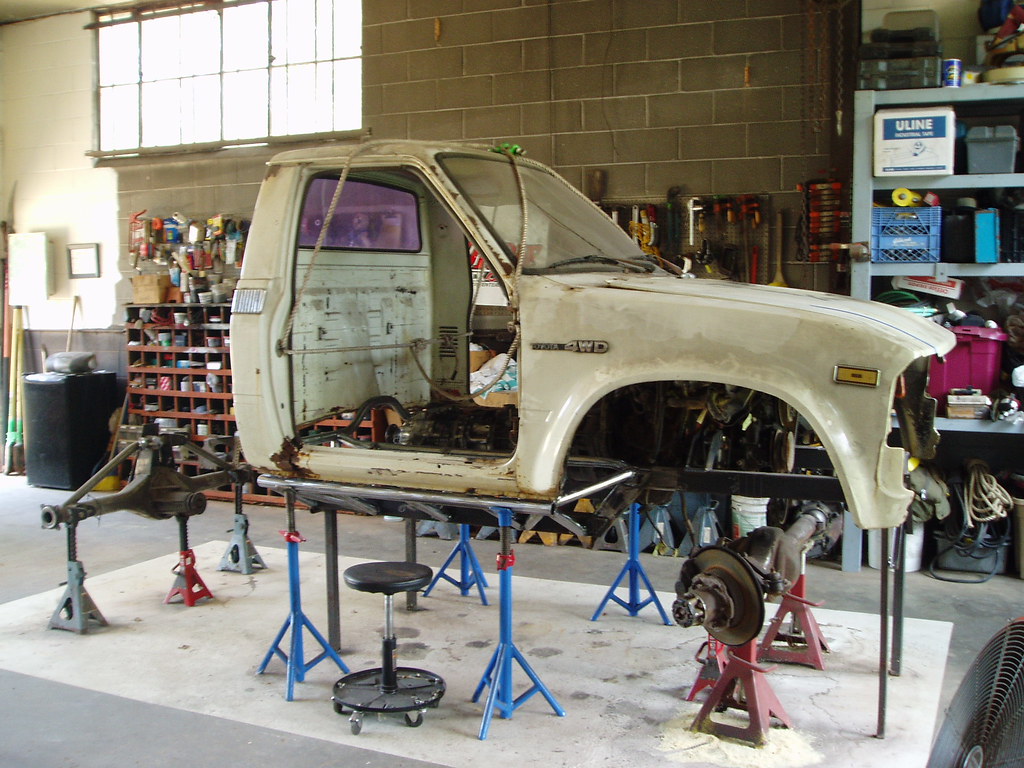 The outside edge of the blue tape is 6" and taper back to 0 where the the top of the fender meets the cowl. THe taper will be removed from the cowl and the hood. 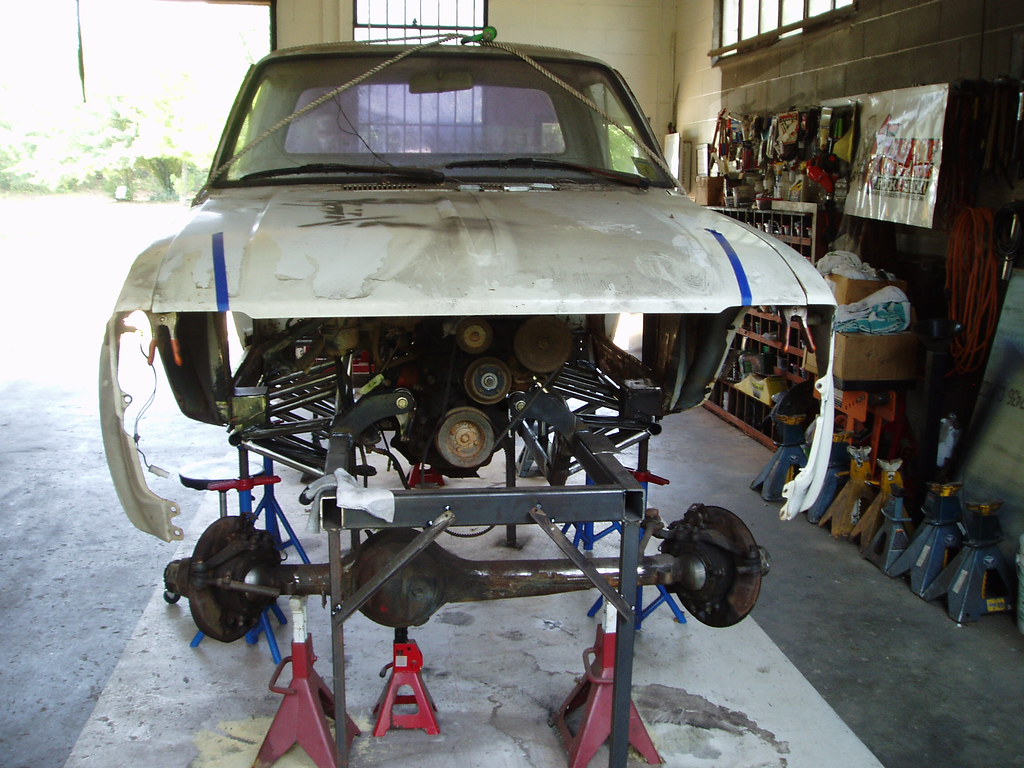 A stock grill on the top, narrowed grill on the bottom 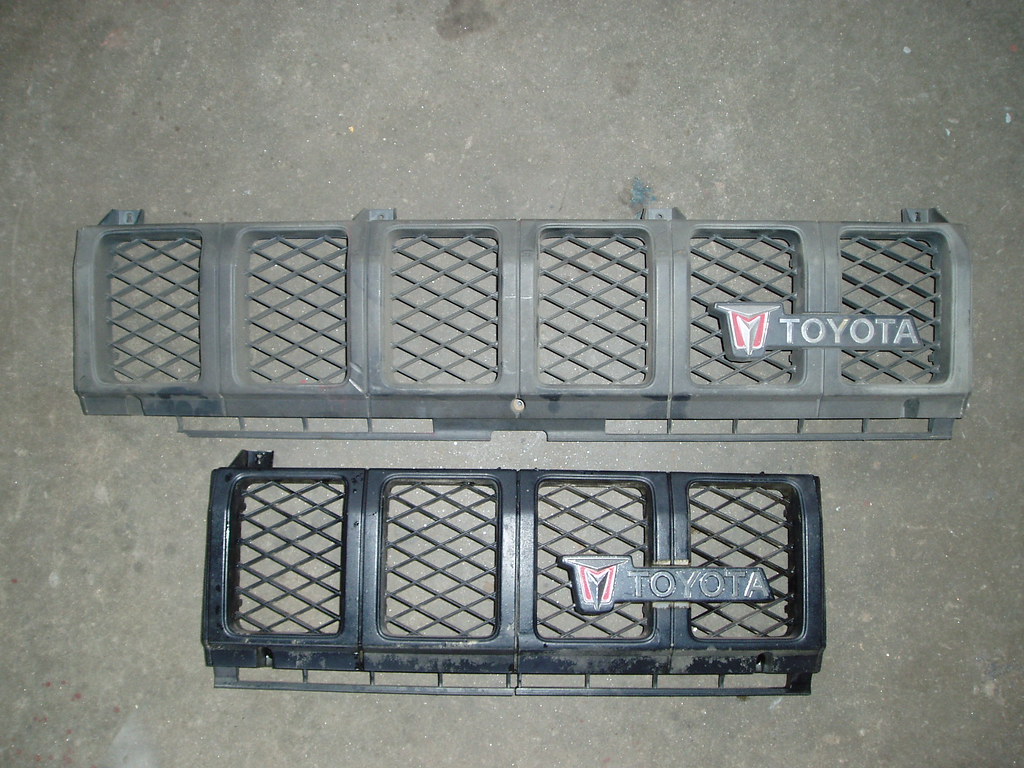 Once the center two sections which are exactly 6" were removed I glassed the two outside sections together with epoxy resin. 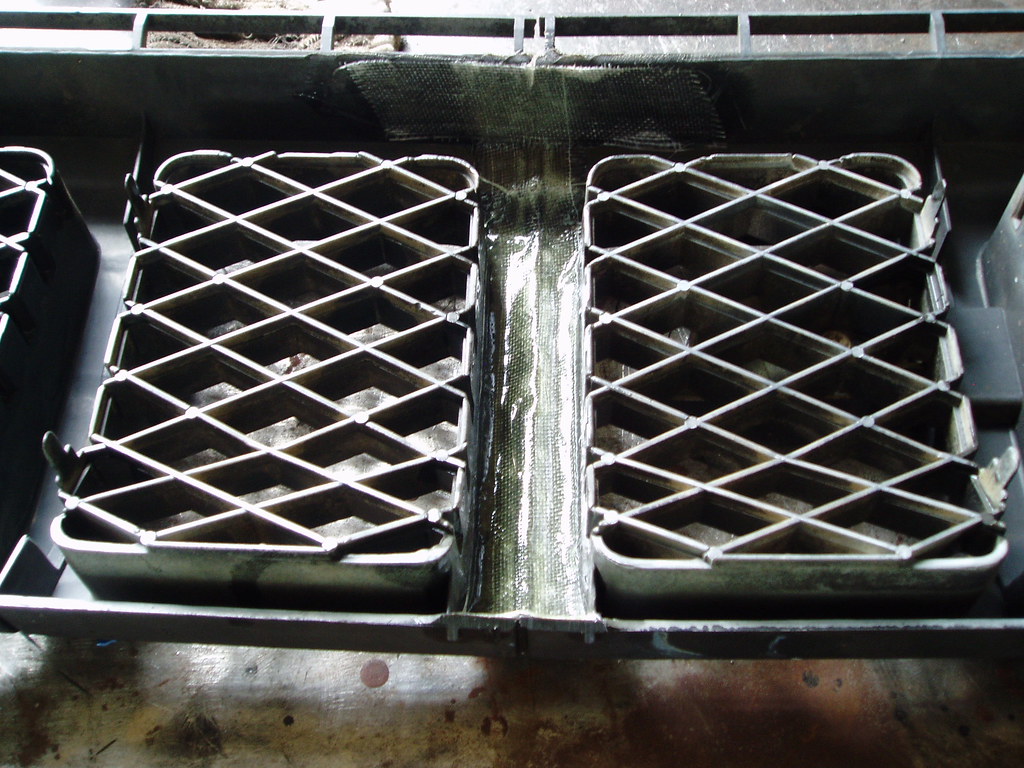 Did a little more today. Past the point of no return, well sorta. I cut the cowl and the hood on the passenger side. No photos of the hood but here's the cowl. Before 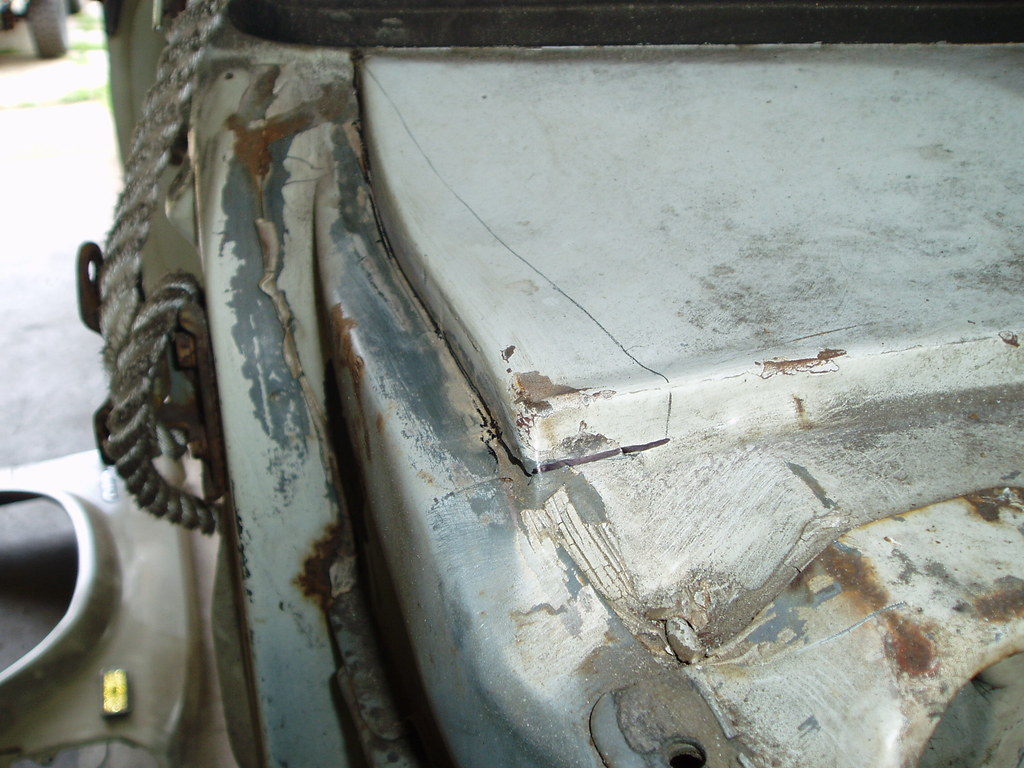 During 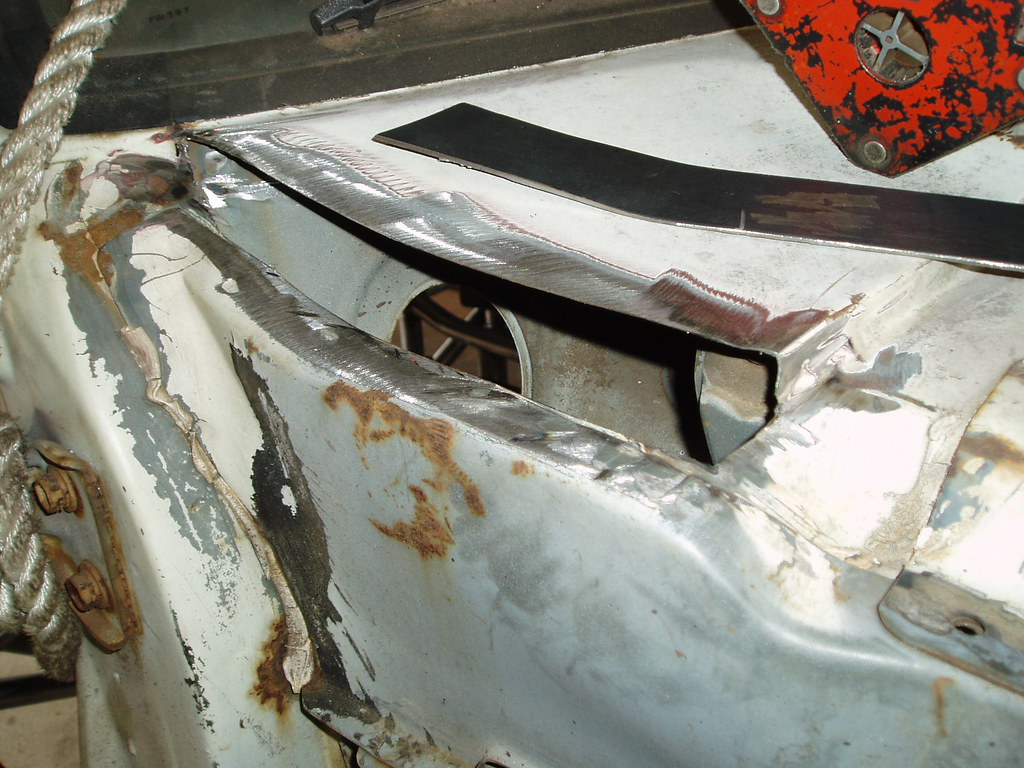 After  The front end is narrowed! All that is left is to fit the grill section and that has to wait until the front tube work is complete so there is something to tie it all in to. Once the fenders were pulled in 2.25" had to be removed from the front of the hood. Once the section of the hood was cut the edge was cut off and then welded back to the edge of the hood. 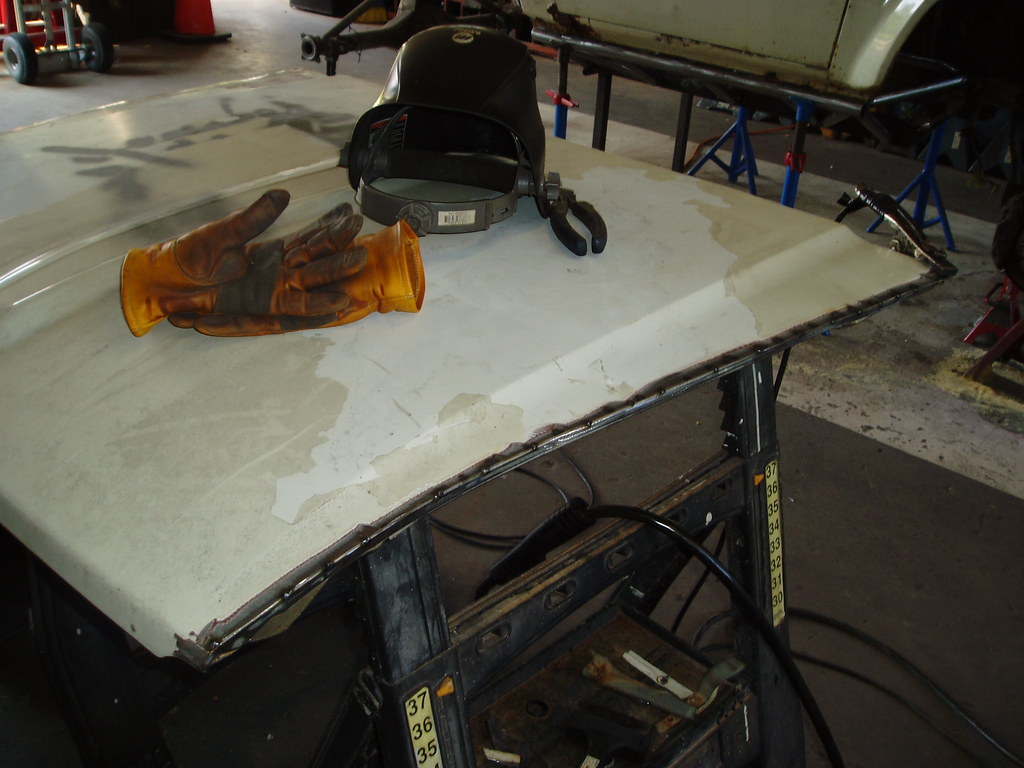 The hood cut, ready to slit the top of the fender and pull it in.  All narrowed and hung in place temporarily 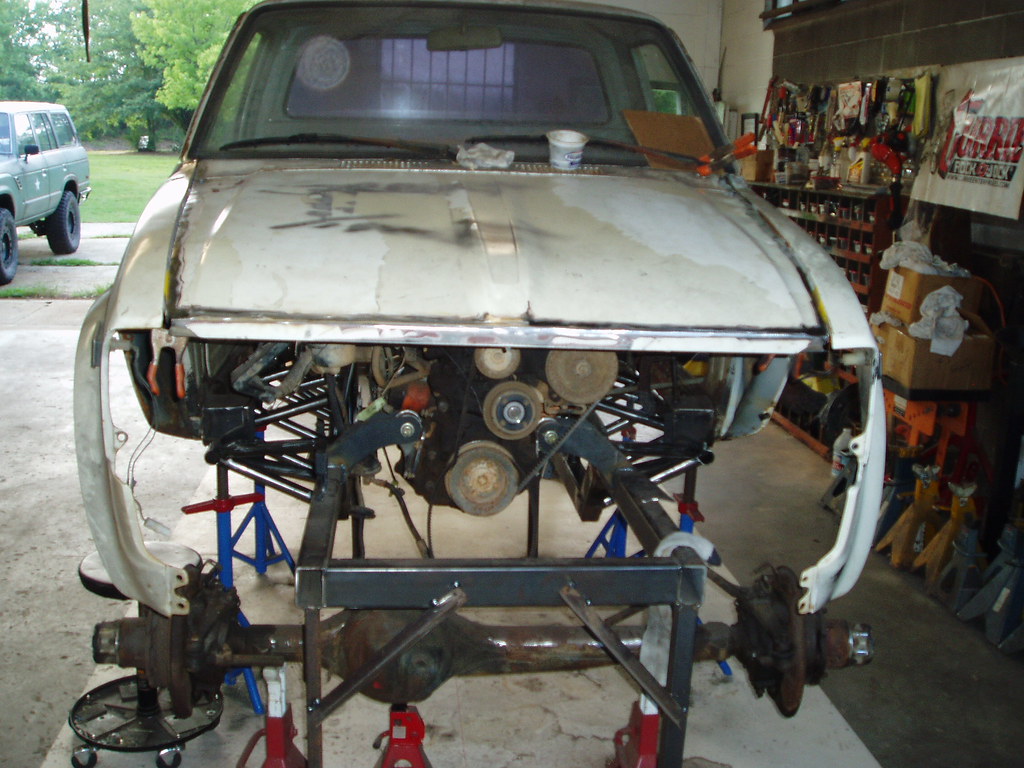 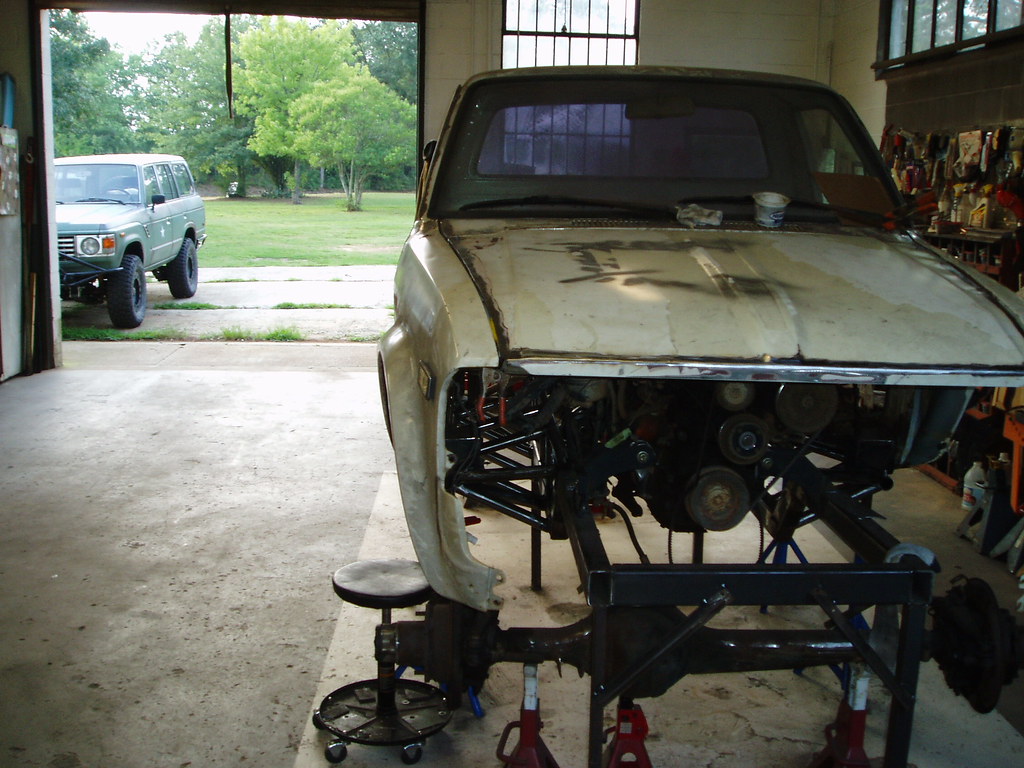 | |
|
  | |
NCFJ1
VENDOR - HFS

Posts : 225
Points : 5035
Join date : 2011-10-30
Location : Chesnee, SC
 | |
  | |
NCFJ1
VENDOR - HFS

Posts : 225
Points : 5035
Join date : 2011-10-30
Location : Chesnee, SC
 |  Subject: Re: JP comes to life-A Truggy Build Subject: Re: JP comes to life-A Truggy Build  Thu Dec 08, 2011 9:38 pm Thu Dec 08, 2011 9:38 pm | |
| I was busy over the weekend……… Got the louvers in and the hood pounded back in to shape and primed. Best I can guess is that this hood was walked on at some point, there was 3/8” bondo in places and the hood panel was popped off the sub panel. I cut all that was needed to support the headlight and tie in to the fenders in two places from the radiator support and clamped the narrowed grill section between them to mock up the hood. This is as far as I can go with the front clip without the tube behind it to hang it from. 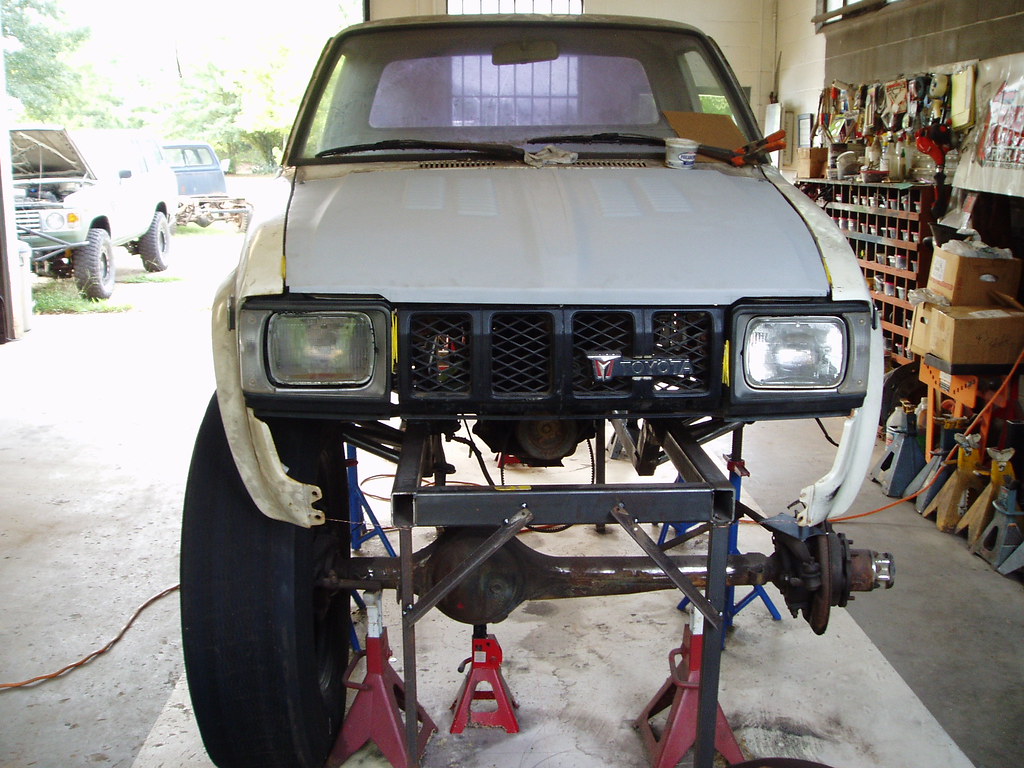 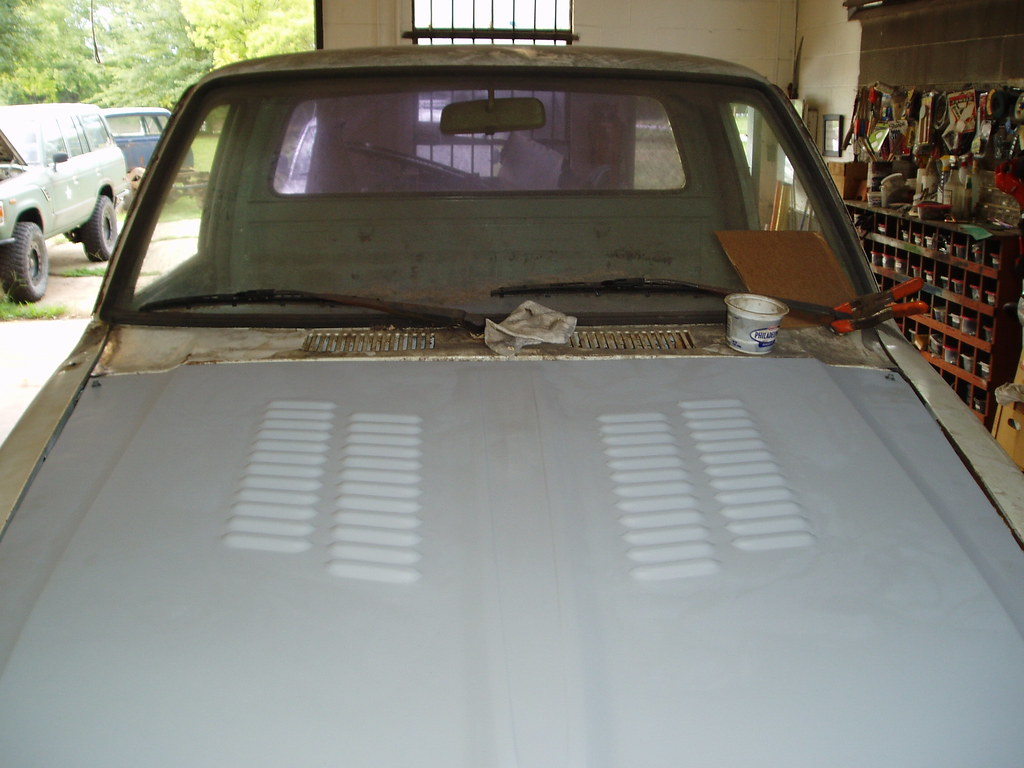  If you are thinking about an early 80’s Toyota mini truck build, be prepared to hone your metal working skills. The lower corner of the body at the passenger side door was swiss cheese so I cut it back to solid metal.  The first piece required a curved bend and a 90 degree angle. Not too hard to create using a shrinker and stretcher. Thanks James. You can see the black lines to cut the piece so it welds in flush. 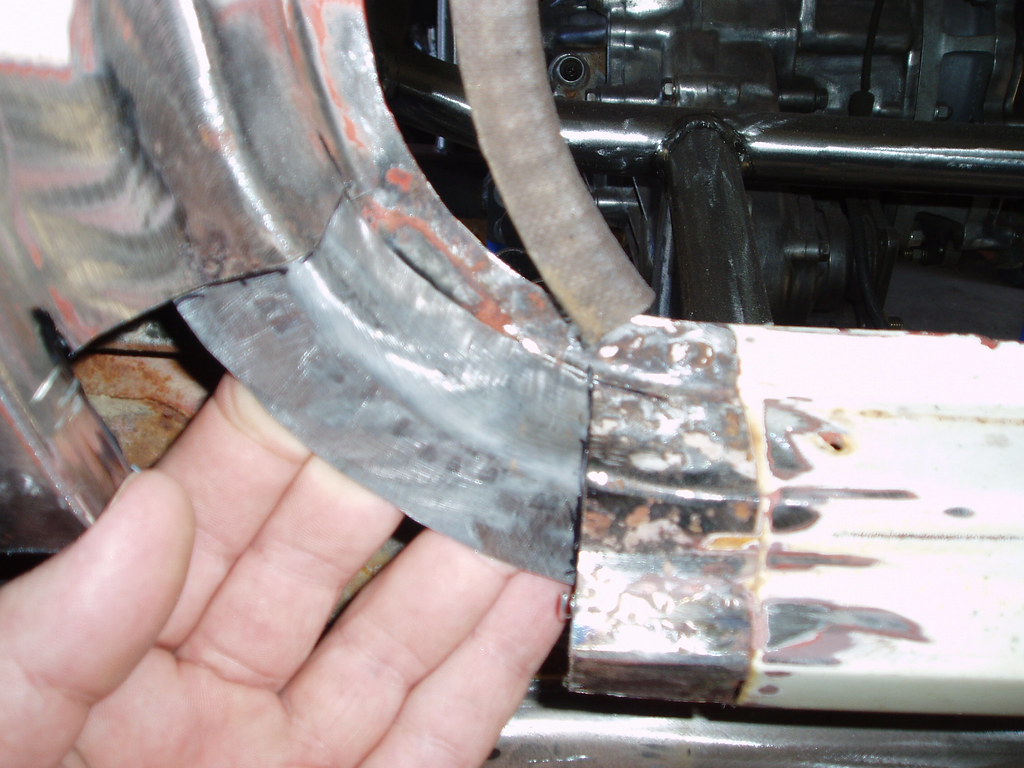 A few flat pieces and one piece rolled to follow the contour of the bottom of the cab were all welded in to match the driver’s side. The door gaps now all line up and no more cancer. 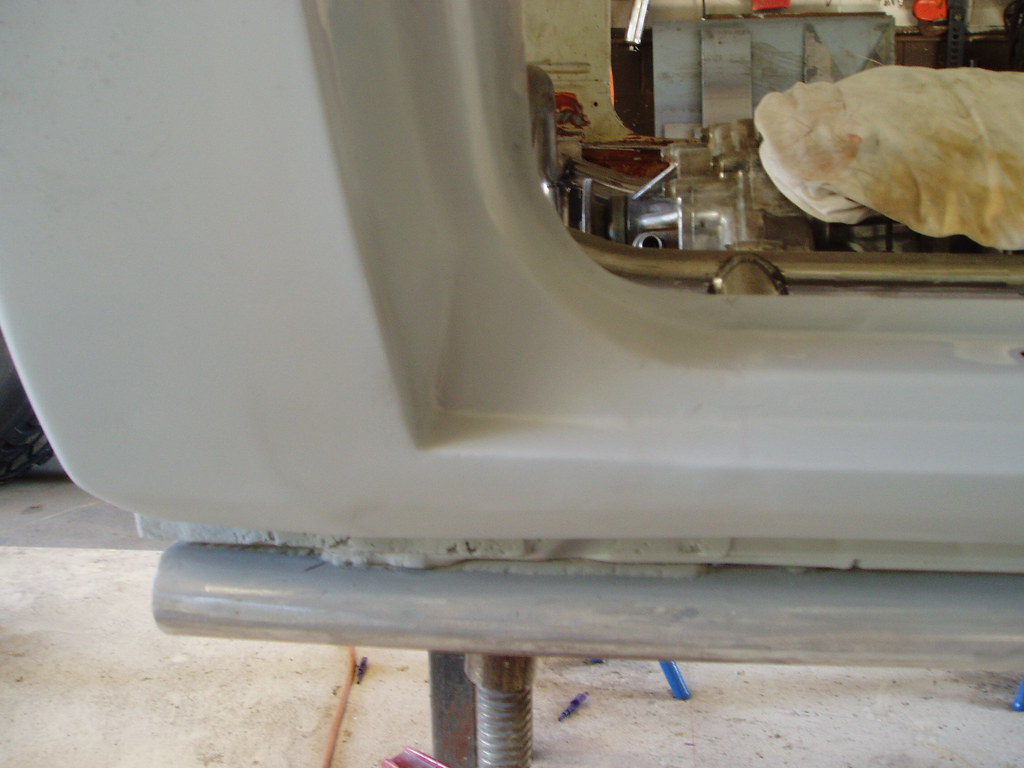 | |
|
  | |
NCFJ1
VENDOR - HFS

Posts : 225
Points : 5035
Join date : 2011-10-30
Location : Chesnee, SC
 |  Subject: Re: JP comes to life-A Truggy Build Subject: Re: JP comes to life-A Truggy Build  Thu Dec 08, 2011 9:40 pm Thu Dec 08, 2011 9:40 pm | |
| The Truggy mocked up with 37” tires. I am planning on using 39” tires but these will work for a while. 114” wheel base, front axle is moved forward 3” . It’ll have fiberglass fenders on the back half. Radiator, fuel cell, batteries, spare tire and storage in the rear.  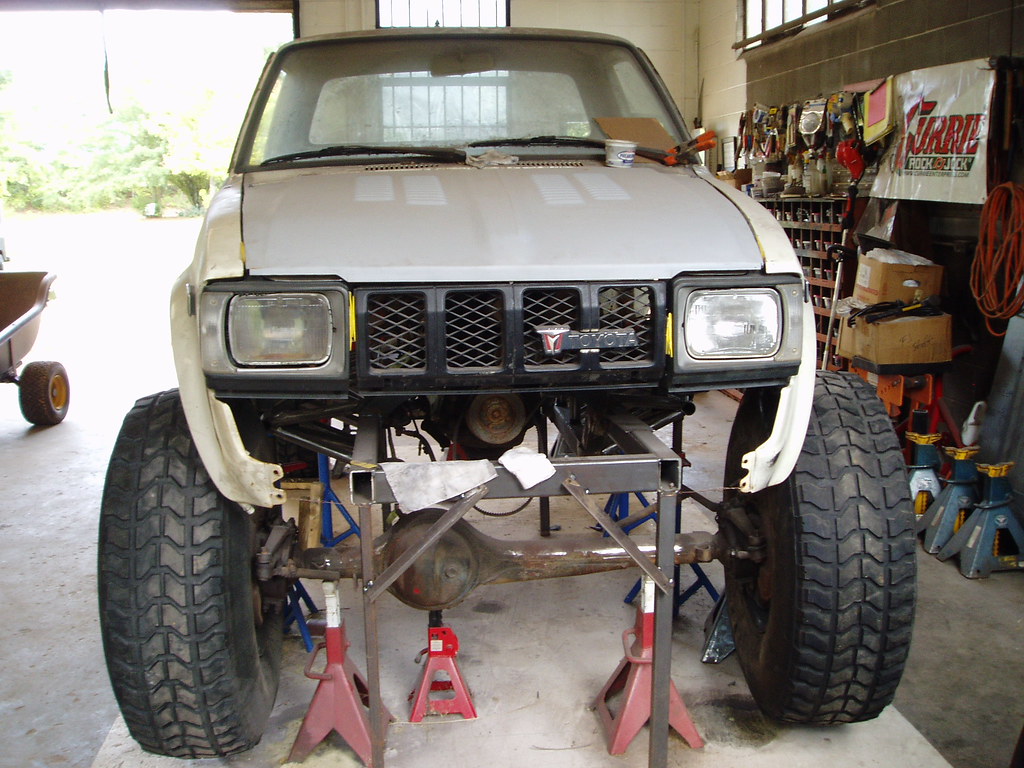 | |
|
  | |
NCFJ1
VENDOR - HFS

Posts : 225
Points : 5035
Join date : 2011-10-30
Location : Chesnee, SC
 |  Subject: Re: JP comes to life-A Truggy Build Subject: Re: JP comes to life-A Truggy Build  Thu Dec 08, 2011 9:40 pm Thu Dec 08, 2011 9:40 pm | |
| While I have been cleaning up the body work on the cab getting ready for paint, I’ve been working on the drawings for the back half tube work. Just a little glimpse of what I have so far. The main hoop will be inside the fiberglass rear fenders. The rear fenders will be flush with the cab at the front and taper back to a 36” “tailgate” The red line is the outline of the cab. The blue cross hatch is the main hoop and bracing. The green tubes comprise the rear frame section at the tail gate. I’m working on side and top views. Old school CAD. 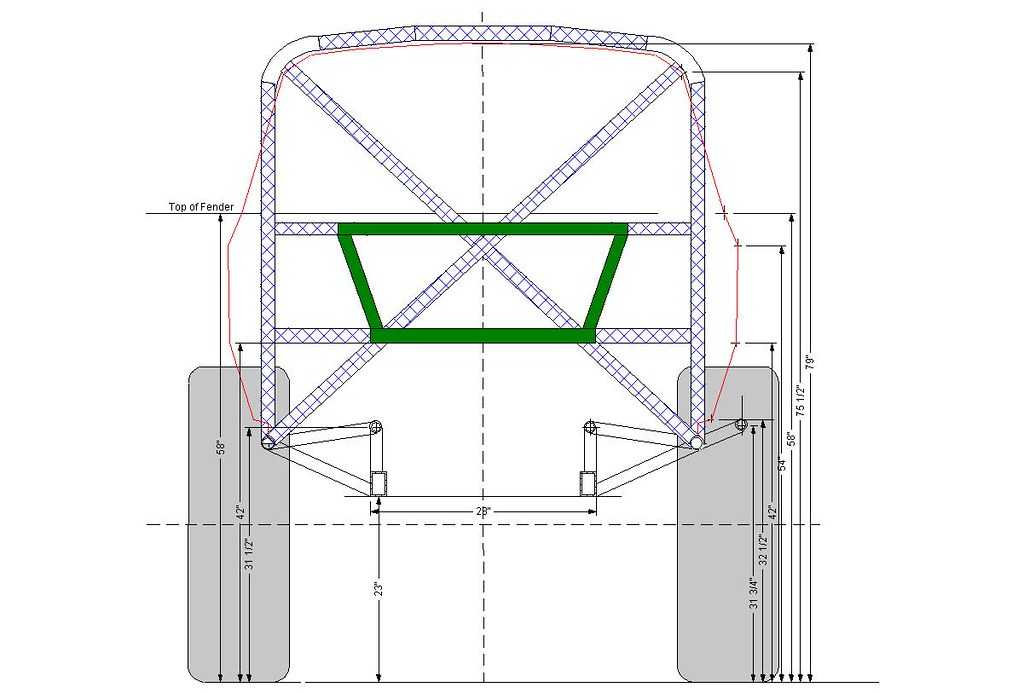 First draft of a side elevation. Green areas are radiator,fuel cell and battery. Radiator may end up in the front.  | |
|
  | |
NCFJ1
VENDOR - HFS

Posts : 225
Points : 5035
Join date : 2011-10-30
Location : Chesnee, SC
 |  Subject: Re: JP comes to life-A Truggy Build Subject: Re: JP comes to life-A Truggy Build  Thu Dec 08, 2011 9:41 pm Thu Dec 08, 2011 9:41 pm | |
| I've been working on getting the body work done on the cab so that I can paint it prior to starting the tube work for the back half and exo cage. I figure it will be far easier to paint it without all the tubes in the way. Pulled out the rear window and the windshield. I had to cut out 6 places where cancer had eaten through the rear of the cab alone. All the patch pannels are welded in and the back of the cab is primed out. Lots of work for just a clean body  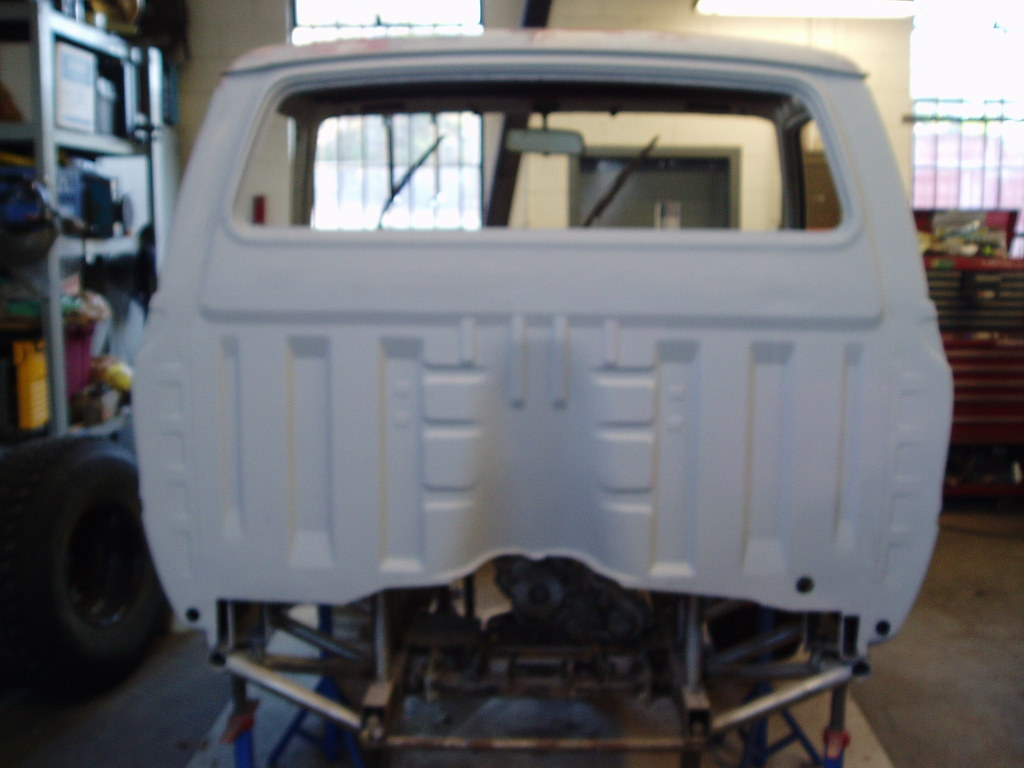 | |
|
  | |
85runner
Trail Scout

Posts : 458
Points : 5228
Join date : 2011-11-09
Age : 30
Location : Raleighwood
 |  Subject: Re: JP comes to life-A Truggy Build Subject: Re: JP comes to life-A Truggy Build  Thu Dec 08, 2011 10:04 pm Thu Dec 08, 2011 10:04 pm | |
| That thing looks like it'll be sweet. Makes me miss my old first gen. | |
|
  | |
bigdogdewey2
ADMINISTRATOR


Posts : 3697
Points : 8682
Join date : 2011-08-30
Age : 56
Location : High Point, NC
 |  Subject: i got to ask... Subject: i got to ask...  Thu Dec 08, 2011 10:49 pm Thu Dec 08, 2011 10:49 pm | |
| you dont still have the utility bed do you?? if you do are you still interested in selling? and well pm me ..im interested in it... | |
|
  | |
bigdogdewey2
ADMINISTRATOR


Posts : 3697
Points : 8682
Join date : 2011-08-30
Age : 56
Location : High Point, NC
 |  Subject: oh yeah .. Subject: oh yeah ..  Thu Dec 08, 2011 10:51 pm Thu Dec 08, 2011 10:51 pm | |
| By the way...AWESOME build...you really have some nice toys...like the new to you 60 series... | |
|
  | |
totald
SUPPORTING MEMBER

Posts : 1293
Points : 6305
Join date : 2011-05-09
Age : 48
Location : Moyock, NC
 |  Subject: Re: JP comes to life-A Truggy Build Subject: Re: JP comes to life-A Truggy Build  Thu Dec 08, 2011 11:42 pm Thu Dec 08, 2011 11:42 pm | |
| Holy crap you have talent! That is looking incredible. | |
|
  | |
tbulluck
Tail Gunner

Posts : 812
Points : 5821
Join date : 2011-05-11
Age : 45
Location : greenville, nc
 |  Subject: Re: JP comes to life-A Truggy Build Subject: Re: JP comes to life-A Truggy Build  Fri Dec 09, 2011 1:07 am Fri Dec 09, 2011 1:07 am | |
| holy crap...this whole project is awesome. keep posting | |
|
  | |
NCFJ1
VENDOR - HFS

Posts : 225
Points : 5035
Join date : 2011-10-30
Location : Chesnee, SC
 |  Subject: Re: JP comes to life-A Truggy Build Subject: Re: JP comes to life-A Truggy Build  Fri Dec 09, 2011 10:36 am Fri Dec 09, 2011 10:36 am | |
| - 85runner wrote:
- That thing looks like it'll be sweet. Makes me miss my old first gen.
Thanks, You still have a first Gen, only the bed is attached to the cab  | |
|
  | |
NCFJ1
VENDOR - HFS

Posts : 225
Points : 5035
Join date : 2011-10-30
Location : Chesnee, SC
 |  Subject: Re: JP comes to life-A Truggy Build Subject: Re: JP comes to life-A Truggy Build  Fri Dec 09, 2011 10:37 am Fri Dec 09, 2011 10:37 am | |
| - bigdogdewey2 wrote:
- you dont still have the utility bed do you?? if you do are you still interested in selling? and well pm me ..im interested in it...
Sorry, the utility bed is gone. Thanks | |
|
  | |
NCFJ1
VENDOR - HFS

Posts : 225
Points : 5035
Join date : 2011-10-30
Location : Chesnee, SC
 |  Subject: Re: JP comes to life-A Truggy Build Subject: Re: JP comes to life-A Truggy Build  Fri Dec 09, 2011 10:38 am Fri Dec 09, 2011 10:38 am | |
| - totald wrote:
- Holy crap you have talent! That is looking incredible.
Thanks much, appreciate it. | |
|
  | |
NCFJ1
VENDOR - HFS

Posts : 225
Points : 5035
Join date : 2011-10-30
Location : Chesnee, SC
 |  Subject: Re: JP comes to life-A Truggy Build Subject: Re: JP comes to life-A Truggy Build  Fri Dec 09, 2011 10:38 am Fri Dec 09, 2011 10:38 am | |
| - tbulluck wrote:
- holy crap...this whole project is awesome. keep posting
Thank you, hoping to get some time this weekend to work on it. | |
|
  | |
Sponsored content
 |  Subject: Re: JP comes to life-A Truggy Build Subject: Re: JP comes to life-A Truggy Build  | |
| |
|
  | |
| | JP comes to life-A Truggy Build |  |
|


