| | Speedrye build |  |
|
+19FiJiKrawl DamnItsAGlasgow SingleTrack planemechFJ Crazy Hube FJ Derek CarolinaCruiser15 yota15 fjdarrell ncorn38 totald Auto Solutions Snowdogyyz David B Darklight bigdogdewey2 NC FJ Driver Xx_Black-out Speedrye 23 posters |
|
| Author | Message |
|---|
bigdogdewey2
ADMINISTRATOR


Posts : 3697
Points : 8682
Join date : 2011-08-30
Age : 56
Location : High Point, NC
 |  Subject: Re: Speedrye build Subject: Re: Speedrye build  Thu May 02, 2013 9:17 pm Thu May 02, 2013 9:17 pm | |
| so which lights are you gonna be running in those holes? | |
|
  | |
SingleTrack
Trail Scout


Posts : 267
Points : 4682
Join date : 2012-11-25
Age : 47
Location : Greensboro, NC
 |  Subject: Re: Speedrye build Subject: Re: Speedrye build  Thu May 02, 2013 9:19 pm Thu May 02, 2013 9:19 pm | |
| Ryan that looks awesome. Can't wait to see it finished | |
|
  | |
Guest
Guest
 |  Subject: Re: Speedrye build Subject: Re: Speedrye build  Thu May 02, 2013 9:24 pm Thu May 02, 2013 9:24 pm | |
| Looks great Ryan. You might need to leave a little more room for upward flex. I was surprised how much there is. |
|
  | |
Speedrye
Trail Guide


Posts : 1050
Points : 6038
Join date : 2011-08-30
Location : Stokesdale, NC
 |  Subject: Re: Speedrye build Subject: Re: Speedrye build  Thu May 02, 2013 9:34 pm Thu May 02, 2013 9:34 pm | |
| I won't have much upward flex since I've got a top mount frame bracket (in addition to the standard lower frame mount) but it's got as much clearance as the ARB had and I never had issues. With the body lift, I have different anchoring options than most people.
Mike, the lights are still up in the air a bit, but the large hole in the bottom will have a 18"-22" LED bar of some variety and the 7" holes will end up with four 35w bi-xenon HIDs in each for a total of eight HIDs. I'll do two yellow/amber in each and two 4300k white lights in each and these will be my day to day driving lights. Yellow for inclement weather and white for normal driving. The LEDs will be for all out blind-the-heck-out-of-everyone lighting. | |
|
  | |
Speedrye
Trail Guide


Posts : 1050
Points : 6038
Join date : 2011-08-30
Location : Stokesdale, NC
 |  Subject: Re: Speedrye build Subject: Re: Speedrye build  Sat May 25, 2013 10:56 pm Sat May 25, 2013 10:56 pm | |
| Weather has been terrible for weeks and weeks for painting, but I've finally got some painting done. For now, I'm just using the old Hellas in the holes and some Rigids I had around (  ) for the underside until I make final decisions on new lights. I'm waiting on my fairlead to show up before I cut/drill the center plate for it. I'm getting to the point where I'm going to stare at it for awhile now to figure out exactly what I want to do for the wings...     | |
|
  | |
FJ Derek
SUPPORTING MEMBER


Posts : 571
Points : 5132
Join date : 2012-07-12
Age : 39
Location : Greensboro
 |  Subject: Re: Speedrye build Subject: Re: Speedrye build  Sat May 25, 2013 11:12 pm Sat May 25, 2013 11:12 pm | |
| | |
|
  | |
DamnItsAGlasgow
Tail Gunner

Posts : 889
Points : 5593
Join date : 2012-04-09
Age : 39
Location : Charlotte
 |  Subject: Re: Speedrye build Subject: Re: Speedrye build  Tue May 28, 2013 8:54 am Tue May 28, 2013 8:54 am | |
| | |
|
  | |
JiveTurkey0514
Trail Scout


Posts : 87
Points : 4361
Join date : 2013-03-25
Location : Pickens, SC
 |  Subject: Re: Speedrye build Subject: Re: Speedrye build  Tue May 28, 2013 9:02 am Tue May 28, 2013 9:02 am | |
| Mad props for your fabbing skills.... I like it a lot | |
|
  | |
Cbeck
Greenhorn

Posts : 16
Points : 4221
Join date : 2013-05-27
Location : Jacksonville NC
 |  Subject: Re: Speedrye build Subject: Re: Speedrye build  Tue May 28, 2013 1:02 pm Tue May 28, 2013 1:02 pm | |
| I'm slowly blacking out my yellow 07 fj. What did you use for all the silver parts? Any advice? | |
|
  | |
Speedrye
Trail Guide


Posts : 1050
Points : 6038
Join date : 2011-08-30
Location : Stokesdale, NC
 |  Subject: Re: Speedrye build Subject: Re: Speedrye build  Tue May 28, 2013 4:28 pm Tue May 28, 2013 4:28 pm | |
| Satin Black Rustoleum #7777 from Lowes. I removed the parts, sanded/scuffed them up with scotchbrite or sandpaper, cleaned them up well and painted. Paint a light layer, wait a few minutes until the paint looks tacky and do another light layer. Repeat for 4-6 light coats, let dry as needed. Reinstall.
I've now used it on my front grill, handles, mirrors, roof, bumper wings, bumpers, skid plates and a few other places with great success. | |
|
  | |
Speedrye
Trail Guide


Posts : 1050
Points : 6038
Join date : 2011-08-30
Location : Stokesdale, NC
 |  Subject: Re: Speedrye build Subject: Re: Speedrye build  Mon Jun 03, 2013 8:05 pm Mon Jun 03, 2013 8:05 pm | |
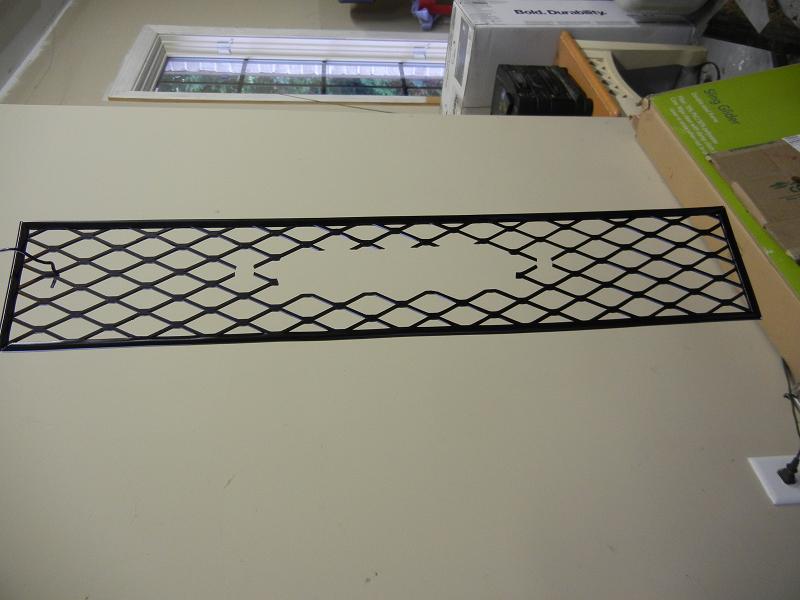
| Next step: Center Section Detailing It took awhile, but the clearance fairlead finally showed up from Amazon. I sanded down the polished billet and painted it a satin black to match. When I install the winch down the road, I'll clean up the synthetic rope's rub points to keep the rope clean, but for now, it's black. For the center section, I've envisioned something to mimic the stock grill. As you can see from the sketch in my first post, I'm keeping true to my initial idea (so far). I picked up some 3/4" expanded steel from Home Depot. It's cut to fit, and I painted it satin black as well. I used adhesive u-shaped door edge trim to trim the outside edges to keep things from scratching. It ended up a simple and inexpensive grill. Bolt it all up and it gives me the look I was going for while matching the stock grill almost perfectly. The grill doesn't look straight in the pictures due to some odd reflections, but it's almost perfectly straight. I've also started playing with some PVC piping and mocking up the bumper wings, but there's nothing finalized on that design yet.    | |
|
  | |
Guest
Guest
 |  Subject: Re: Speedrye build Subject: Re: Speedrye build  Mon Jun 03, 2013 8:13 pm Mon Jun 03, 2013 8:13 pm | |
| I bought one of these a few weeks ago. It might be an option to keep the lead black and not dirty the line. |
|
  | |
Speedrye
Trail Guide


Posts : 1050
Points : 6038
Join date : 2011-08-30
Location : Stokesdale, NC
 |  Subject: Re: Speedrye build Subject: Re: Speedrye build  Mon Jun 03, 2013 8:56 pm Mon Jun 03, 2013 8:56 pm | |
| Powdercoating would probably work and I'll see how the paint holds up through a loaded pull, but I think it'll likely rub it off. Either way, the polished billet looked like crap on my truck. | |
|
  | |
Guest
Guest
 |  Subject: Re: Speedrye build Subject: Re: Speedrye build  Mon Jun 03, 2013 8:59 pm Mon Jun 03, 2013 8:59 pm | |
| http://www.ebay.com/itm/10-8000-15000LB-Universal-Aluminum-Hawse-Fairlead-Synthetic-Winch-Rope-SUV-/120957350542?pt=Motors_ATV_Parts_Accessories&hash=item1c299eb28e&vxp=mtr
HA, I forgot to put the link. |
|
  | |
Speedrye
Trail Guide


Posts : 1050
Points : 6038
Join date : 2011-08-30
Location : Stokesdale, NC
 |  Subject: Re: Speedrye build Subject: Re: Speedrye build  Mon Jun 03, 2013 9:14 pm Mon Jun 03, 2013 9:14 pm | |
| Looks like the same one I got, just black. I don't like any logos though, so I'd have to fill the 4x4 logo and repaint it anyway, so it was probably easier and cheaper to go the way I did. I wonder what kind of finish that is... | |
|
  | |
Guest
Guest
 |  Subject: Re: Speedrye build Subject: Re: Speedrye build  Mon Jun 03, 2013 9:18 pm Mon Jun 03, 2013 9:18 pm | |
| It seems anodized. It's not a coating. |
|
  | |
iwashmycar
Tail Gunner


Posts : 629
Points : 5067
Join date : 2012-10-07
Age : 39
Location : Newport News, VA
 |  Subject: Re: Speedrye build Subject: Re: Speedrye build  Tue Jun 04, 2013 8:16 am Tue Jun 04, 2013 8:16 am | |
| Anodizing is a coating!  It does rub off (eventually) but it does it gradually, as the line sort of "buffs" it off. Good anodizing (if it is good) it TOUGH stuff. Took me like 2 hours to wire wheel black anodizing off of my LCA skids after I bought them. Bumper looks tough. I am curious to see the rest of it come together. Any plans for a hoop on top? Or not because it is already painted? I know you mentioned PVC to mock up the wings.... are you going to also have any plate on them? Kind of like how Demello did their Baja bumper or whatever it was? | |
|
  | |
Speedrye
Trail Guide


Posts : 1050
Points : 6038
Join date : 2011-08-30
Location : Stokesdale, NC
 |  Subject: Re: Speedrye build Subject: Re: Speedrye build  Tue Jun 04, 2013 8:57 am Tue Jun 04, 2013 8:57 am | |
| Nah, no hoop on top. The only reasons I can see for a hoop would be driving through open vegetation or hitting animals. Since I stay on trails, the vegetation isn't much of a problem. The only animal I worry about hitting is a moose since I'm high enough to handle most deer. Luckily there aren't many moose in this area and I don't go to Maine as often as I'd like.
Your question about the wings is a good one and I have no idea. I don't think tubes alone will match the style of the bumper, so I think some plate will be involved, but I've also got to work in some lights on the wings as well, so... yeah. I like what Demello did on the Baja bumper but it won't quite work for what I'm thinking of doing. I'm still torn at this point. I know there's a happy medium in what I want to do and I know I can do it, but I have to figure out how to get there.
As an added bonus, since installing the center section of the bumper, I'm getting almost a full 1mpg better in general over the complete lack of a bumper I was running with for a while. | |
|
  | |
iwashmycar
Tail Gunner


Posts : 629
Points : 5067
Join date : 2012-10-07
Age : 39
Location : Newport News, VA
 |  Subject: Re: Speedrye build Subject: Re: Speedrye build  Tue Jun 04, 2013 9:10 am Tue Jun 04, 2013 9:10 am | |
| Makes sense. a couple tubes with plate infilling like the center would make sense. Maybe just cap it off at the very ends with a pointy boxed form to tie into the flares (like the Demello) EDIT: actually not too shabby  | |
|
  | |
Speedrye
Trail Guide


Posts : 1050
Points : 6038
Join date : 2011-08-30
Location : Stokesdale, NC
 |  Subject: Re: Speedrye build Subject: Re: Speedrye build  Tue Jun 04, 2013 9:26 am Tue Jun 04, 2013 9:26 am | |
| Nice! That's not far from what I'm thinking, but I'm planning on another tube running down to the area just in front of the body mount near the main mounting bolts for the bumper. The lower triangle formed by doing that will probably be where the lights go. | |
|
  | |
iwashmycar
Tail Gunner


Posts : 629
Points : 5067
Join date : 2012-10-07
Age : 39
Location : Newport News, VA
 |  Subject: Re: Speedrye build Subject: Re: Speedrye build  Tue Jun 04, 2013 10:00 am Tue Jun 04, 2013 10:00 am | |
| That sounds like a great plan. Will really look cohesive with a 3rd tube and some plate! | |
|
  | |
Speedrye
Trail Guide


Posts : 1050
Points : 6038
Join date : 2011-08-30
Location : Stokesdale, NC
 |  Subject: Re: Speedrye build Subject: Re: Speedrye build  Thu Jun 06, 2013 11:02 pm Thu Jun 06, 2013 11:02 pm | |
| Bumper needed a break. Well, I needed a break from the bumper...
Brian's old Ricochet lower A-arm skids are installed, so most of the front is now protected. Also got a full set of four Toyoutfitter rear links on the way as well! If I can find the time to swap out my front spindles for the gusseted ones I've got sitting in the garage, I'll be mostly beefed up to my satisfaction! There are a few small things left under there to take care of, but that's most of it. I'll post pictures when I have more time. | |
|
  | |
Guest
Guest
 |  Subject: Re: Speedrye build Subject: Re: Speedrye build  Thu Jun 06, 2013 11:27 pm Thu Jun 06, 2013 11:27 pm | |
| - iwashmycar wrote:
- Makes sense. a couple tubes with plate infilling like the center would make sense. Maybe just cap it off at the very ends with a pointy boxed form to tie into the flares (like the Demello)
EDIT: actually not too shabby
 Nice shop job. I thought I missed an update for a second. I wished I was this good at PS. I look forward to this continuing. |
|
  | |
Speedrye
Trail Guide


Posts : 1050
Points : 6038
Join date : 2011-08-30
Location : Stokesdale, NC
 |  Subject: Re: Speedrye build Subject: Re: Speedrye build  Tue Jun 11, 2013 9:06 pm Tue Jun 11, 2013 9:06 pm | |
| Got the center section of the bumper done. Also a big thanks to Brian for the good deal on the front A-arm skids! I've been playing with some ideas on the wings, but so far, nothing I like:  Well, I've been busy with work while parts are stockpiling for the FJ. The whole front suspension will come apart with new gusseted spindles, CVs, brake rotors and brake pads going in. I'll probably replace the bearings while I'm there since I'm approaching 100k miles but at $105 for each bearing, I might leave them alone... On the back end, the lower link frame mounts will be cut off, the gas tank will be dropped and some HEAVY DUTY Ruffstuff mounts will be welded to the frame. The ugly blue will be ground off the lower rear Toyoutfitters links with a fresh coat of black or green going on them. Parts getting lonely:  | |
|
  | |
Speedrye
Trail Guide


Posts : 1050
Points : 6038
Join date : 2011-08-30
Location : Stokesdale, NC
 |  Subject: Re: Speedrye build Subject: Re: Speedrye build  Tue Jul 16, 2013 10:48 pm Tue Jul 16, 2013 10:48 pm | |
| Well, I've found enough time to strip all those control arms down to bare metal, prime them and paint them in a nice satin black to match the rest of the truck. Hopefully I'll find a few minutes this week to install them and take those POS bent Toyota arms out from under there. On a side note, I don't have enough light on the front of the truck, so I'm working on adding some more custom lights to the front for daily driving duties (these will be in the large holes in the bumper). VW Golf Mark II headlights stripped down and modified to fit some Retrofit Source FX-R bi-xenon HID projectors. This will be a slow build because I'm trying to do it right. On a side note, I'm considering making them auto-leveling my using some pneumatic air pistons mounted to the lights and to the center of the front sway bar. In the past I've had problems blinding people when the HID cutoff rises when accelerating and I can't see too much when braking due to brake dive. If nothing else, it'll be fun to play with. Just beginning:    | |
|
  | |
Sponsored content
 |  Subject: Re: Speedrye build Subject: Re: Speedrye build  | |
| |
|
  | |
| | Speedrye build |  |
|


