| | Speedrye build |  |
|
+19FiJiKrawl DamnItsAGlasgow SingleTrack planemechFJ Crazy Hube FJ Derek CarolinaCruiser15 yota15 fjdarrell ncorn38 totald Auto Solutions Snowdogyyz David B Darklight bigdogdewey2 NC FJ Driver Xx_Black-out Speedrye 23 posters |
|
| Author | Message |
|---|
Speedrye
Trail Guide

Posts : 1050
Points : 5827
Join date : 2011-08-30
Location : Stokesdale, NC
| Subject: Speedrye build  Fri Feb 10, 2012 12:02 am Fri Feb 10, 2012 12:02 am | |
|  ^As she stands now^ Obviously any truly loved FJ is a work in progress and mine is no exception. She has no name yet, but I've never been the type to name vehicles either. I purchased her used up in Washington DC in February of 2010 with 32k miles on her. She's originally a March 2006 build, 2007 model year, California truck. I don't have any pictures of her stock since I added the wheels and tires within the first month. I needed mud tires more than anything, so thus it begins:  Exterior mods: 17x9 Liquid Metal Gatlin wheels Kumho KL71 315/70-17 tires Toytec adjustable front coilovers on Bilstein 5100s w/ silver Eibachs Light Racing upper control arms Toytec superflex rear springs with Icon shocks 4Crawler 1.25" body lift URD short shifter kit Ricochet skid plates (not the whole set yet, but I'm working on it) Speedrye custom front bumper Blacked out everything including roof Toyota rock rails Toyoutfitter rear lower links Ugly body mount chop Baja Designs 20" ONX bar in lower bumper opening Hella 700FFs with 100w upgraded bulbs (2) Rigid SR 10" Specter bars on hood Rigid Dually floods in rear bumper wings Amber bulbs in mirrors Custom rack mounts for shovel, jack, etc. 3' Firestik CB antenna custom mounted on front panel Matching 3' Firestik replacing AM/FM antenna Interior mods: Uniden 520XL custom mounted between cupholders JVC head unit Infinity 3.5" front and rear small speakers Alpine 6"x9" front door speakers 1/0 gauge wire to rear with distribution block MB Quart amp for sub and front Alpines Boston Pro 12" sub in custom hidden enclosure Very custom Cooper Bussmann fuse box under hood to power most everything aftermarket in the truck Rewired steering wheel controls to power aftermarket lights A-Trac hack and VSC Switch added Custom dome light/map lights from a busted Mustang 9" quad-view monitor flush mounted in driver's side sun visor Dark window tint on front windows Sonar switch rewired to also defeat reverse lights and backup camera MPAC shifter rack Custom passenger side dash-mount storage rack Custom carpeted rear shelf with tie downs, net, and hidden subwoofer Heated front seats Other mods: LED reverse bulb replacements Magnaflow muffler replacement The Source 10lb CO2 kit with adjustable regulator I'll have to think more about this... Future mods: Working on a 4-camera system for the 9" monitor in the sun visor. Replace front brakes (new rotors and EBC pads in garage) Replace CVs (new CVs sitting in garage) Upgrading CV clamps to stop leaking (CV bands in garage) custom operable rear side windows (spare windows in garage) custom gusseted spindles (sitting in garage) Toyoutfitters rear upper links (sitting in garage) Ruff Stuff lower link weld-on mounts (in garage) LED rear cargo lighting (LEDs and wiring in garage) body mount chop (chopped so far, but not welded) still need to make some front bumper wings, but the parts are now here Finish the four HIDs for the front bumper (all parts in garage) rock lighting?? winch
Last edited by Speedrye on Sat Sep 28, 2013 10:27 pm; edited 23 times in total | |
|
| | |
Xx_Black-out
South Carolina Liaison


Posts : 433
Points : 5078
Join date : 2011-10-29
Age : 36
Location : Easley, SC
| | Subject: Re: Speedrye build Fri Feb 10, 2012 6:13 am | |
| Looking good! Can you get a picture of how you mounted the Firestik? | |
|
| | |
Speedrye
Trail Guide
Posts : 1050
Points : 5827
Join date : 2011-08-30
Location : Stokesdale, NC
| | Subject: Re: Speedrye build Fri Feb 10, 2012 9:39 am | |
| Yeah, I'll have more pictures coming in the next few days, but I had to start somewhere! It's about time I finally got around to doing a build thread... | |
|
| | |
Speedrye
Trail Guide
Posts : 1050
Points : 5827
Join date : 2011-08-30
Location : Stokesdale, NC
| | Subject: Re: Speedrye build Sat Feb 11, 2012 11:57 pm | |
| This whole build has been on a tight budget and many parts are used, clearance or on sale at the very least. I've sold off most stock parts to make up the cost difference when possible. The first thing I did when I bought it used was replace the wheels and tires since I needed mud tires for the deep mud I always seem to be in on job sites. I have an idea of what I want the truck to be, and when I find great deals on parts that fit into that plan, I try to buy them, even if it's not the ideal time to do so because I know it'll save a lot of money in the end. Next up was selling the stock running boards and replacing them with OEM Toyota rock rails I picked up used in Charlotte for $100. The stock sound system was lacking bass pretty bad, so I removed the stock sub, sold it and replaced it with a Boston Pro series 12" sub I had sitting around in the basement. Power comes from an old MTX class D amp that I also had laying around. I rewired the whole power inverter circuit from Toyota and used it to power my amp. A high level input was tapped into at the stock subwoofer wiring harness. The really custom part to all of this was the sub enclosure. I felt that a shelf across the rear cargo area would give me more usable space, but I didn't want to lose the large flat surface area that I was creating with my subwoofer. Instead, I flush mounted the sub down into the shelf with a box built integrally below the shelf. The amp is also flush mounted onto the rear of the box with all wires hidden. The shelf is topped off with carpet, airline track and fasteners to use as tiedowns. A cargo net attaches to some of the fasteners to keep things like groceries from tumbling around. In the picture below, you can see the silver amp under the shelf. The subwoofer is directly above that facing up with a grill over it for protection. The final result gives me a lot of space and a subwoofer and amp that are hidden from prying eyes.  | |
|
| | |
Speedrye
Trail Guide
Posts : 1050
Points : 5827
Join date : 2011-08-30
Location : Stokesdale, NC
| | Subject: Re: Speedrye build Sun Feb 12, 2012 12:05 am | |
| I've always had black trucks, and the silver accents started to bother me, so blacking everything out came up next. Multiple cans of Satin Black Rustoleum and some free time ended up with no more silver parts. I opted to remove the front bumper wings altogether since I knew I'd rip them off anyway. Around the same time, I found a vendor that was getting rid of it's last Toytec lift for very cheap. It was unassembled and didn't come with the sway bar drop, but it did come with the heavier duty silver Eibachs. Since it was hundreds cheaper than any other Toytec options, I couldn't pass it up. I ordered the sway bar kit and some Superflex springs from Toytec to finish off the look. I left the stock rear shocks on for awhile until I found a good deal on some used ICONs months later. Huge difference in looks now! Picture below is from last years Leith show:  | |
|
| | |
Speedrye
Trail Guide
Posts : 1050
Points : 5827
Join date : 2011-08-30
Location : Stokesdale, NC
| | Subject: Re: Speedrye build Sun Feb 12, 2012 12:15 am | |
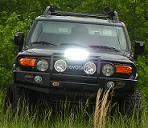
| I love light at night and don't feel like I could get enough. I've got multiple Quickfists in the rear holding two Maglites and a separate LED headlamp I keep in the toolbag. On the outside, I started with some Hella 700FF lights which were nice, but didn't give me enough to start with. Upgrading to 100w bulbs helped a lot, but the LED light bars I kept seeing started to call my name. After finding an incredible deal on Ebay, I picked up a new 10" Rigid SR Specter driving light bar. Like the Hellas, I used Toyota OEM switches to keep the factory look in the dash. I wired these as standalone though so I could use them anytime, ignition on or not. I'd wanted to put lights in the hood scoop for awhile so I finally found a good light for it (even though I'd really like a 20" bar). A LOT of work later, I had the light mounted and it was frickin AWESOME! It took longer to install this light than the whole suspension though that's due in large part to my anal nature.  | |
|
| | |
Speedrye
Trail Guide
Posts : 1050
Points : 5827
Join date : 2011-08-30
Location : Stokesdale, NC
| | Subject: Re: Speedrye build Sun Feb 12, 2012 12:35 am | |
| Next up, I needed some communications equipment! I thought for a long time about this and was specifically looking for a small unit with good reviews. I didn't want to lose any space in the main cabin for the radio, so my initial plan was to dissect the radio, remove the faceplate and remote mount the body while connecting the two via ribbon cable. After getting the Uniden 520XL and opening it up, I realized this wasn't gonna happen. So I started looking for a place in the interior that was wasted for lack of better words. I saw there was a lot of space under the cupholders (since I have a 6MT) and chose to mount the CB between the cupholders, facing up. It fit, though it's very very tight. There's no room on the backside for the antenna cable, so I created a new connector that didn't stick out more than 1/16" so it would clear the transmission tunnel below the CB. 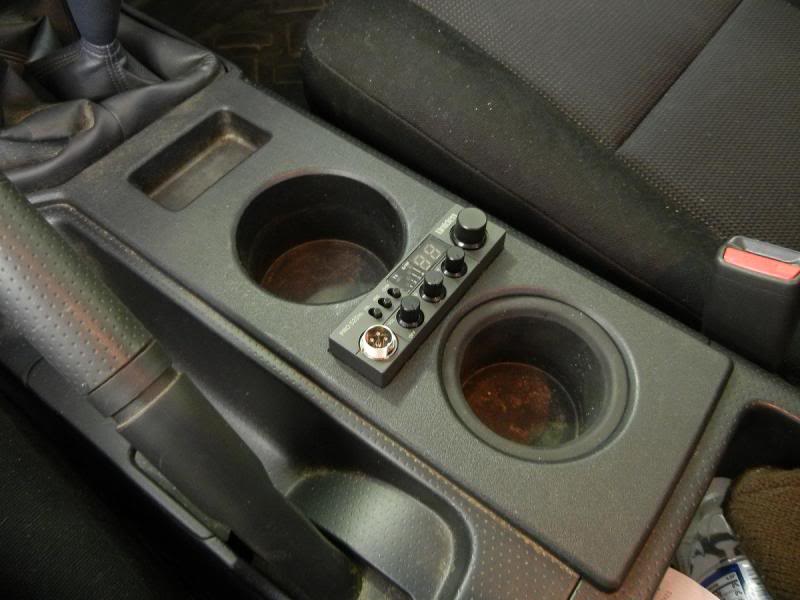 That leads me to the antenna mount. Sure, I considered the Bandi mount but decided to do something unique, just because I could. The previous owner had the windshield replaced by a terrible company and they screwed up a lot of stuff. Among the problems was the small panels flanking the windshield. All of the clips had been broken but the passenger side was at least held on by the FM antenna. The driver's side one was in danger of flying off at any point, so I chose this location for the antenna. I assumed it was a mirrored version of the passenger side and was correct. On the bottom side of it, there was a perfect space to drill through to mount the antenna to match the FM antenna on the other side. Drilling through was the easy part. Mounting the antenna took a bit more work. I fabricated a Z-bracket that went under the hood hinge mounting bracket and had it welded to the body for a good solid ground. Attaching the antenna was then easy and I used a spring for the antenna. I wrapped the spring tightly in electrical tape to keep the black theme going. To hide the hole in the body panel, I spent $1 at Lowes and picked up a small plumbing gasket that fits perfectly. All pretty and functional now, and I no longer have to worry about the body panel flying off! A close picture will follow, but this'll have to do for now: 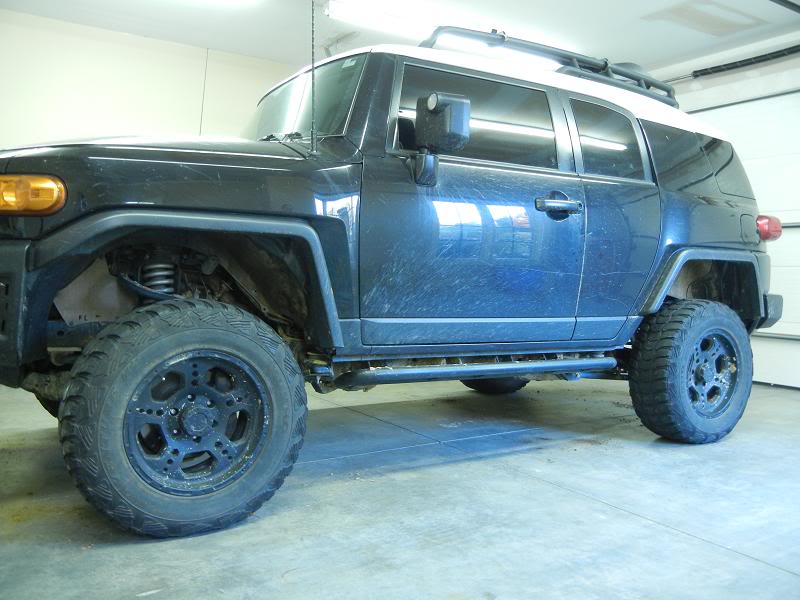 | |
|
| | |
Speedrye
Trail Guide
Posts : 1050
Points : 5827
Join date : 2011-08-30
Location : Stokesdale, NC
| | Subject: Re: Speedrye build Fri Feb 17, 2012 9:56 pm | |
| Better picture of where I mounted the CB antenna (unfortunately I don't have any of the install):  | |
|
| | |
NC FJ Driver
Gunner


Posts : 1551
Points : 6286
Join date : 2011-05-09
Age : 61
Location : Raeford, NC
| | Subject: Re: Speedrye build Sat Feb 18, 2012 10:38 am | |
| Really great job with the antenna...looks like it came that way from Japan! I didnt even consider that as an option when doing mine. | |
|
| | |
Xx_Black-out
South Carolina Liaison
Posts : 433
Points : 5078
Join date : 2011-10-29
Age : 36
Location : Easley, SC
| | Subject: Re: Speedrye build Sun Feb 19, 2012 2:17 am | |
| Awesome, thats clean looking! Thanks for getting that pic. | |
|
| | |
Speedrye
Trail Guide
Posts : 1050
Points : 5827
Join date : 2011-08-30
Location : Stokesdale, NC
| | Subject: Re: Speedrye build Wed Mar 14, 2012 9:13 pm | |
| Okay, it looks like some grinding might be in my future! I'm starting by trying to fit the spare in the stock location and keeping the window operable, so I'm pretty sure the stock bumper is gonna be cut up even more. I tried flipping the bracket, but the tire still hit the bumper and the wiper arm. At some point in the next week or two I'll be installing the UCAs and doing a BMC and seeing what else needs to be ground off to make things fit... 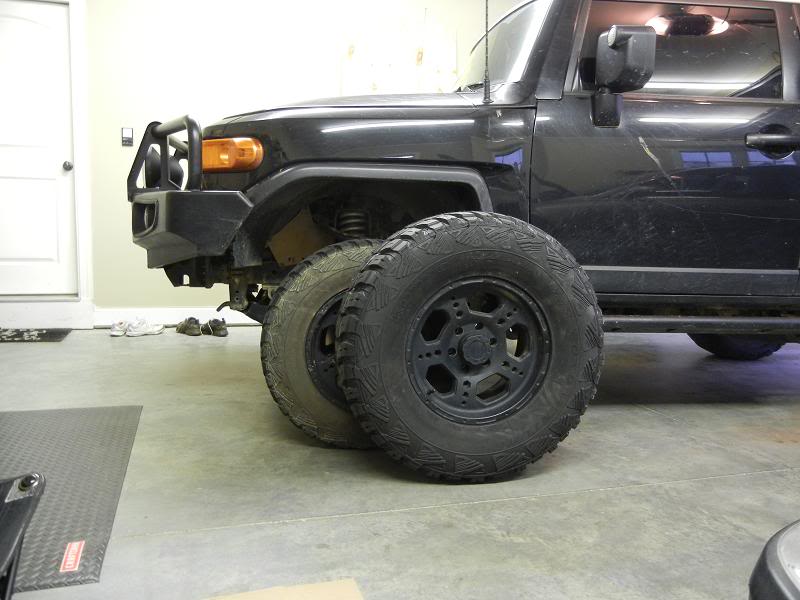 | |
|
| | |
bigdogdewey2
ADMINISTRATOR

Posts : 3697
Points : 8471
Join date : 2011-08-30
Age : 55
Location : High Point, NC
| | Subject: Re: Speedrye build Wed Mar 14, 2012 9:24 pm | |
| i have ONE ALLPROOFFROAD wheel spacer if you want that to pull the tire and rim away from the door abit so it doesnt hit the bumper and wiper... | |
|
| | |
Speedrye
Trail Guide
Posts : 1050
Points : 5827
Join date : 2011-08-30
Location : Stokesdale, NC
| | Subject: Re: Speedrye build Wed Mar 14, 2012 9:29 pm | |
| I appreciate it, but I need to have the window operable as well and I'm several inches away from that currently... | |
|
| | |
Speedrye
Trail Guide
Posts : 1050
Points : 5827
Join date : 2011-08-30
Location : Stokesdale, NC
| | Subject: Re: Speedrye build Thu Mar 15, 2012 10:55 pm | |
| Okay, got that beast to fit on the stock spare tire holder with the window opening still but the bumper got trimmed some. Once I get that patched back up, I'll post some pictures. I also got the driver's side body mount cut back and ready to weld. It's amazing what I can get done when nothing's on TV! | |
|
| | |
bigdogdewey2
ADMINISTRATOR
Posts : 3697
Points : 8471
Join date : 2011-08-30
Age : 55
Location : High Point, NC
| | Subject: Re: Speedrye build Thu Mar 15, 2012 11:06 pm | |
| i bet that spacer would have done the trick...
| |
|
| | |
Speedrye
Trail Guide
Posts : 1050
Points : 5827
Join date : 2011-08-30
Location : Stokesdale, NC
| | Subject: Re: Speedrye build Thu Mar 15, 2012 11:12 pm | |
| Haha, only if it was a 3"+ spacer. It wasn't even close to fitting! | |
|
| | |
Speedrye
Trail Guide
Posts : 1050
Points : 5827
Join date : 2011-08-30
Location : Stokesdale, NC
| | Subject: Re: Speedrye build Sat Mar 17, 2012 9:04 pm | |
| Okay, I finished chopping the body mounts. Thank you sawzall and grinder. They aren't the prettiest, but they should work. I've gotta get them welded at some point, just for some peace of mind. I'll try to get some pics tomorrow.
I also installed my Light Racing UCAs today as well. Man, that was easy, I was expecting more work based on other things I've read. I think the body lift made things more spacious and easier to work on. All told, I ended up with 1 1/2 hours in them from first jacking the truck up to having everything (tools and all) cleaned up and back in place. | |
|
| | |
Speedrye
Trail Guide
Posts : 1050
Points : 5827
Join date : 2011-08-30
Location : Stokesdale, NC
| | Subject: Re: Speedrye build Sun Mar 18, 2012 9:19 pm | |
| Okay, no pics of yesterday's work since I was busy again on the FJ today.
I finally ran two pairs of RCA cables from the head unit back to the amps. Much better sound and control than the line level inputs offered. I also ran a 1/0 power cable back to a distribution block in the back and ran some 4 gauge wires to power the amps. I've now got enough power in the back to do most anything I want. The wiring is still ugly for now since I'm not 100% sure what my end goal is yet, but it'll get prettier once I figure that out. | |
|
| | |
Speedrye
Trail Guide
Posts : 1050
Points : 5827
Join date : 2011-08-30
Location : Stokesdale, NC
| | Subject: Re: Speedrye build Mon Mar 19, 2012 7:01 pm | |
| Okay, combined picture showing the rough chop (unwelded to the body mount and most of the Light Racing UCA. As I said, it's a bit ugly, but it should work since I'm only 1/4" or so from the body mount.  | |
|
| | |
Speedrye
Trail Guide
Posts : 1050
Points : 5827
Join date : 2011-08-30
Location : Stokesdale, NC
| | Subject: Re: Speedrye build Mon Mar 19, 2012 7:04 pm | |
| Okay, next mod showed up in the mail today!! I finally got another 3' Firestik to replace the AM/FM antenna and match my CB antenna on the other side. Not the best pics, but you get the idea:  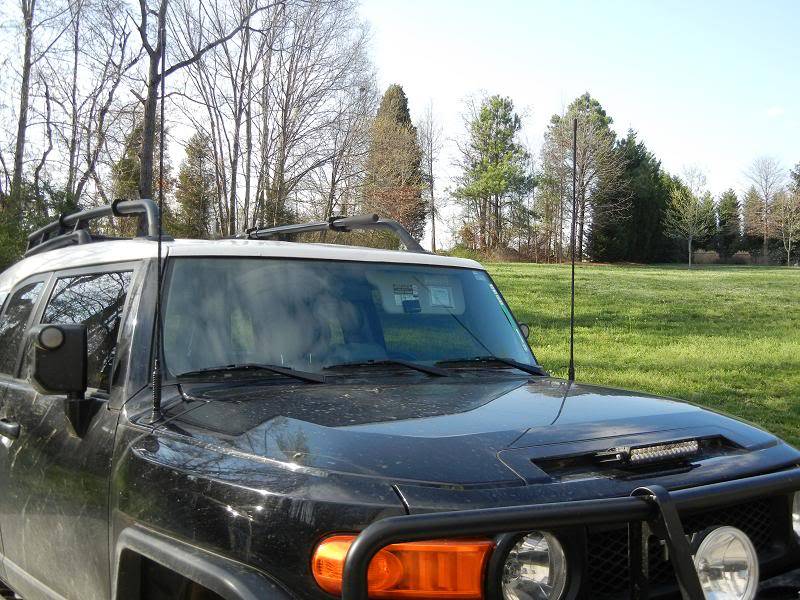 The FM reception is at least as good as the stock antenna, but I haven't gotten to test it fully yet to see if it actually gets better reception or not. | |
|
| | |
Speedrye
Trail Guide
Posts : 1050
Points : 5827
Join date : 2011-08-30
Location : Stokesdale, NC
| | Subject: Re: Speedrye build Sun Mar 25, 2012 12:30 am | |
| Finally mounted the 315s this morning!! Here is a sad FJ:  Here is a happier FJ:   I have yet to get it aligned, so it's not perfect. I put 200+ miles on it today and the ride is much smoother and more quiet. I seem to have lost somewhere between 1/2-1mpg on the highway, which isn't too bad. It doesn't rub at all on the road, even at full lock. I'm within 1/4" of the UCA, but it's fine. I can't wheel it yet until I get it aligned since it will hit the body mount for now. I'm not using wheel spacers, and my wheels have 4 5/8" backspacing, so I didn't know how close they'd be to things, but they look like they'll be perfect. These are D-rated compared to the previous E-rated Kumhos I had, and these are much less abrupt over bumps. Braking is a little slower with the extra weight. Acceleration is fine and didn't seem to lose much. In general, I find I'm in the next lower gear than I used to be, but otherwise it feels the same. I can't speak to cornering yet since it's completely out of alignment with the new UCAs, and my steering out of whack. Overall, I love the ride, the noise and the look now that it doesn't look like a pregnant roller skate anymore. | |
|
| | |
Speedrye
Trail Guide
Posts : 1050
Points : 5827
Join date : 2011-08-30
Location : Stokesdale, NC
| | Subject: Re: Speedrye build Sat Mar 31, 2012 10:19 am | |
| Well, I finally got the alignment done and wow, much better!
I got both caster numbers all the way up to 4.0 and 4.1 degrees (as high as the cams would allow) so now I no longer have body mount interference when flexing. Both camber and toe were perfect.
The steering is a hair less responsive than before with the additional caster, but it tracks straight and even though I have slightly more feel to the steering, I have less bump steer which is nice. Considering I'm pretty much rolling on a 35" mud tire, there's no float or wandering. I'm very happy with the Light Racing upper control arms and the new alignment! | |
|
| | |
Speedrye
Trail Guide
Posts : 1050
Points : 5827
Join date : 2011-08-30
Location : Stokesdale, NC
| | Subject: Re: Speedrye build Sun Apr 01, 2012 9:44 pm | |
| I got bored today and removed the roof rack and washed the roof in preparation for painting the roof black. I removed the rear door window, seals and shocks. Next came cleaning, prep, taping and covering everything in plastic to prevent overspray from getting on everything. I painted both inside and outside satin black to match all of my other satin black pieces.
It turned out looking pretty good though there's a slight ridge where the tape was. I'm sure a little wet sanding will smooth that out, but I'll wait awhile before doing that. I'll try to get some pics if I remember to bring my camera home from work tomorrow. | |
|
| | |
Darklight
Tail Gunner

Posts : 651
Points : 5299
Join date : 2011-08-31
Location : Charlotte,NC 28278
| | Subject: Re: Speedrye build Mon Apr 02, 2012 3:39 pm | |
| Looking good man! 315's have been on my mind lately. They look good on your FJ! Diggin the twin firesticks | |
|
| | |
Speedrye
Trail Guide
Posts : 1050
Points : 5827
Join date : 2011-08-30
Location : Stokesdale, NC
| | Subject: Re: Speedrye build Tue Apr 03, 2012 8:03 pm | |
| Thanks Bobby!
Well, I had a little more time today, so I put the seal back on the rear door. I also pulled the door seals off the other four doors and cleaned everything out from the door sills and behind the seals. Everything is now pretty clean, so I taped off and draped the whole truck in plastic so I don't have to worry about any overspray. She's now ready to go outside and have one final cleaning of the roof before I start painting the main body of everything. When the weather next cooperates, I'll have a satin black roof!
Again, I forgot the camera at work, so I know these updates don't mean much... | |
|
| | |
Sponsored content
| | Subject: Re: Speedrye build | |
| |
|
| | |
| | Speedrye build | |
|


